CFO
Personal Edition
Help and Instructions

CFO is designed to help you keep track of your money in an easy, logical way. It has just enough features to give you a detailed look at your personal finances, but not so many features that you will get overwhelmed learning how to use it.
The basic idea is simple: Break up your money tracking into Months. You make a certain amount each Month, you owe a certain amount each Month and you spend money at random times. The Incomes and Expenses are your monthly entries. The Budgets and Receipts represent your spending.
All you do is enter your information and CFO will sort it all out for you, do some calculations and show you where your money goes, how much you have left for the month to spend or save and give you warnings when you may potentially spend too much.
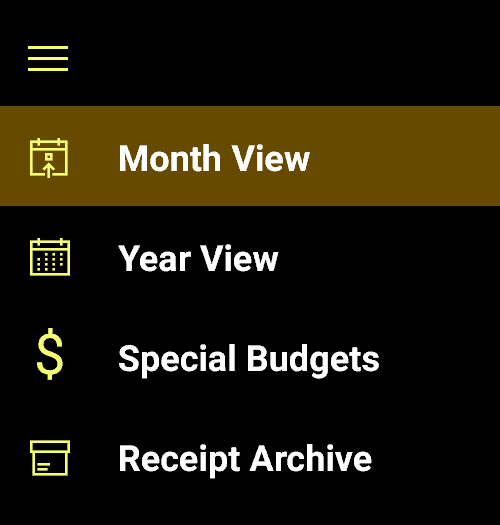
The CFO app consists of four sections, each with its own purpose.
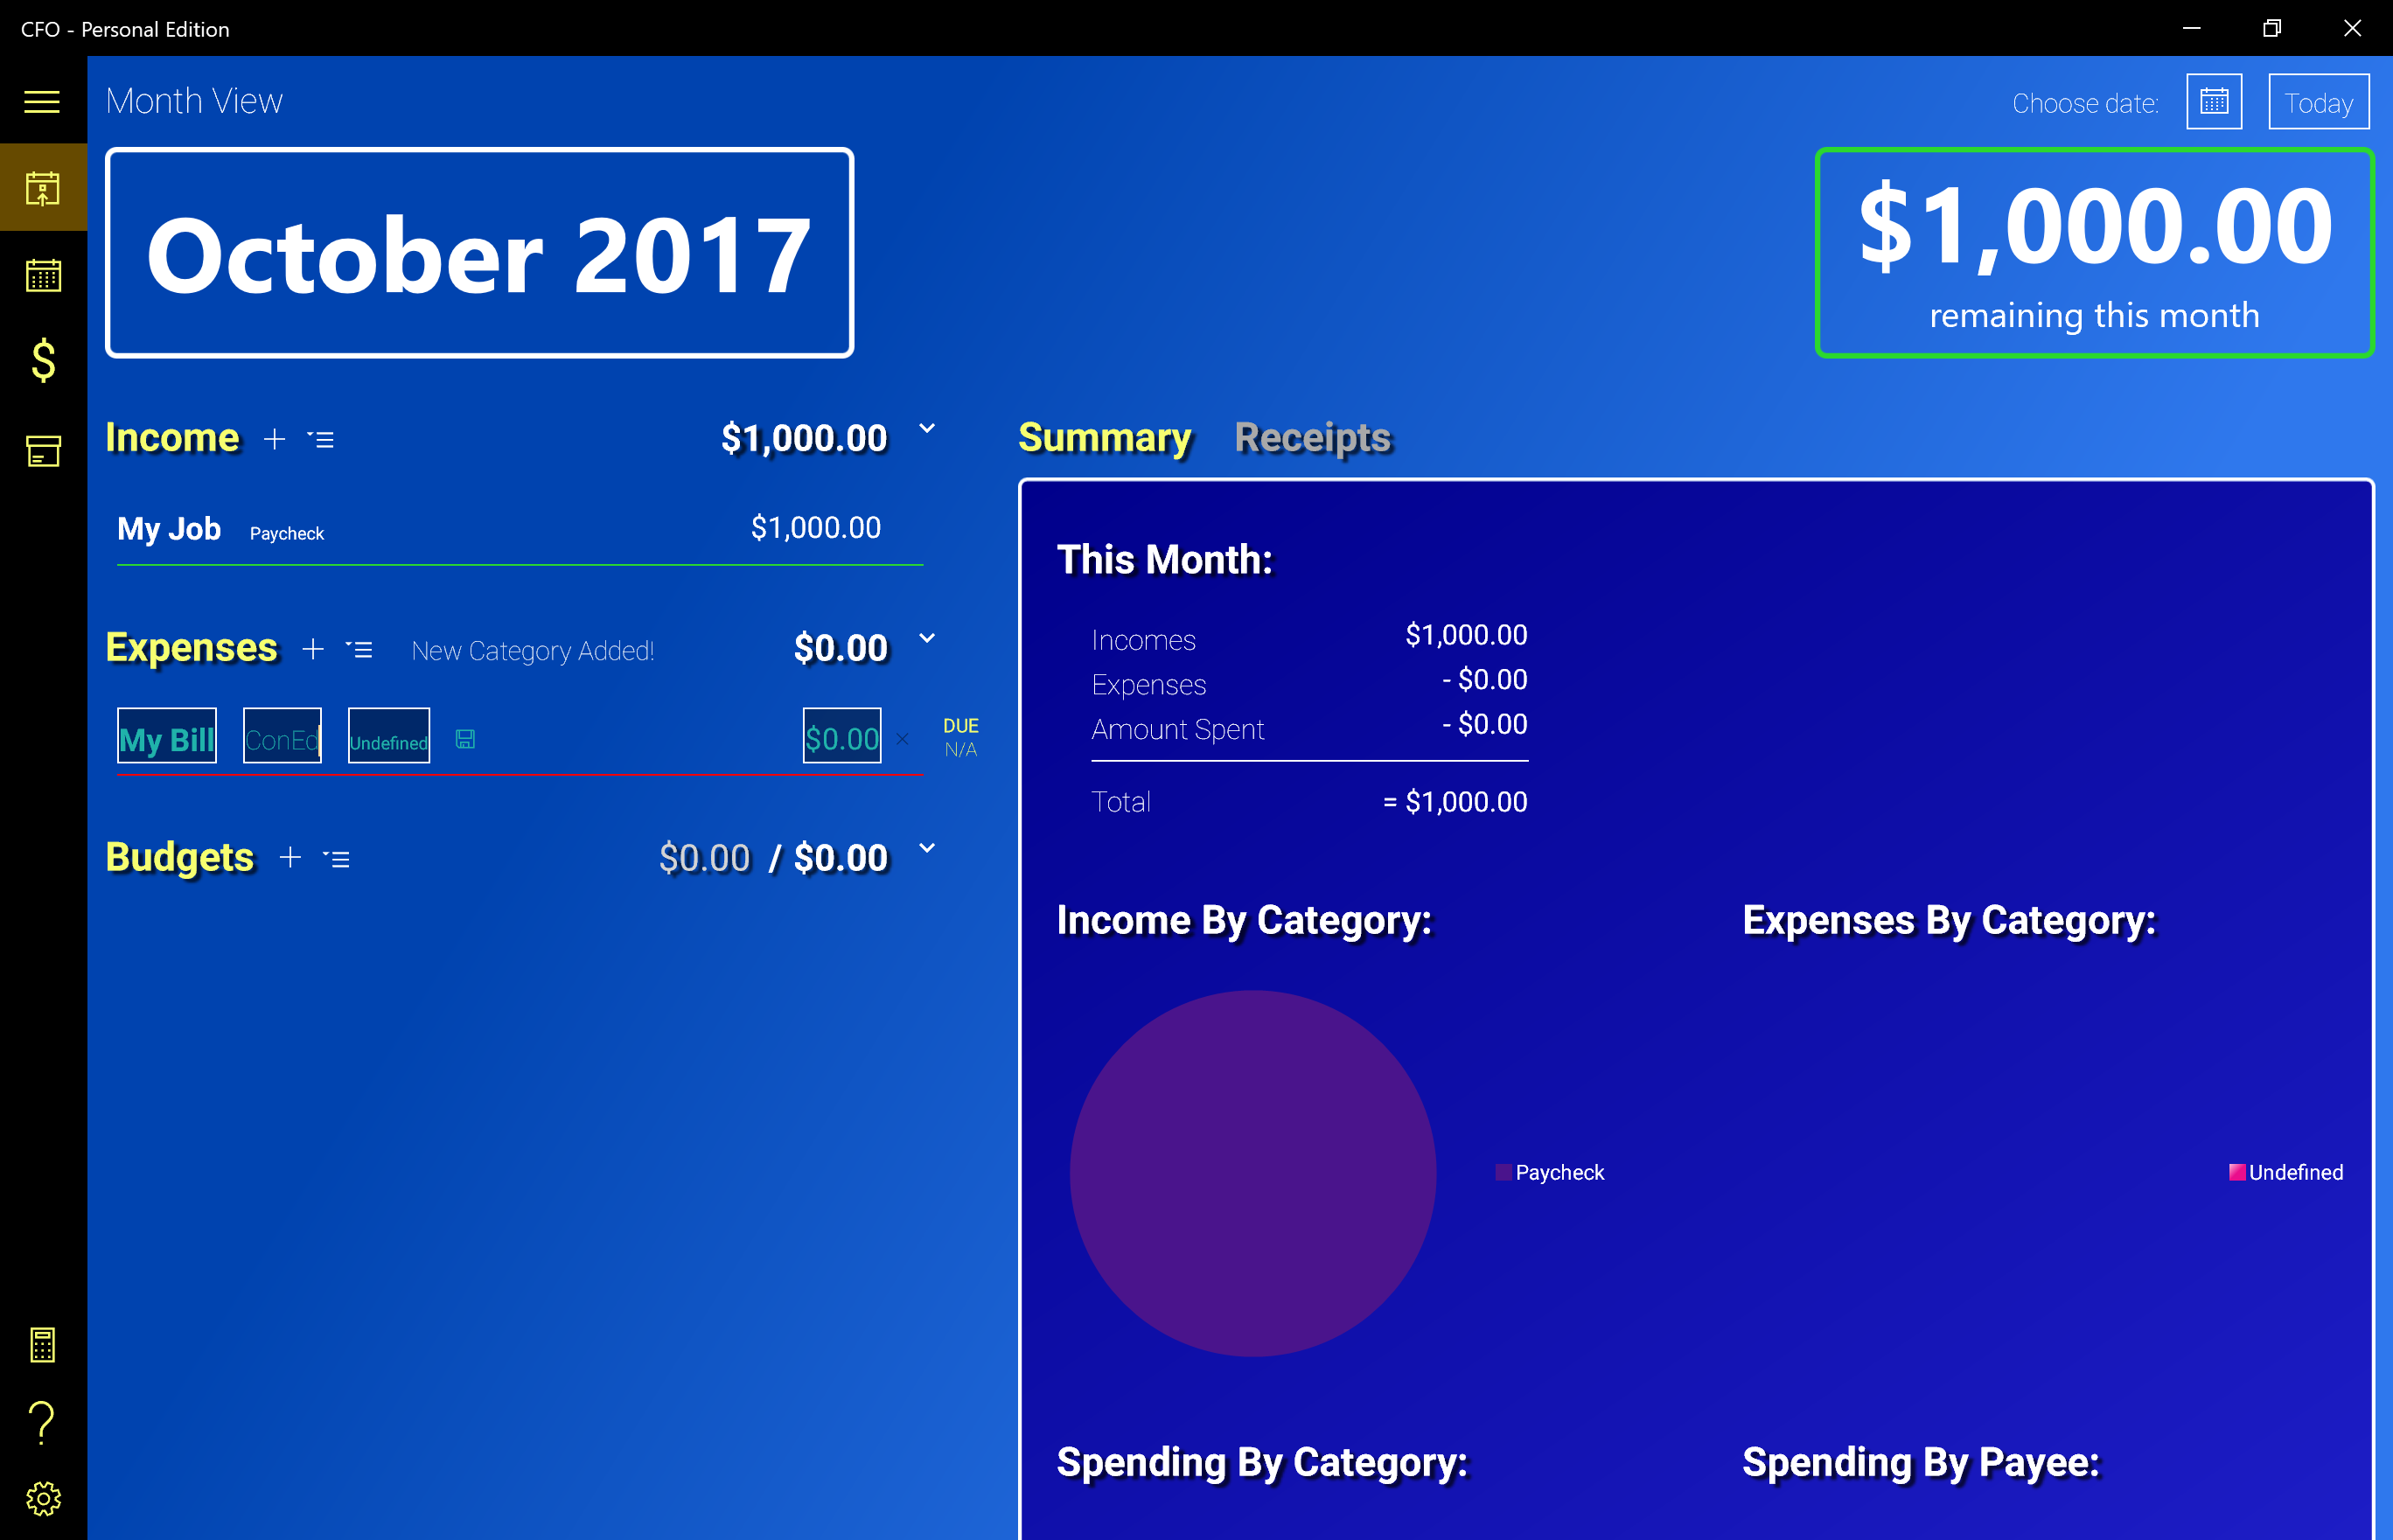
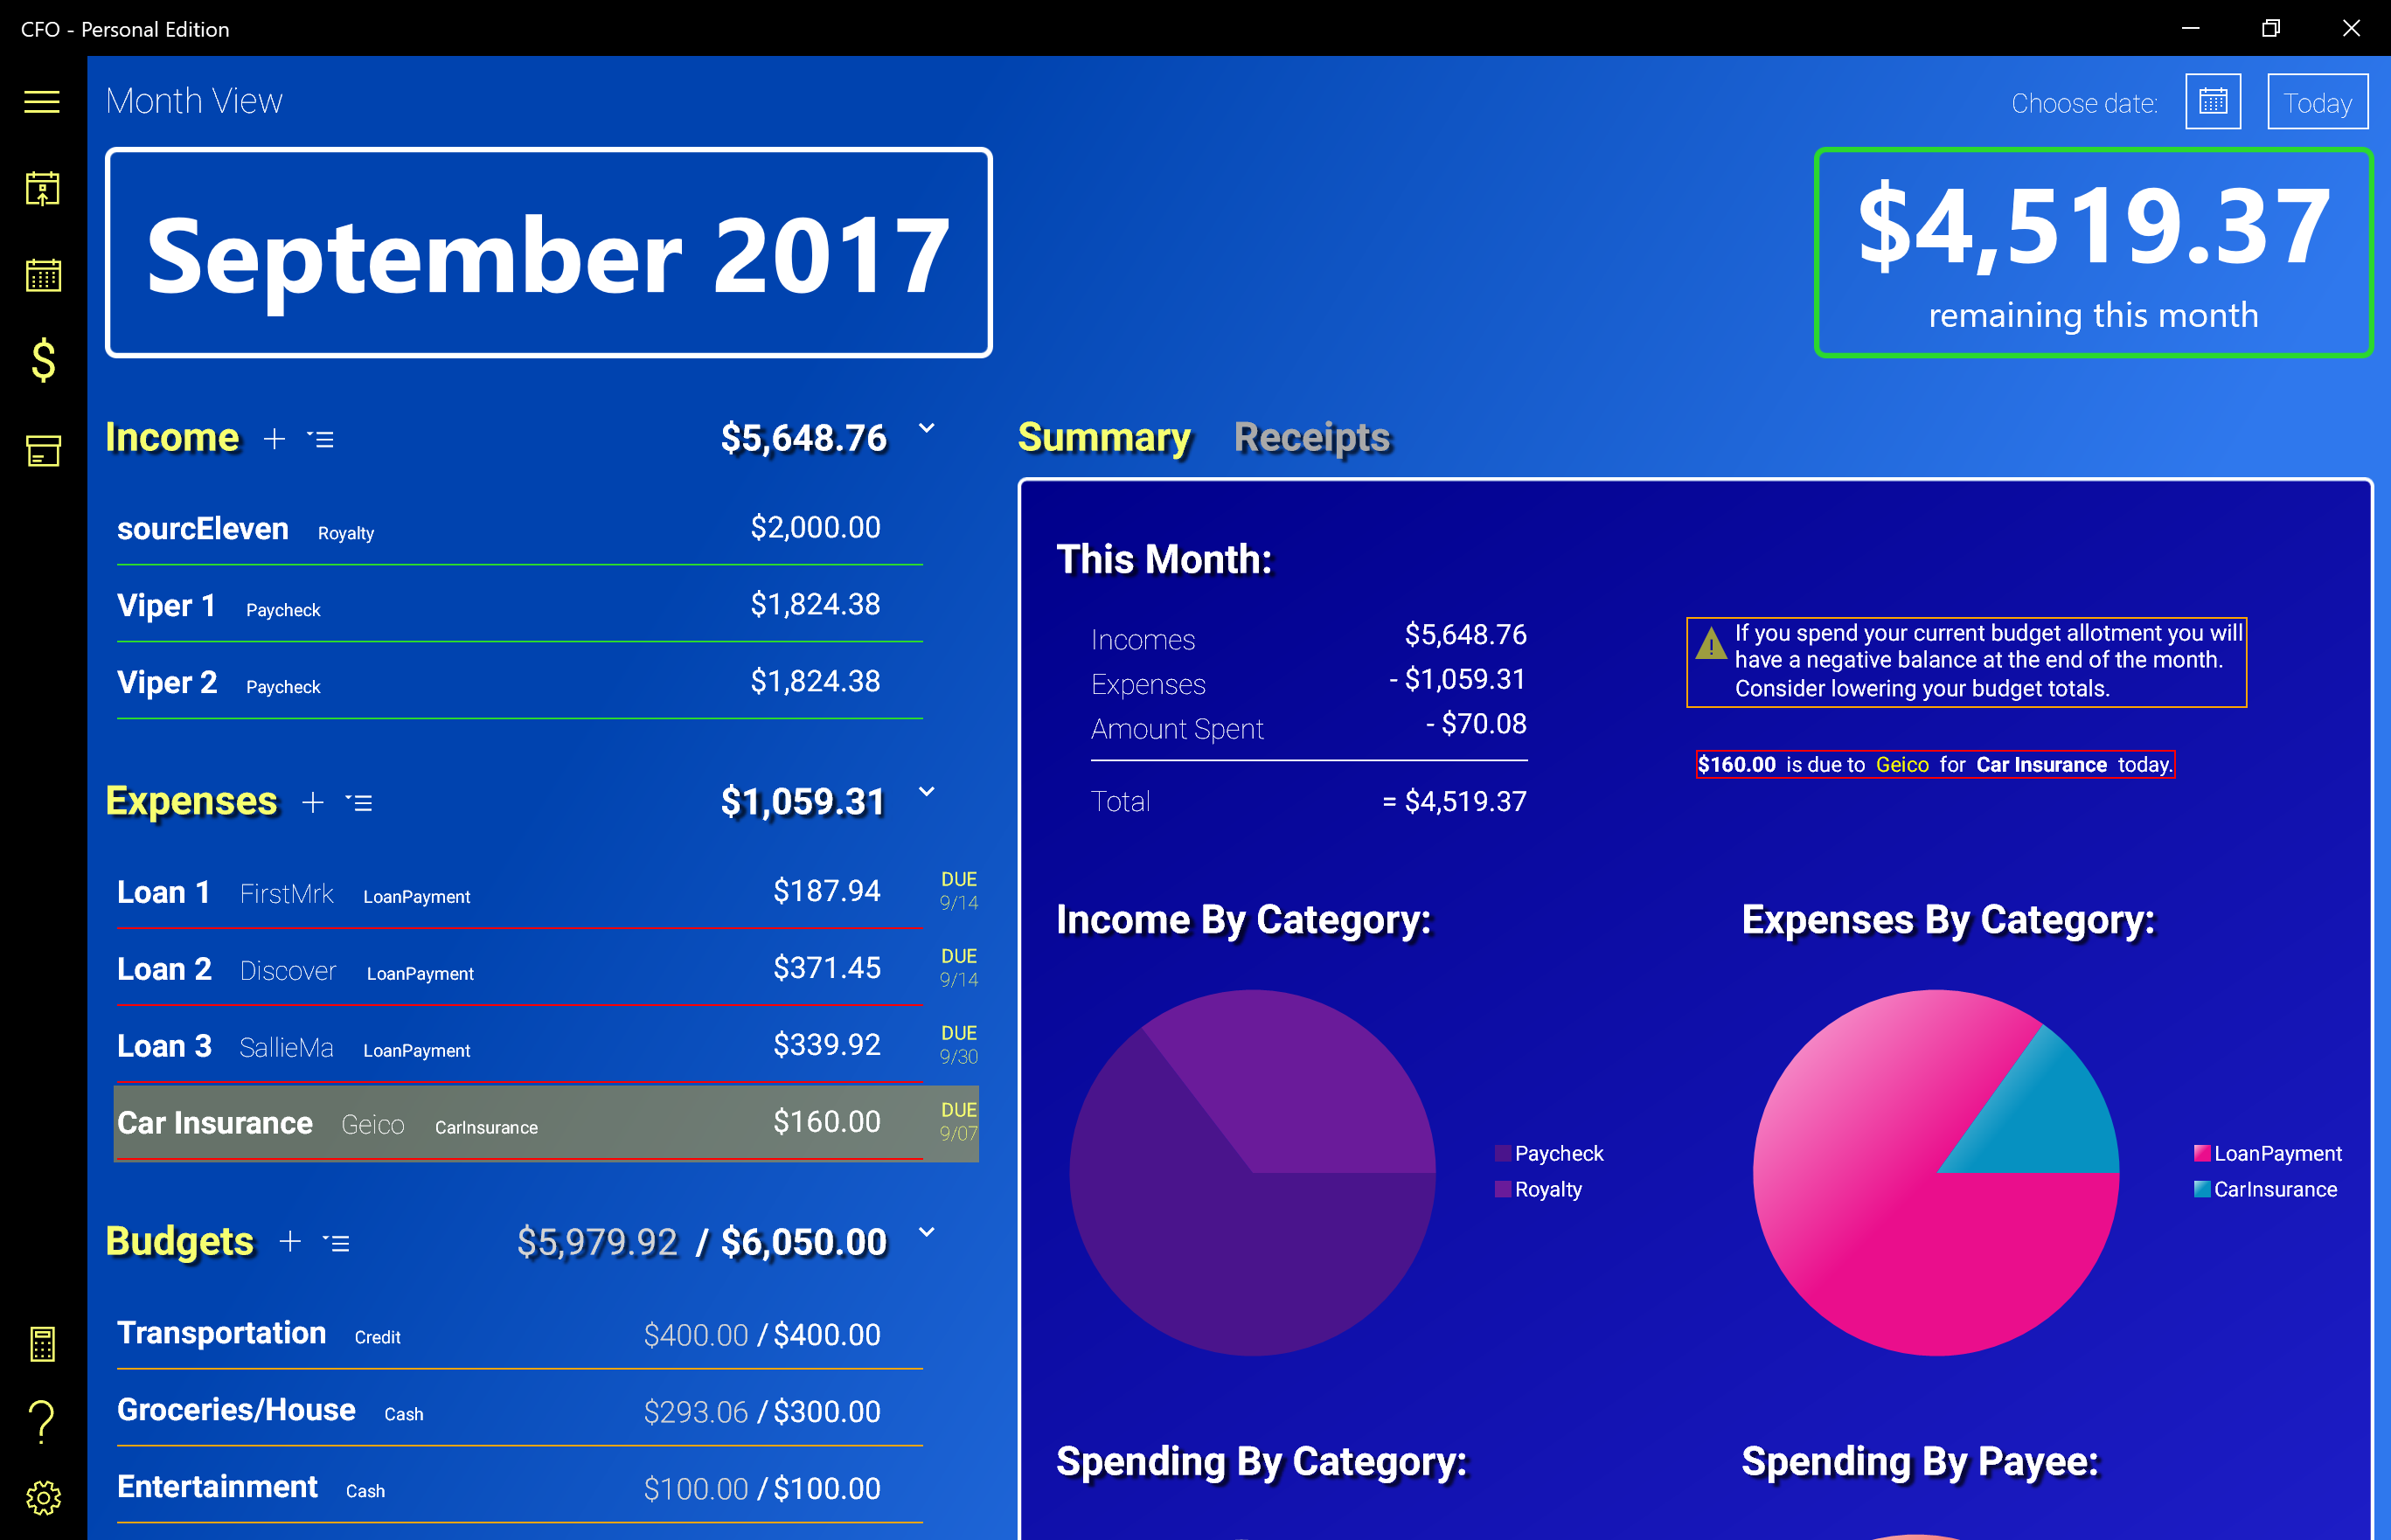
The Month View is the main section, where all your data is added and deleted. Incomes, Expenses, Budgets and Receipts are added here and the Month Summary provides you with valuable information.
Once you enter some data, the Year View is automatically populated to show any Expenses that are due and all Receipts on their Transaction Date. This gives you a broad view of how much you spent on any given day as well as where and for what you spent.
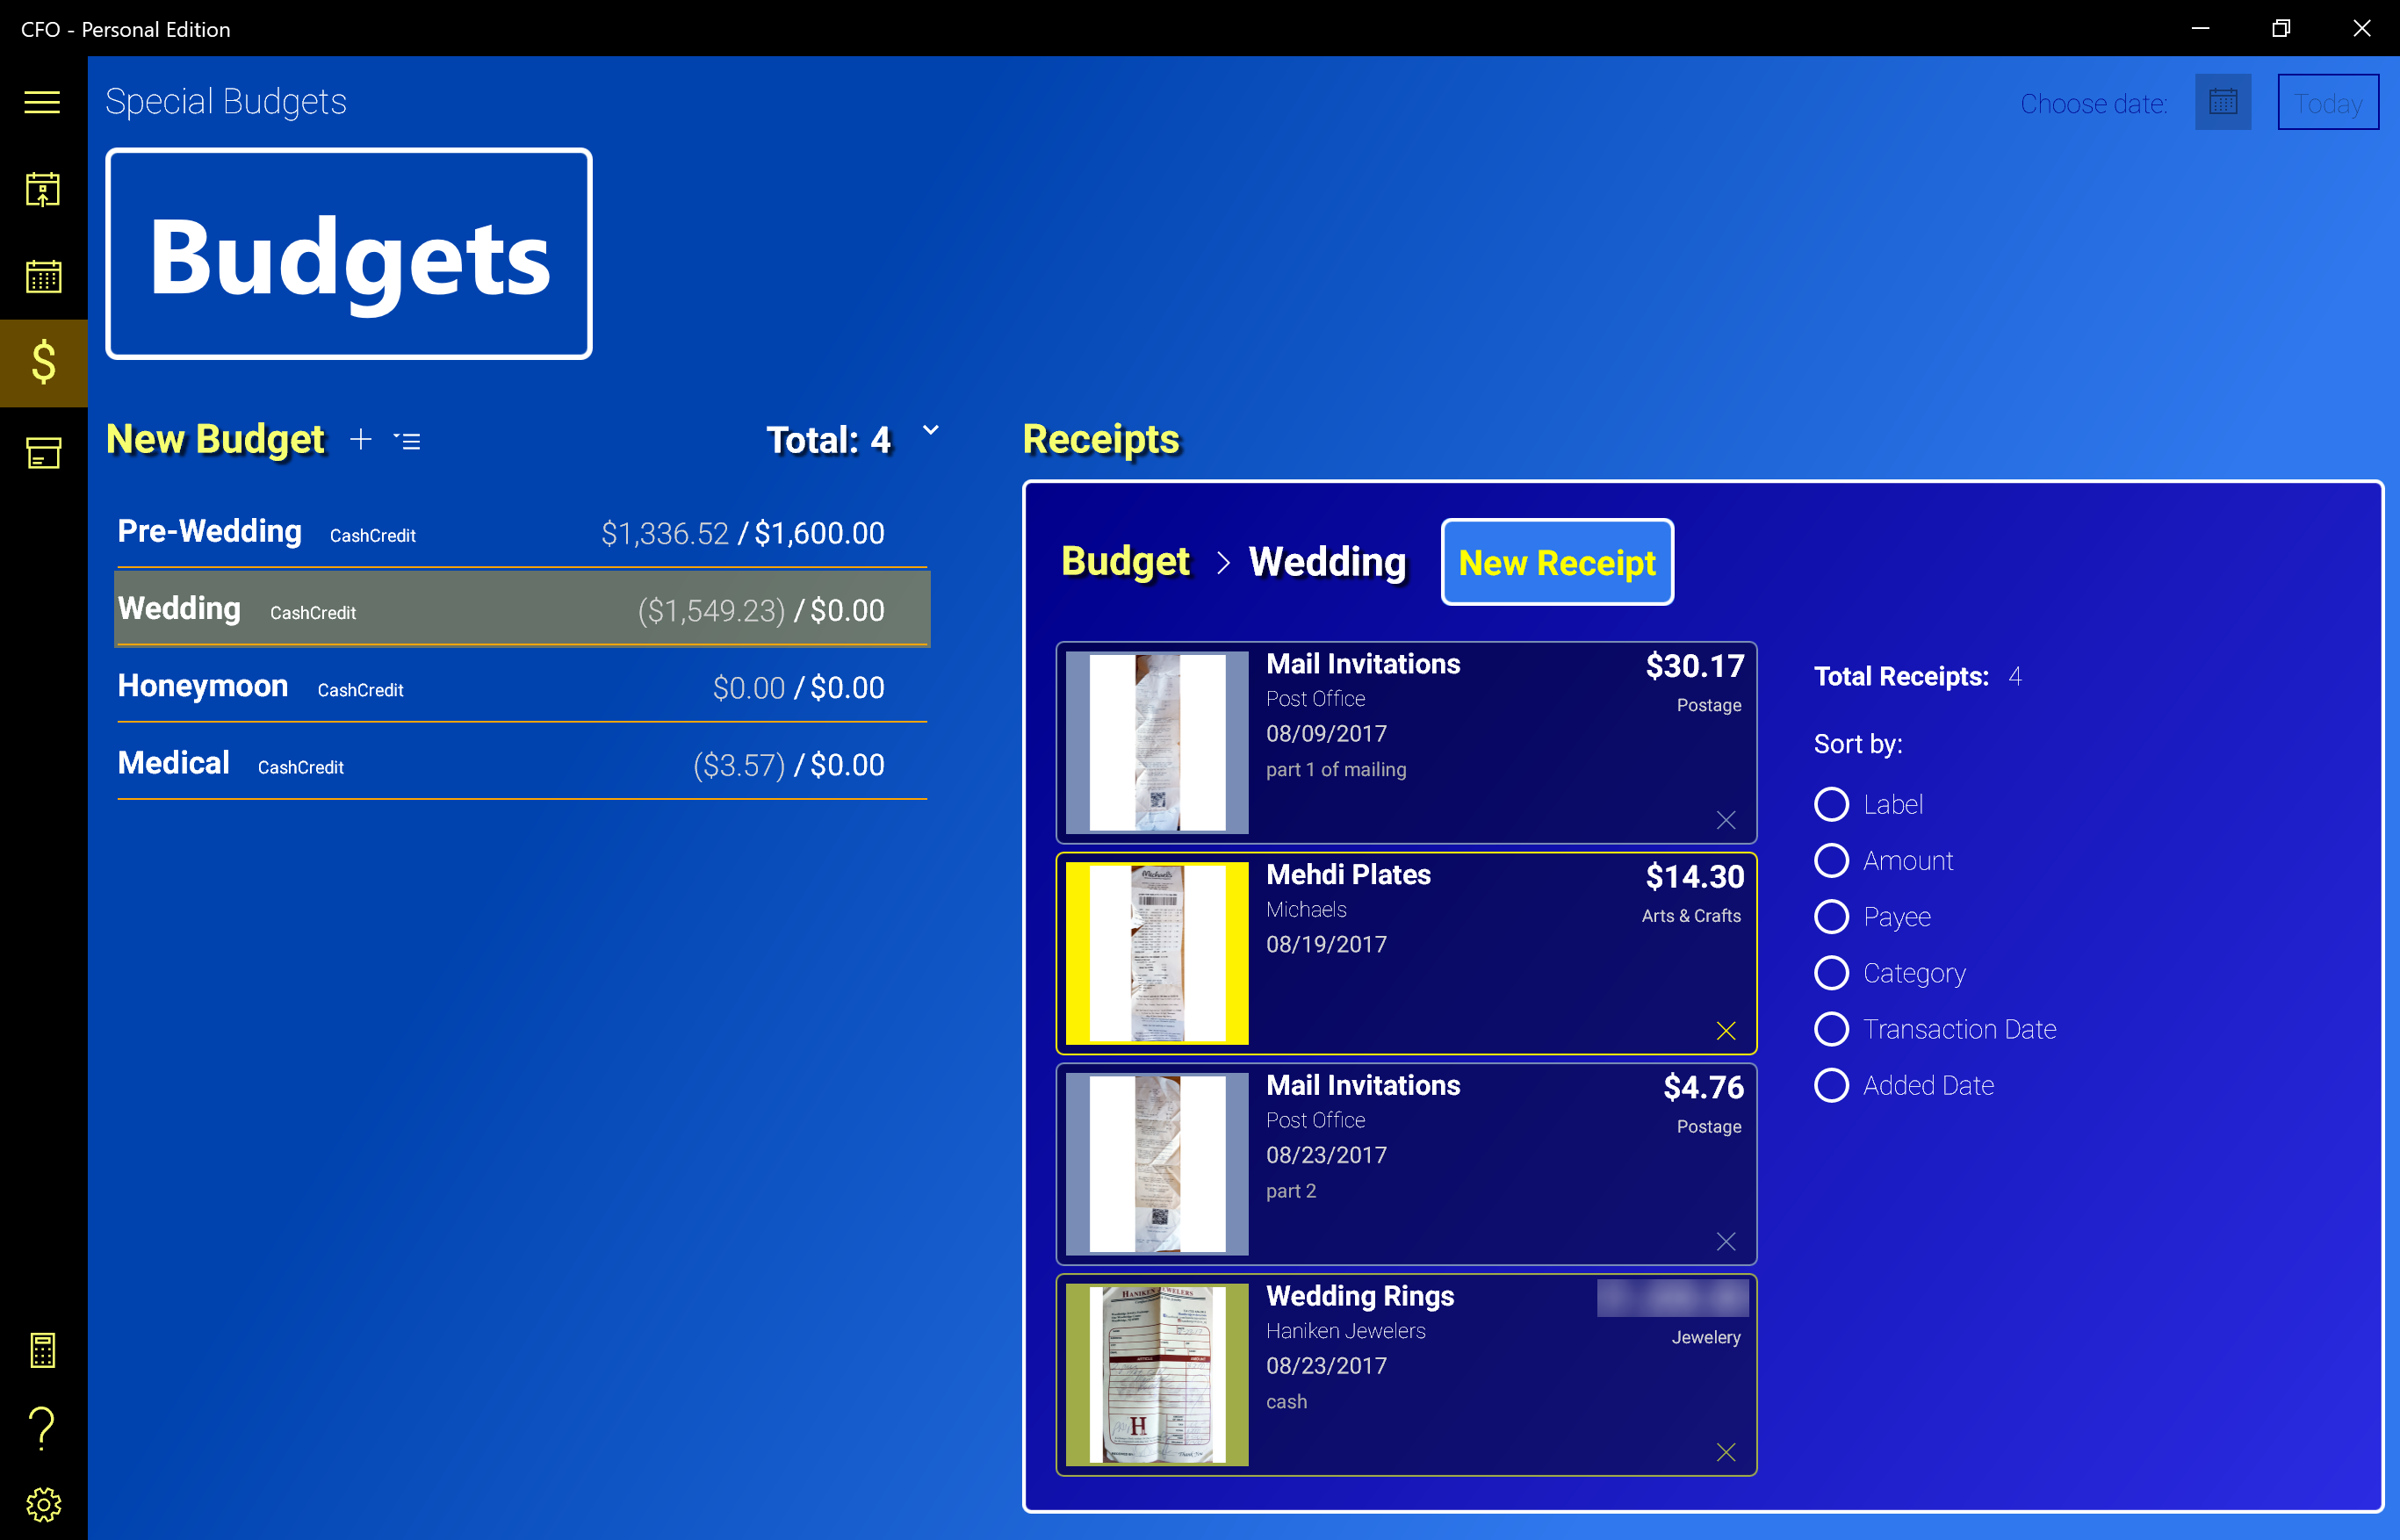
In Special Budgets you can add one-off budgets that aren't tied to one particular month. For instance, use a Special Budget if you are planning a trip or a party and want to stay within budget for that event or you are given a cash gift and want to track the spending of it.
Finally, the Receipt Archive contains a database of all Receipts you've entered into any Budget, including ones you've deleted. You can sort, search and view any Receipt along with its image and details and print a report of any search to Excel spreadsheet or PDF.
If you are not ready to purchase the full CFO app, it can be installed for free and will run in a Trial Mode for 15 days. During the 15-Day Trial there are no limitations and all of the app features can be used.
After the 15-Day Trial expires, you can continue using the app for free indefinitely, but the Year View and Receipt Archive sections will no longer work. But don't worry, all the data you entered during the trial is retained and if you decide to purchase the Full Version license later, you will be able to see all your data in all modes immediately.
The Month View is the main section of the app where your data is entered. Anything entered in the Month View will be automatically populated in the other sections, except Special Budgets, which is meant to stand alone.
On the left side of the Month View are the Income, Expense and Budget lists. Each list has a heading section showing the Name of the section as well as the Total Amount of every entry in the section. There are three buttons in each list heading:
- The Add Button
 - Add a new Income, Expense or Budget.
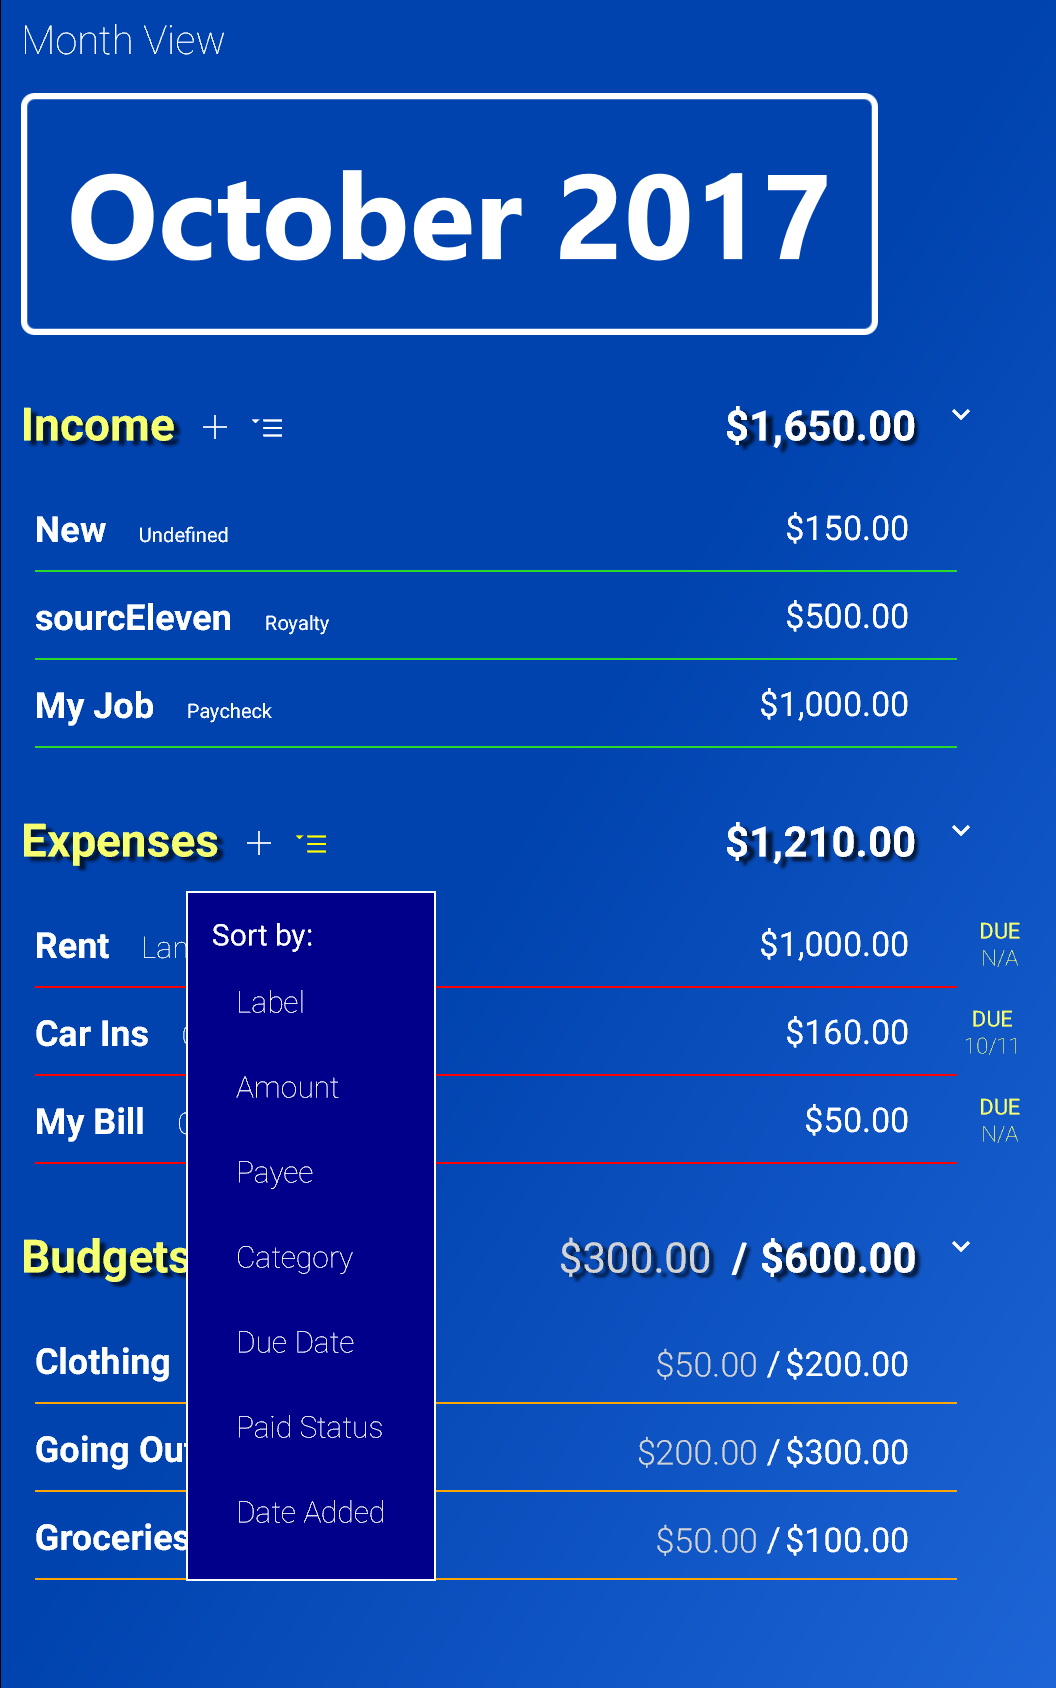
- The Sort Button
 - Sort the list by an attribute. You can also drag the list items around to reorder them.
- The Hide Button
 - Minimize / maximize the list.
When hovering the mouse over an item in any list, action buttons will appear. Every item has the following:
The Expense and Budget sections each have an additional button:
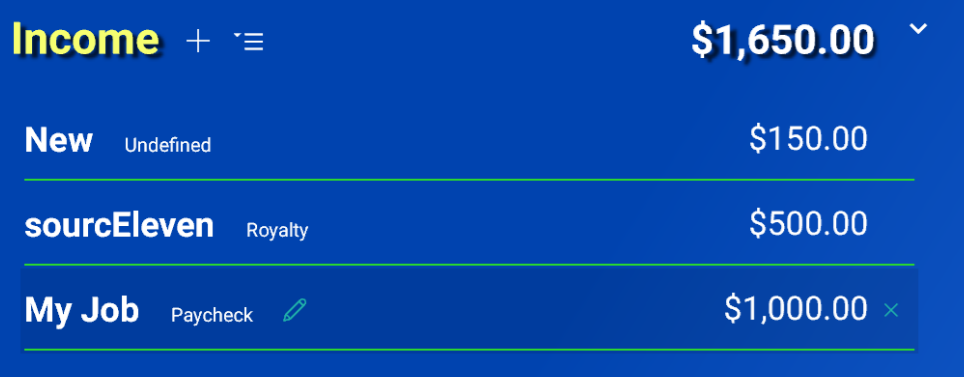
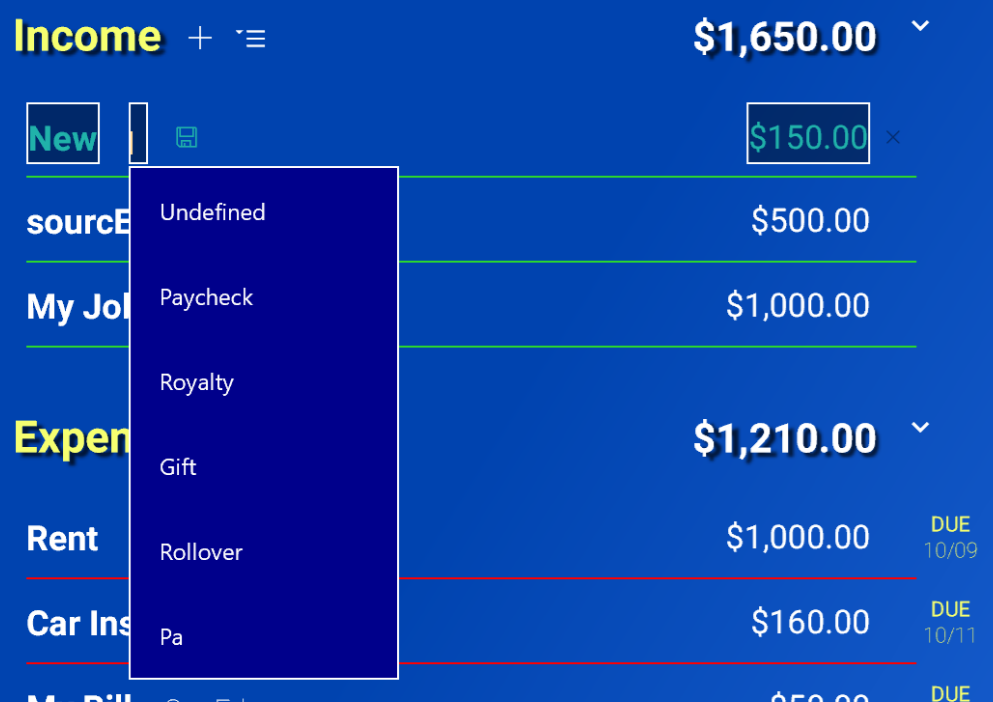
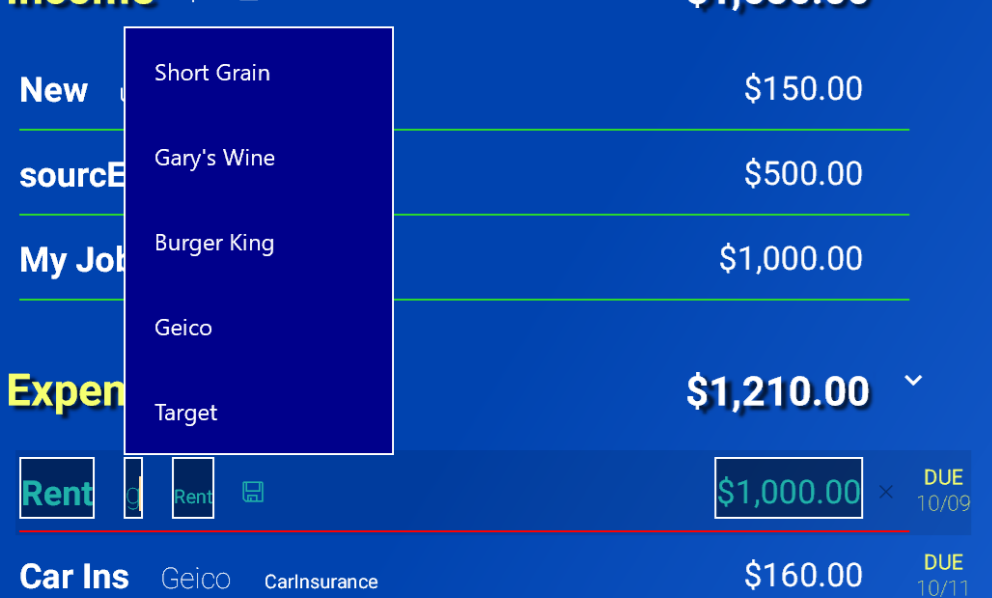
Incomes are meant to represent your monthly incomes as well as any gifts, royalties, winnings or any other type of money that comes to you within a given month.
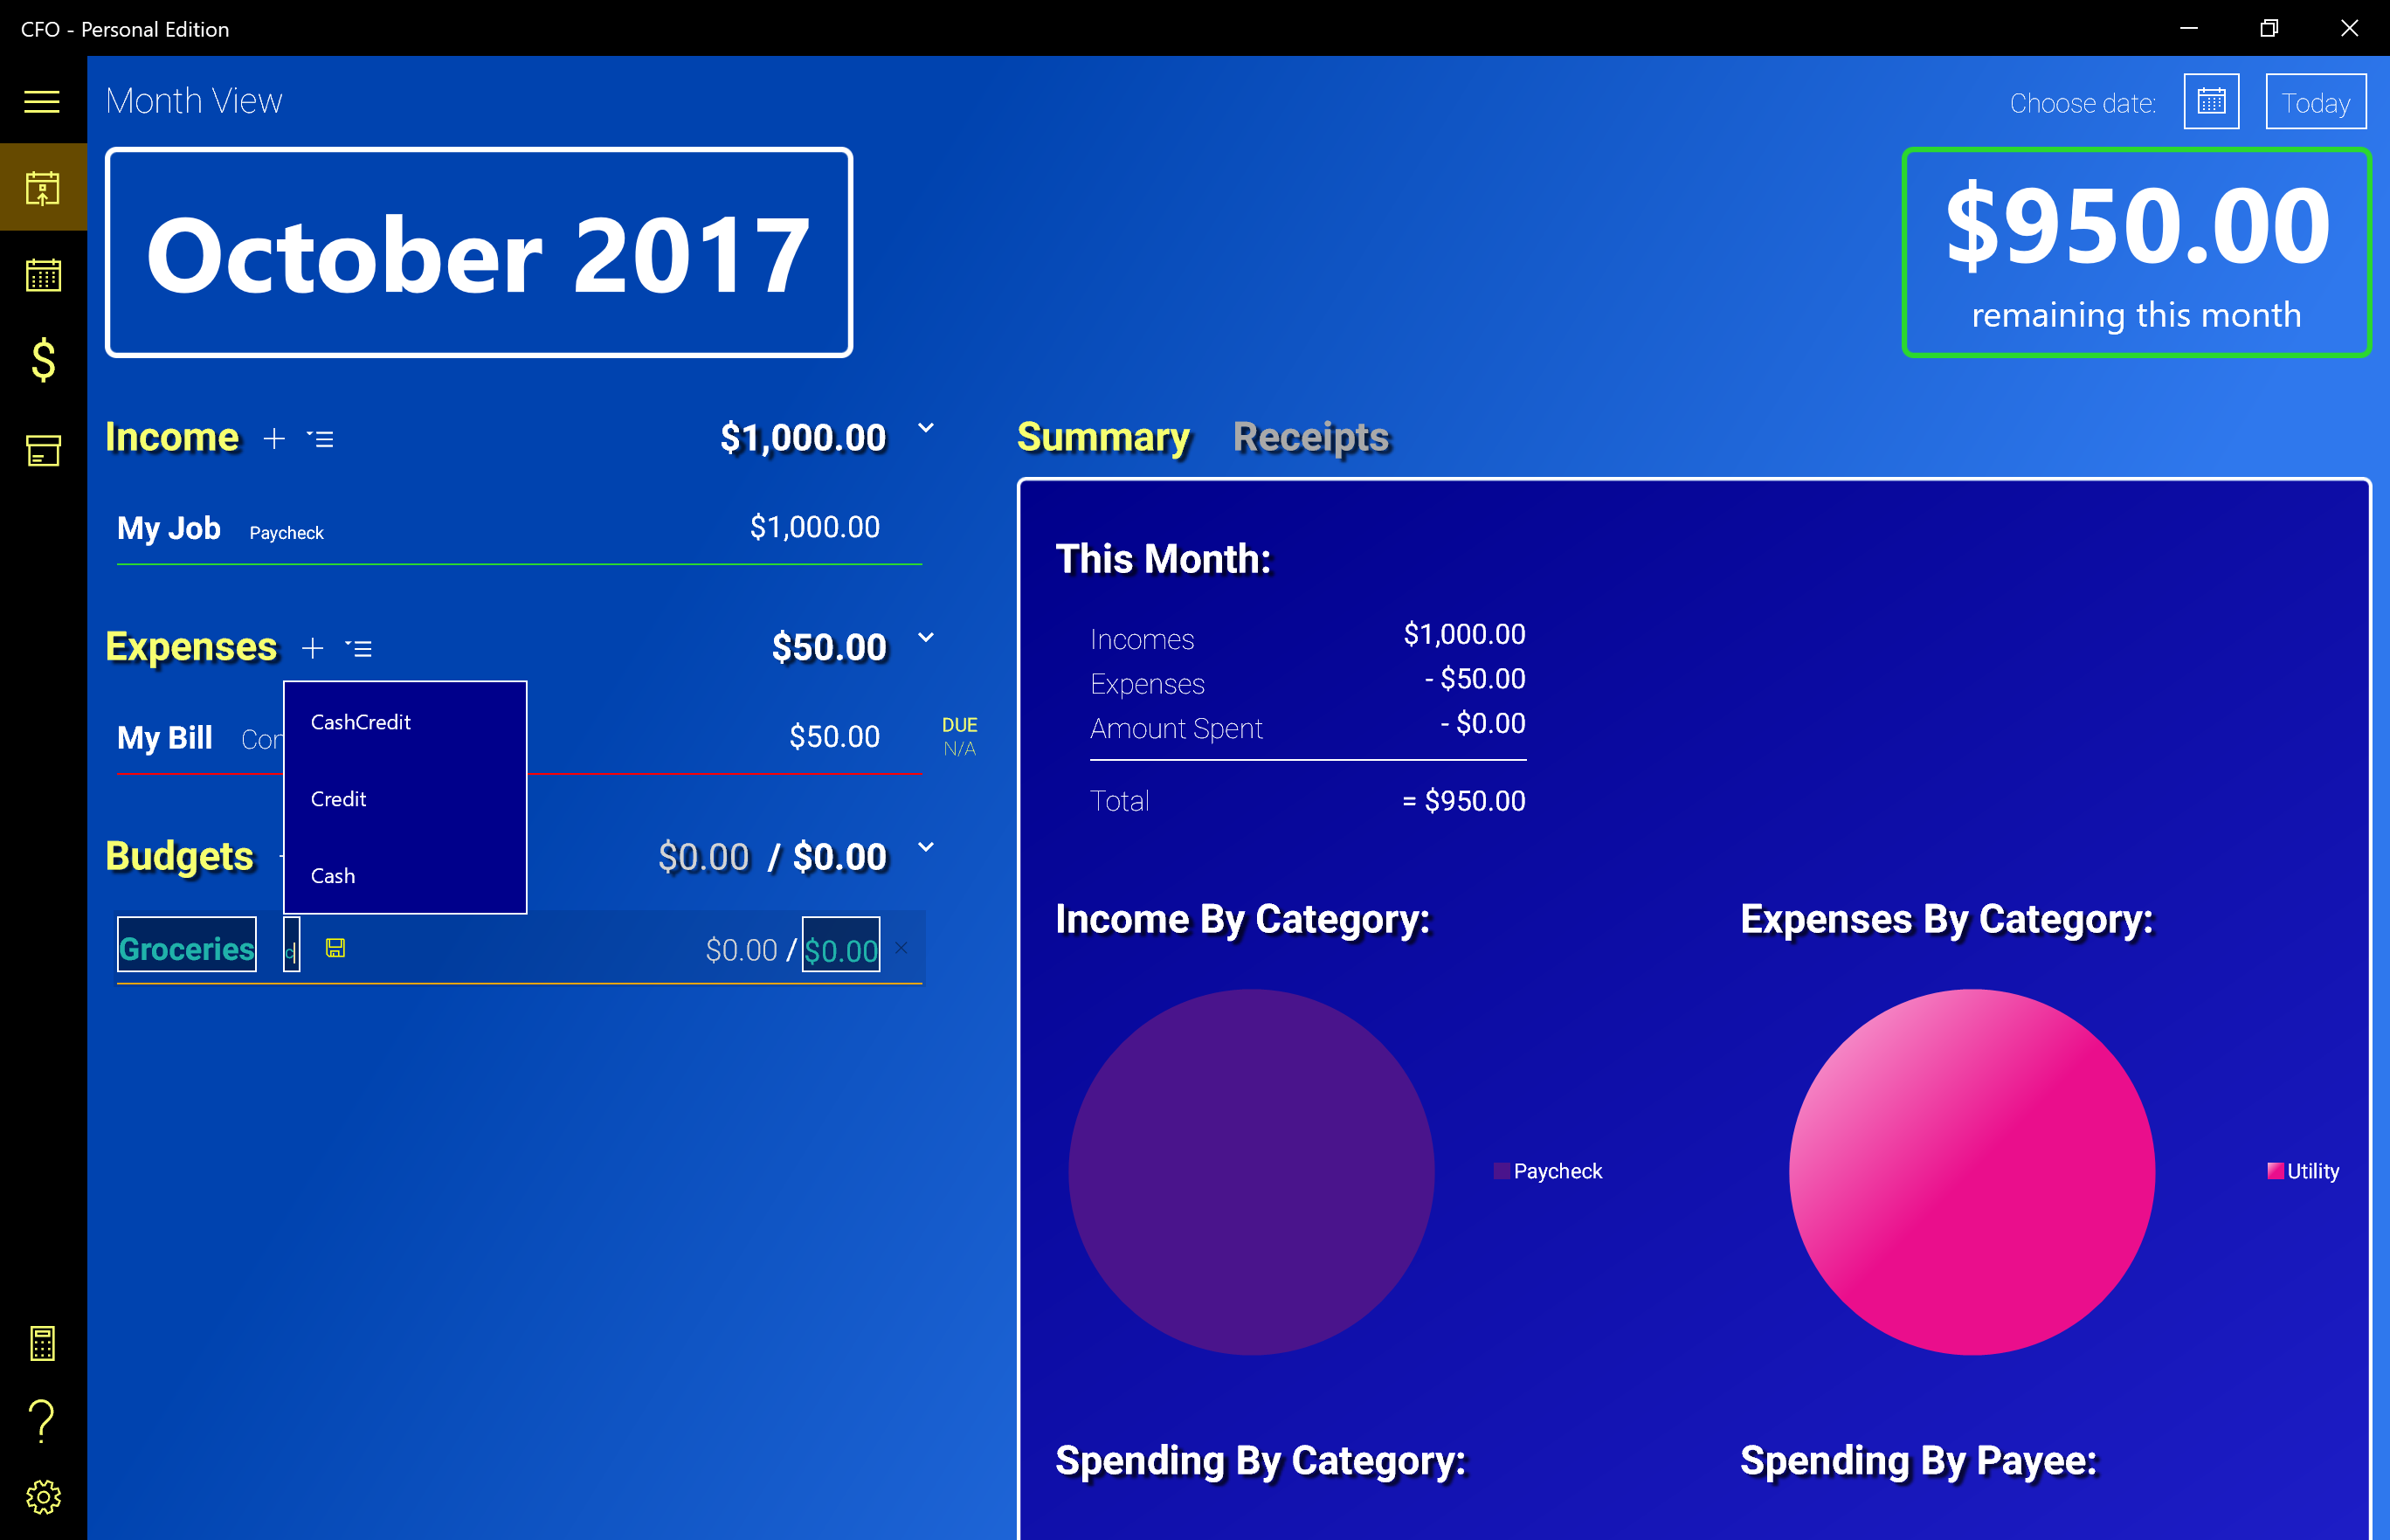
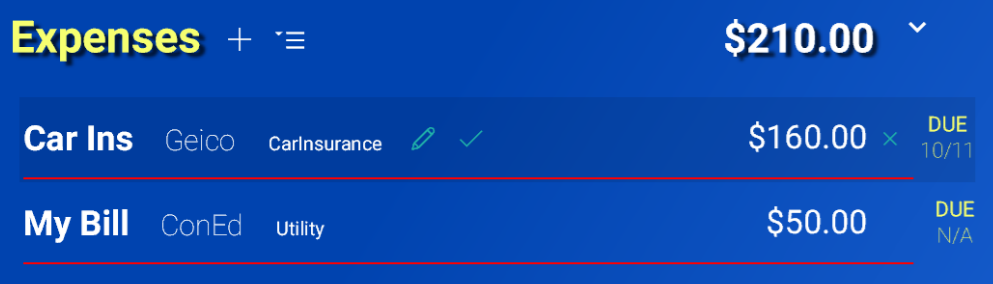
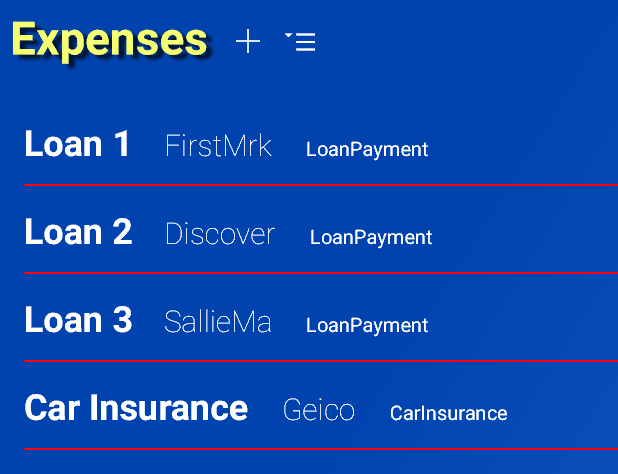
Expenses are your monthly financial obligations, Rent, Utility Bills, Car Payments, etc, and any other money that is "due" on a certain date. The Due Date for a new Expense is always "N/A". If you click on the Due Date indicator  you can choose the Due Date from the Calendar. (See Screenshot)
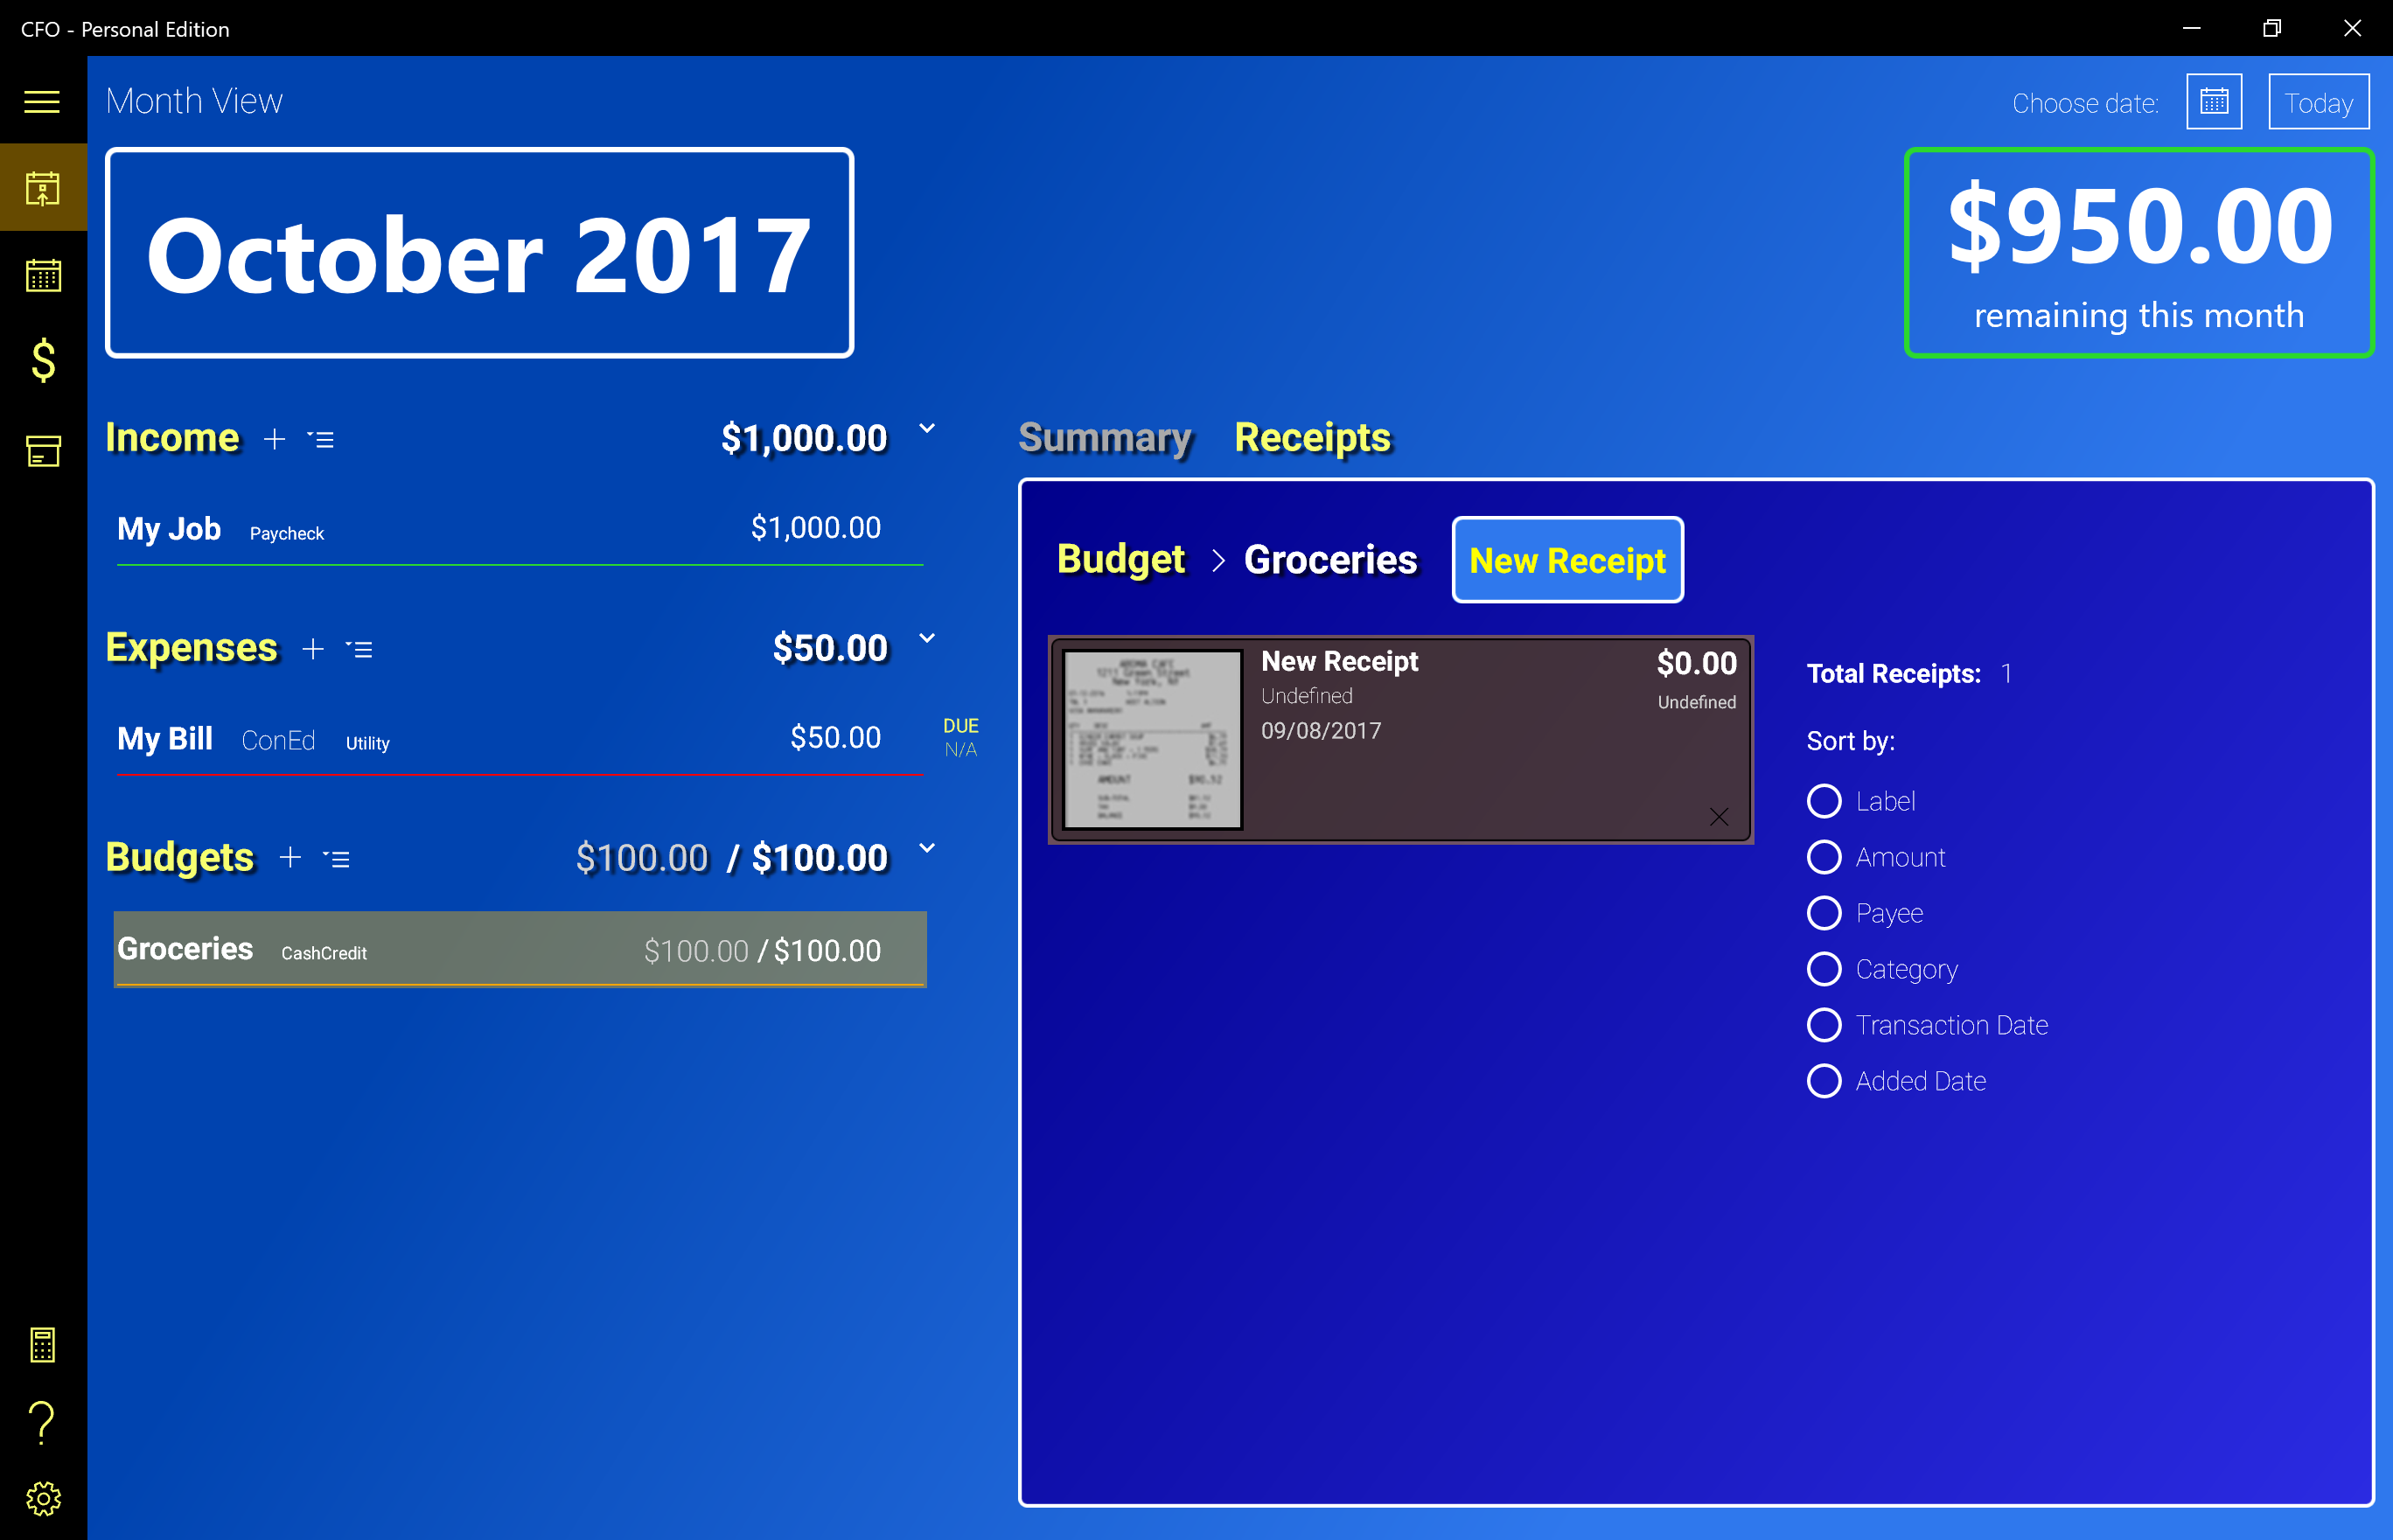
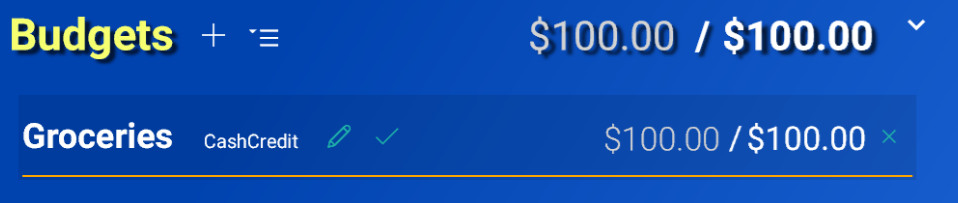
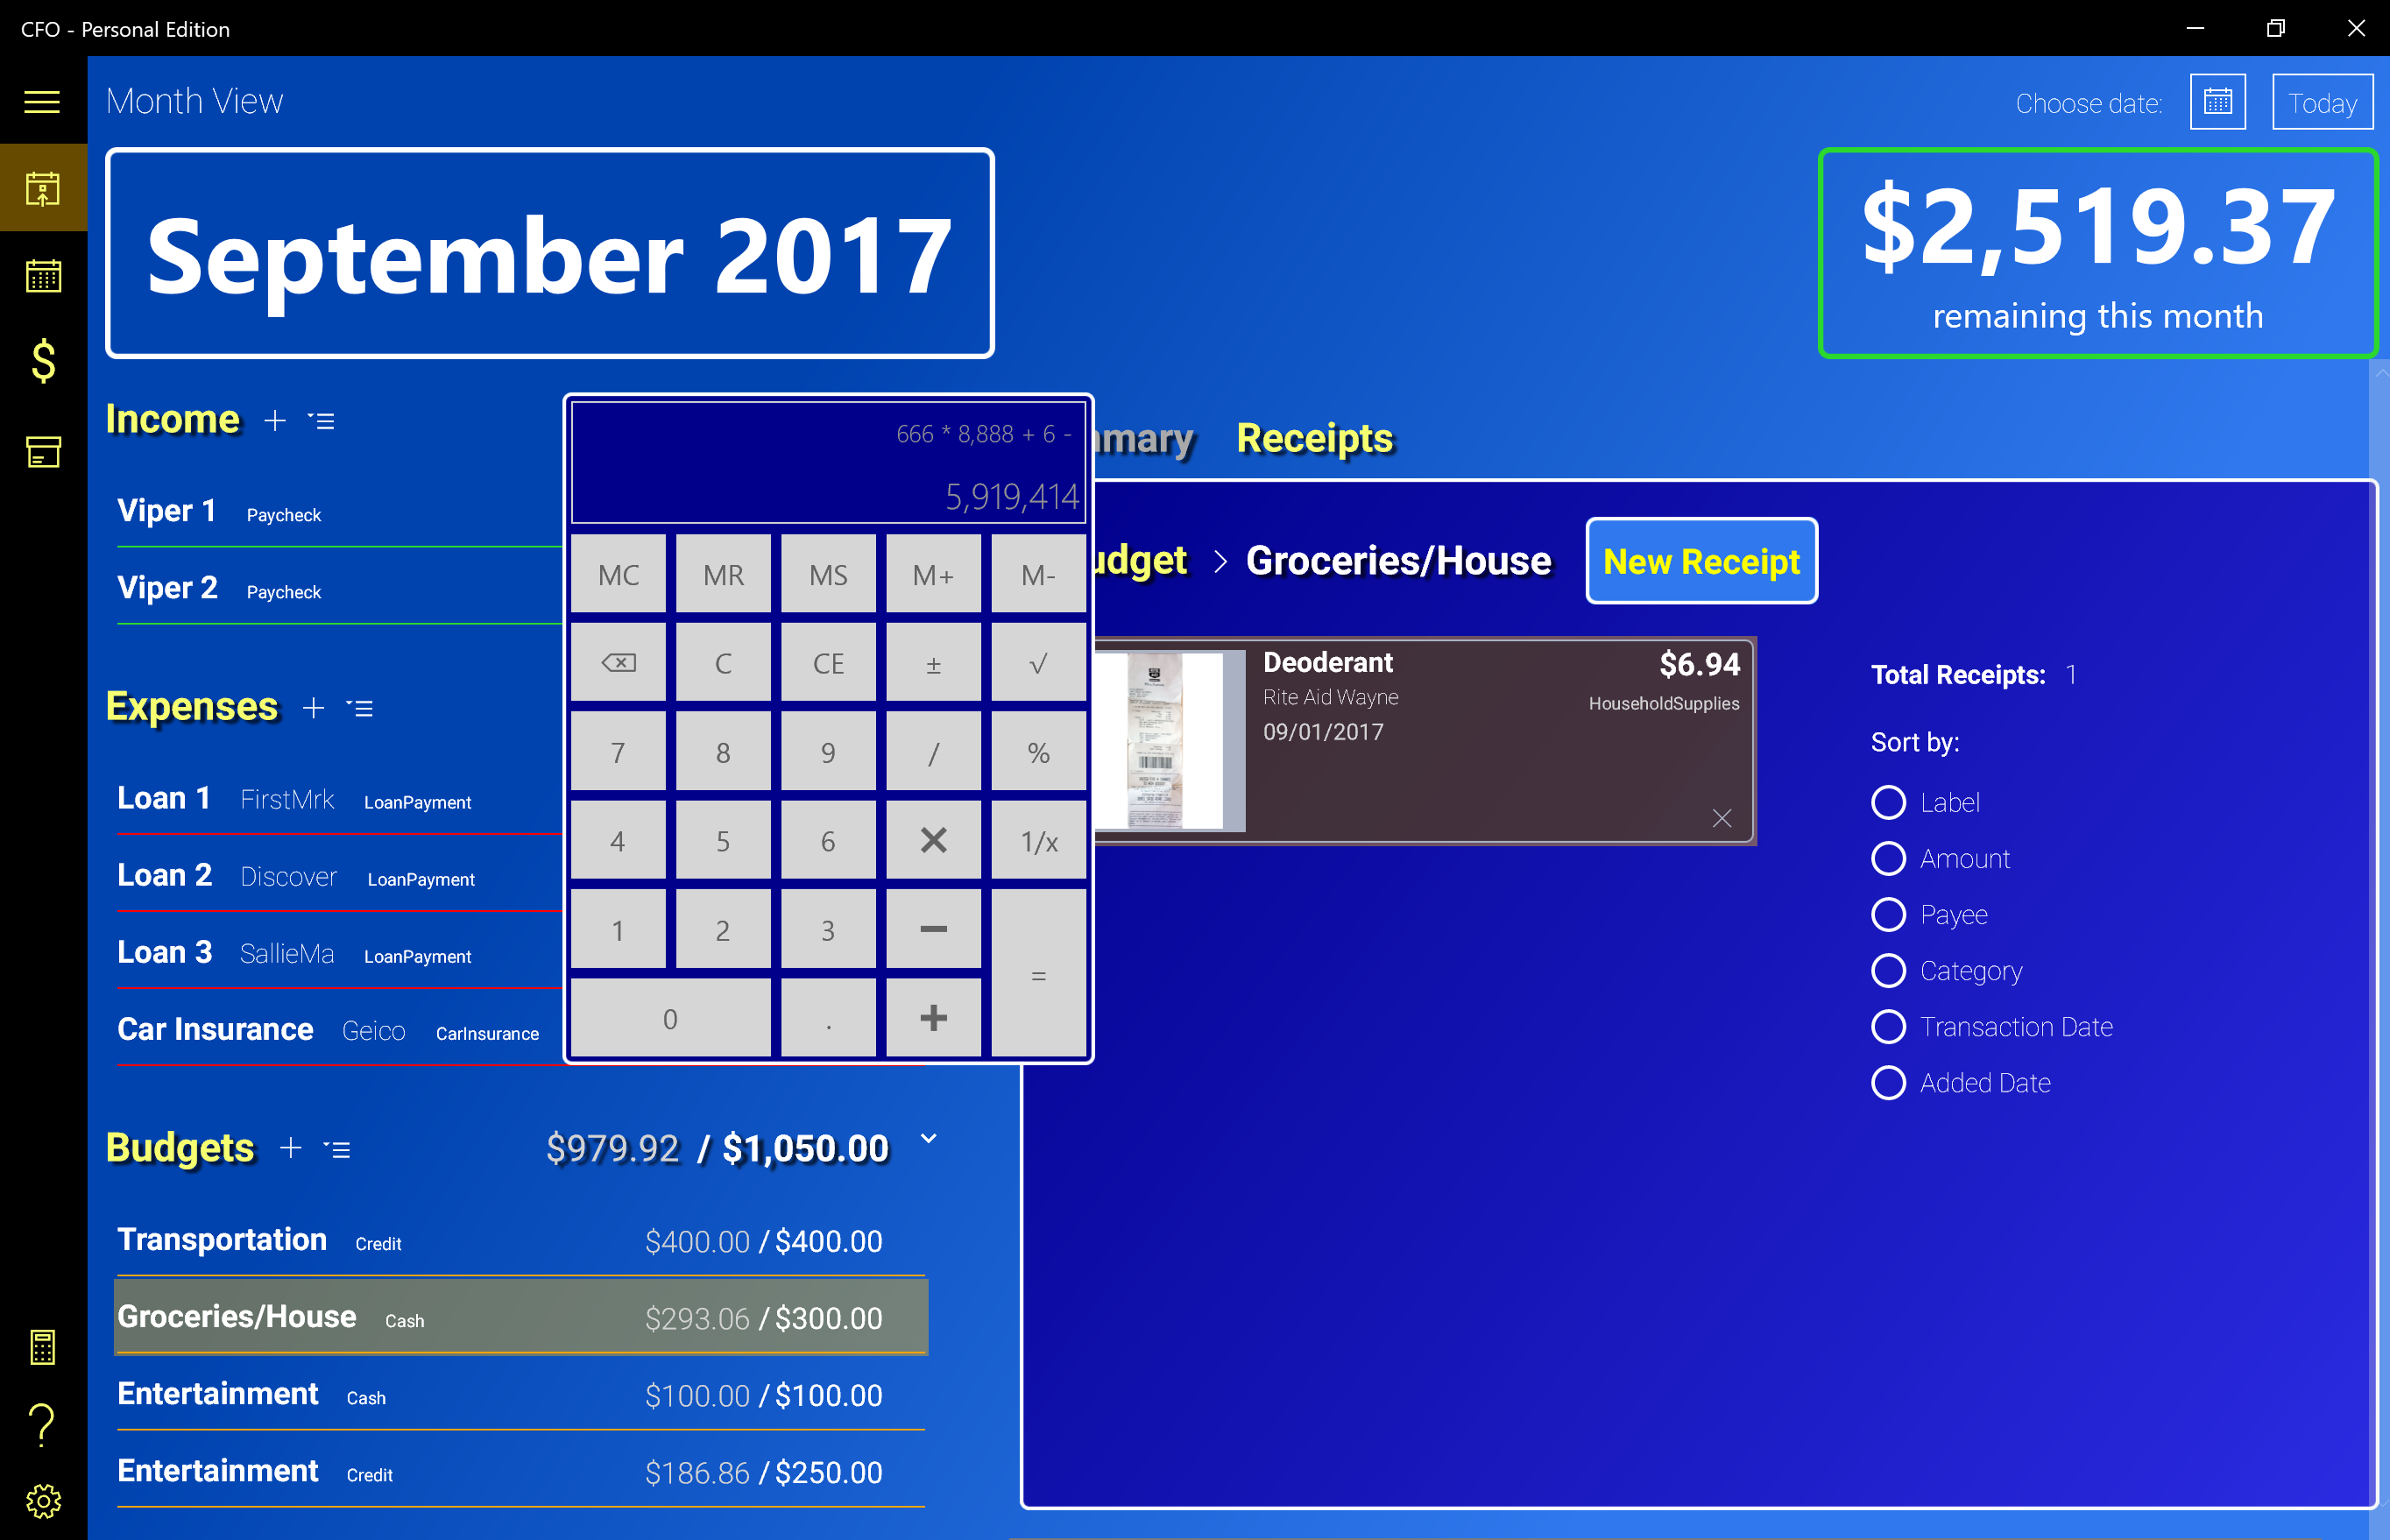
Budgets are slightly different. When you create a Budget with an Amount, say a Grocery Budget of $100.00, it doesn't deduct from the Grand Total until you start adding Receipts to that Budget. Once you start adding Receipts, the Remaining Amount of the Budget (the amount you have left to spend) will be reflected in the list of Budgets next to the Total Amount you allocated and the Grand Total will reflect your actual spending.
If the Amount you bugeted across all your Budgets is higher than your Income minus your Expenses, you will get a warning in the Summary View. This is to let you know you are planning to spend more than you have made for the Month. (See Summary View)
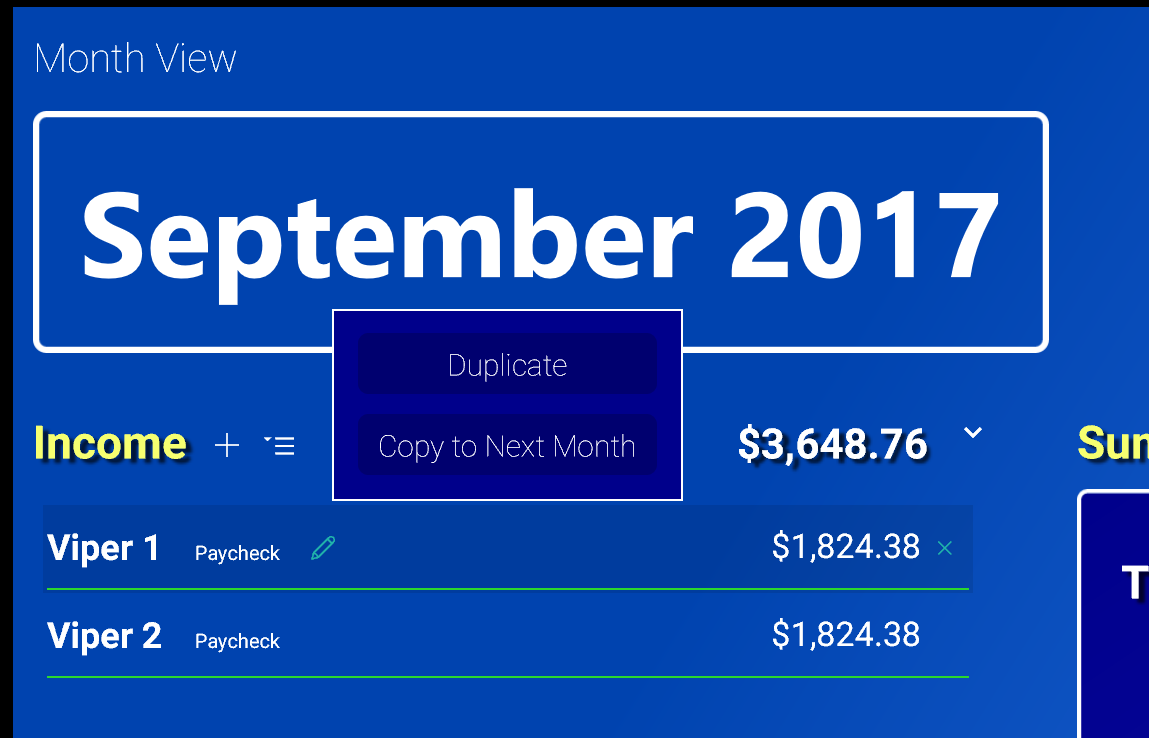
To copy an item to the same Month, right click the entry in the List and choose "Duplicate". To copy the item to the next Month (good for monthly recurring Incomes, Expenses and Budgets), right click and choose "Copy To Next Month". When Expenses are copied to the next month, the receive a Due Date one month from their current Due Date.
you can choose the Due Date from the Calendar. (See Screenshot)
Budgets are slightly different. When you create a Budget with an Amount, say a Grocery Budget of $100.00, it doesn't deduct from the Grand Total until you start adding Receipts to that Budget. Once you start adding Receipts, the Remaining Amount of the Budget (the amount you have left to spend) will be reflected in the list of Budgets next to the Total Amount you allocated and the Grand Total will reflect your actual spending.
If the Amount you bugeted across all your Budgets is higher than your Income minus your Expenses, you will get a warning in the Summary View. This is to let you know you are planning to spend more than you have made for the Month. (See Summary View)
To copy an item to the same Month, right click the entry in the List and choose "Duplicate". To copy the item to the next Month (good for monthly recurring Incomes, Expenses and Budgets), right click and choose "Copy To Next Month". When Expenses are copied to the next month, the receive a Due Date one month from their current Due Date.
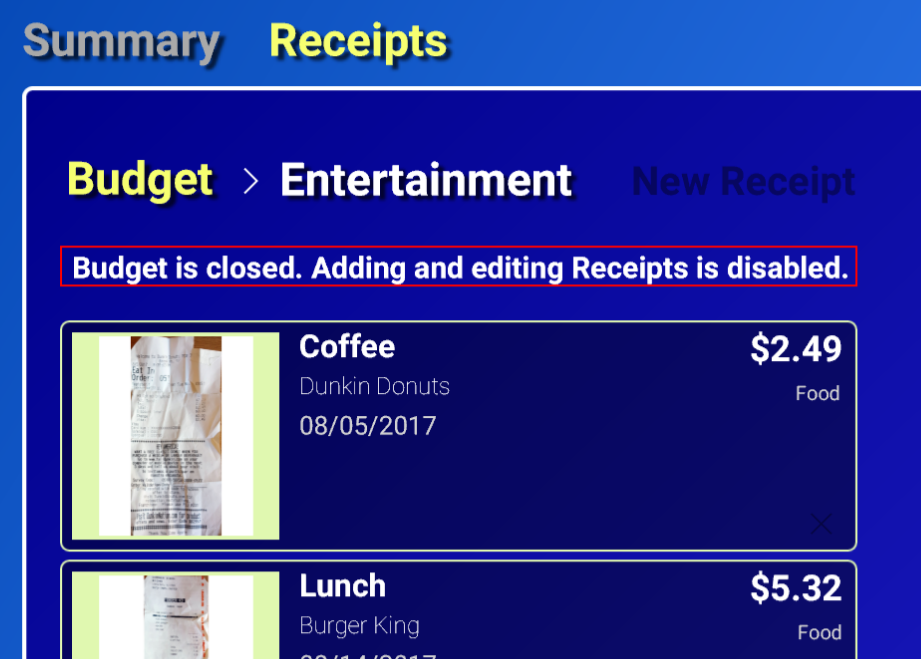
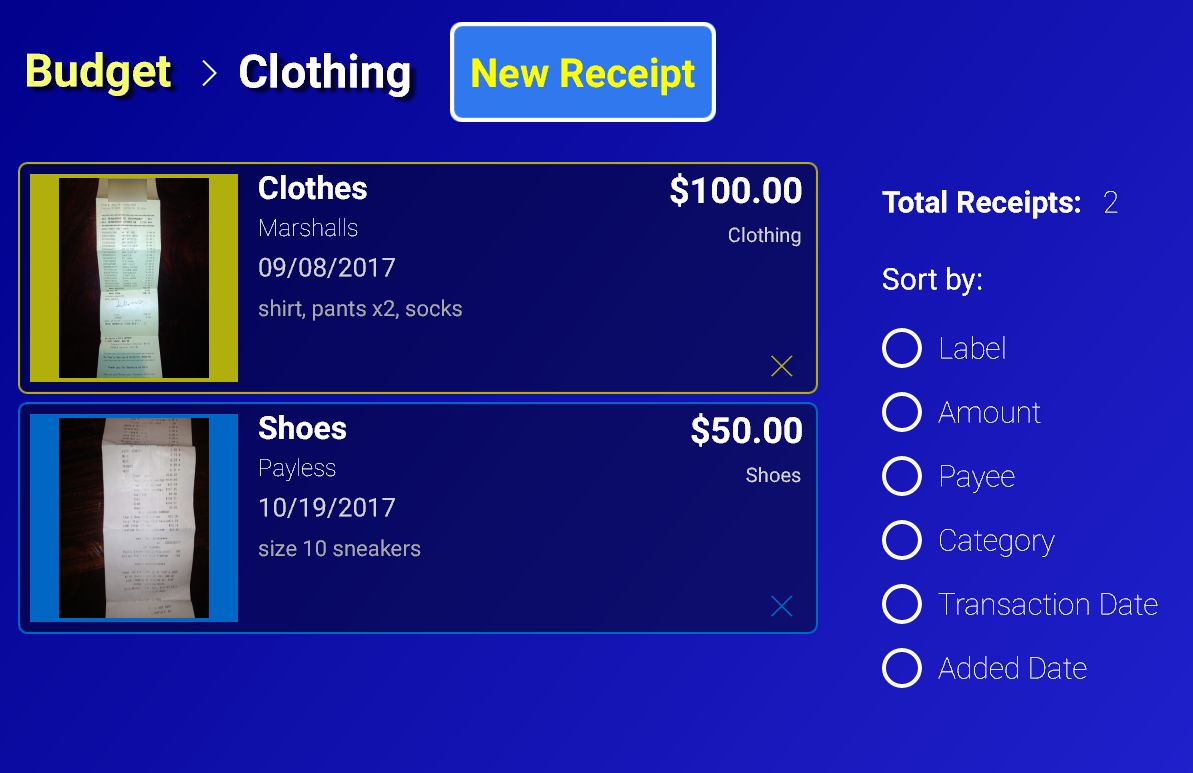
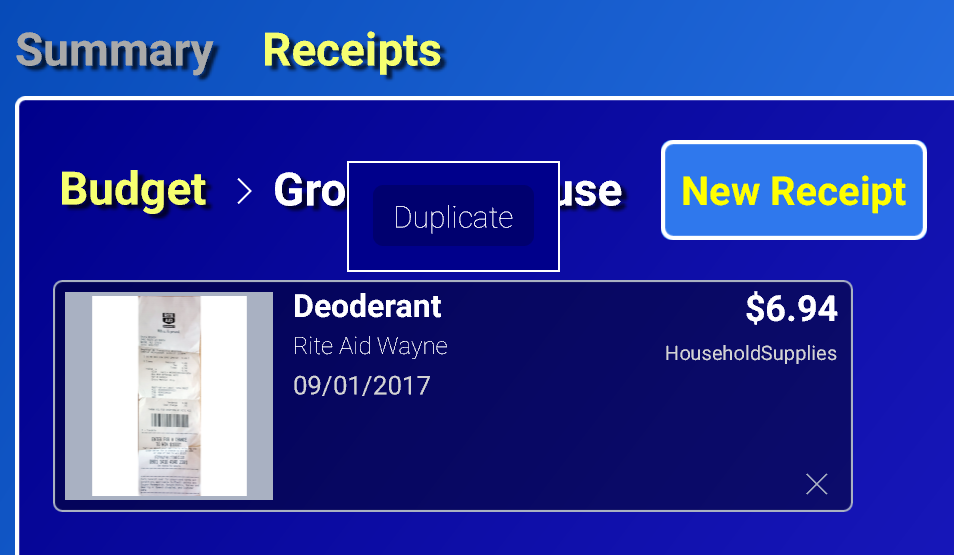
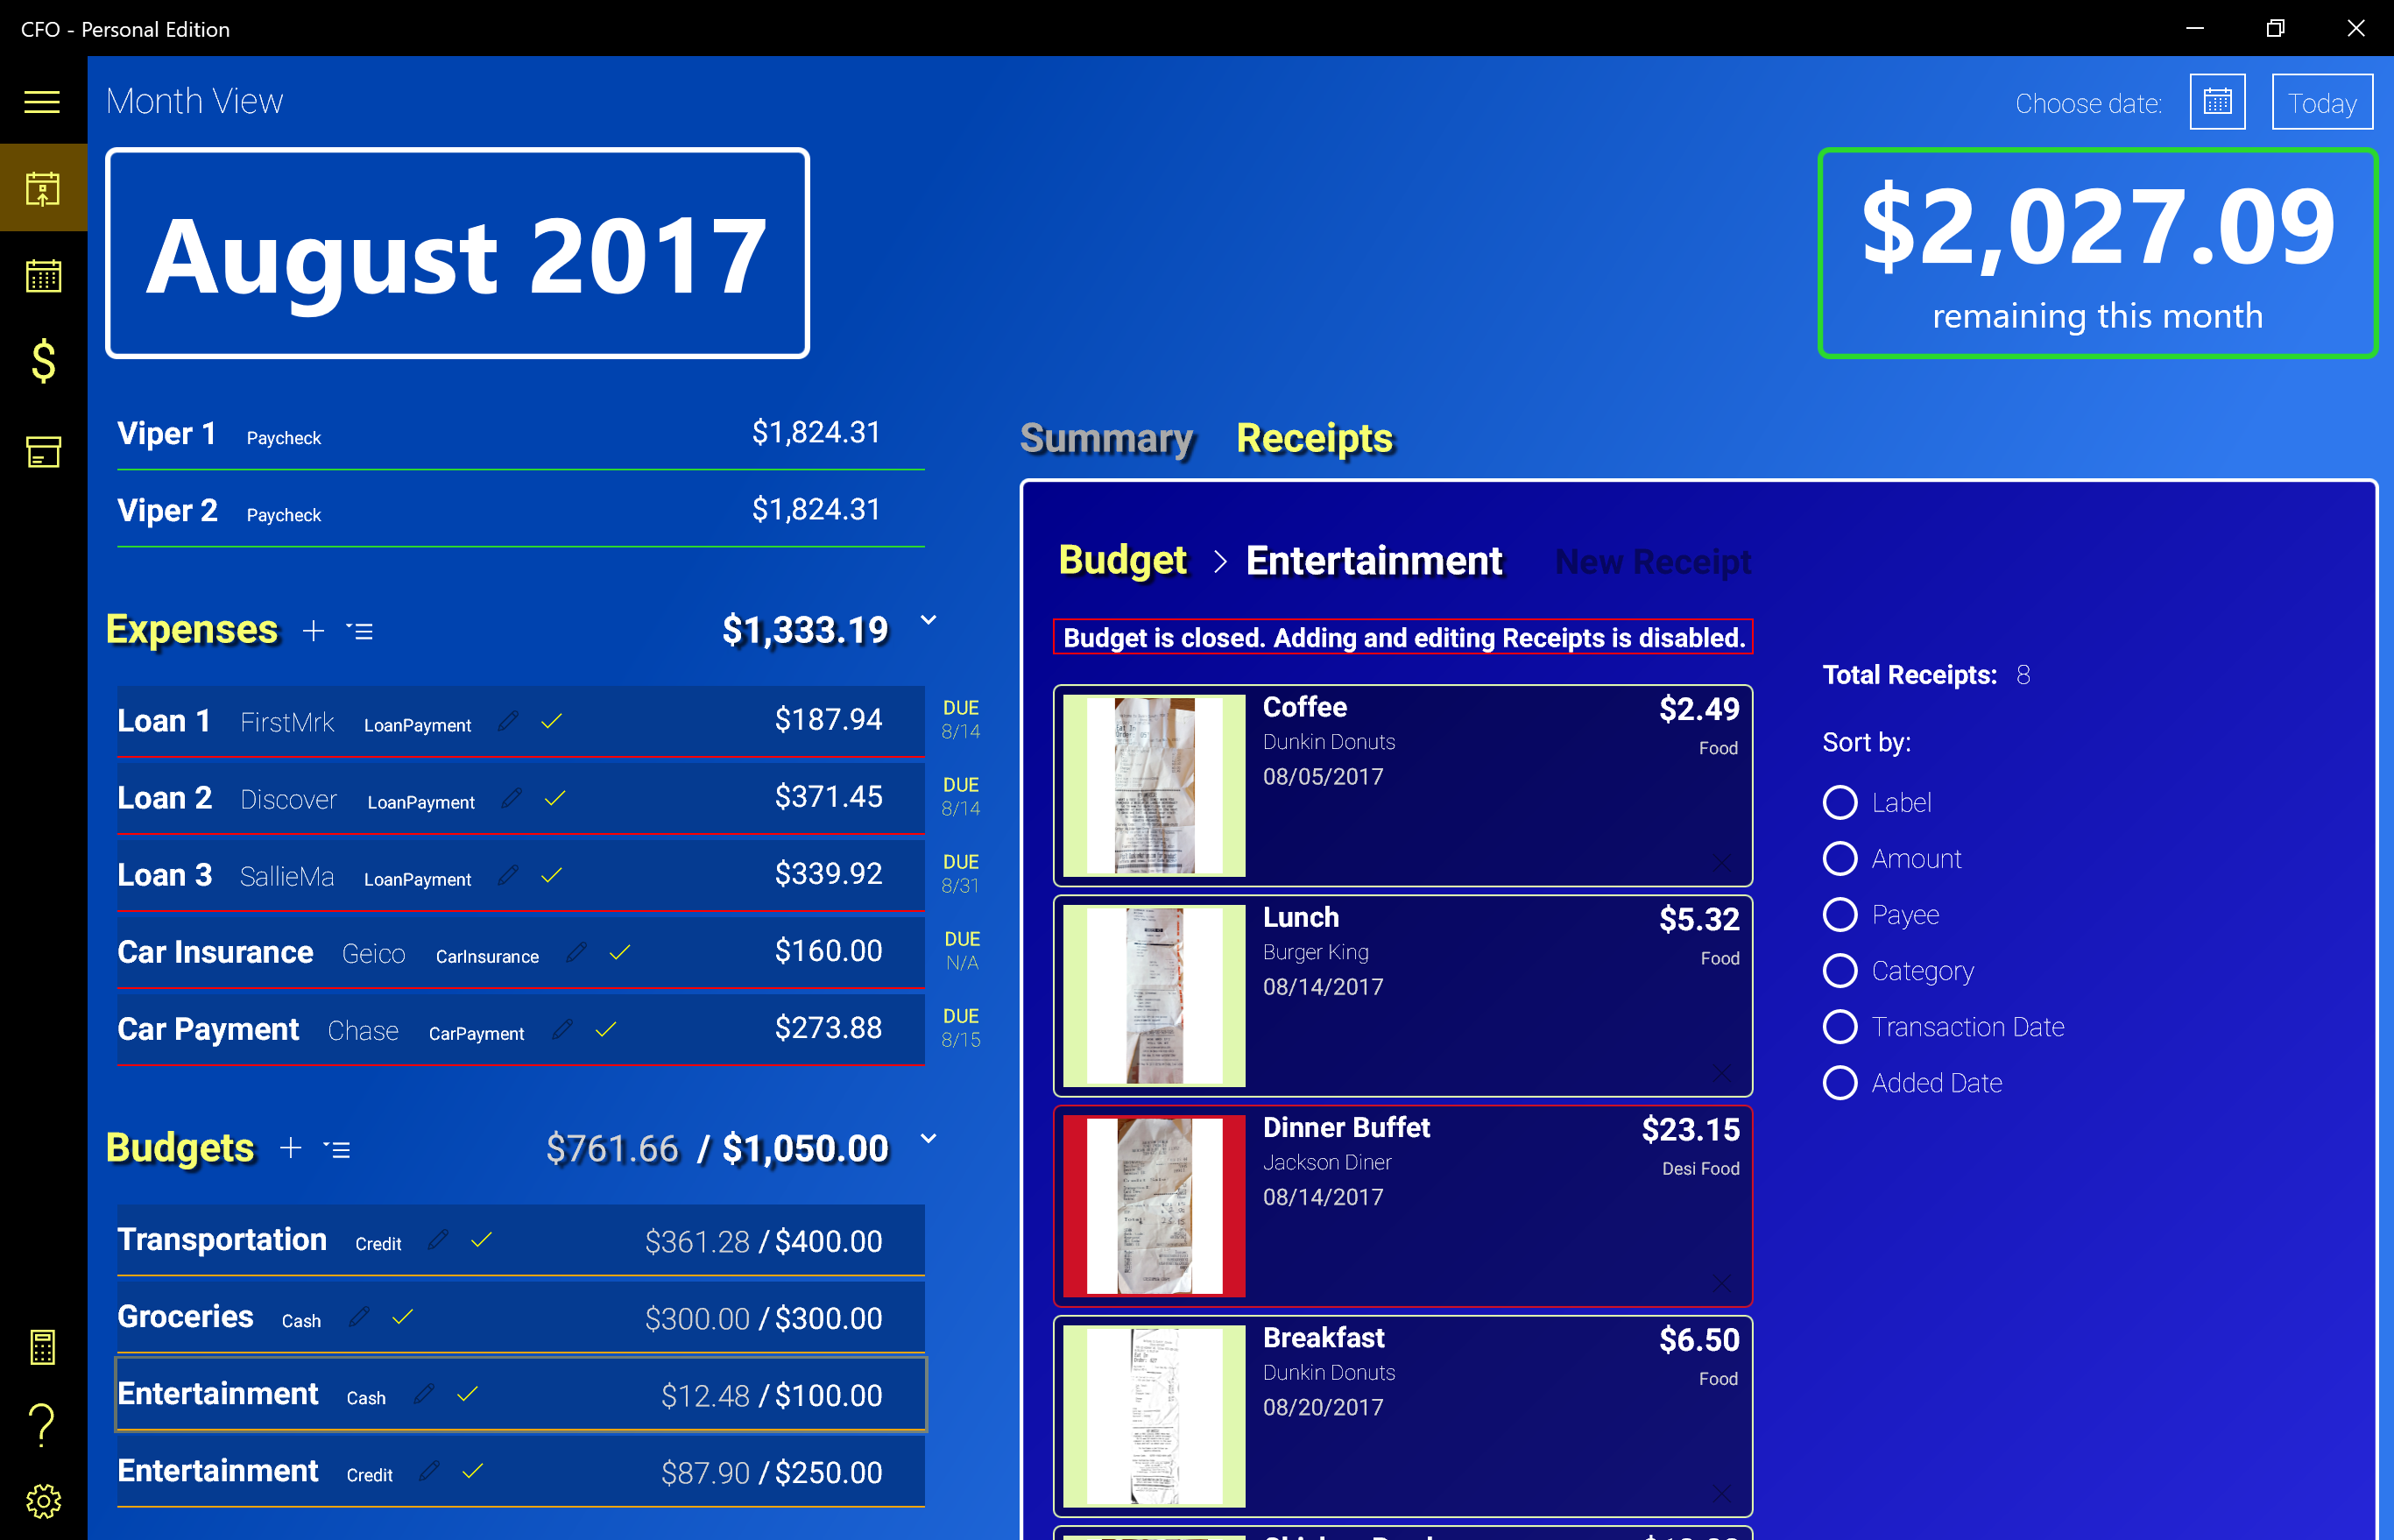
When you click on a Budget in the list, you are taken to the Receipt List for that Budget. If the Budget is not Closed you can click on any existing Receipt to Edit it or you can click the "New Receipt" button to add Receipts. You can also Sort the list with the provided radio buttons.
To make a Copy of a Receipt, right click on it and select "Duplicate".
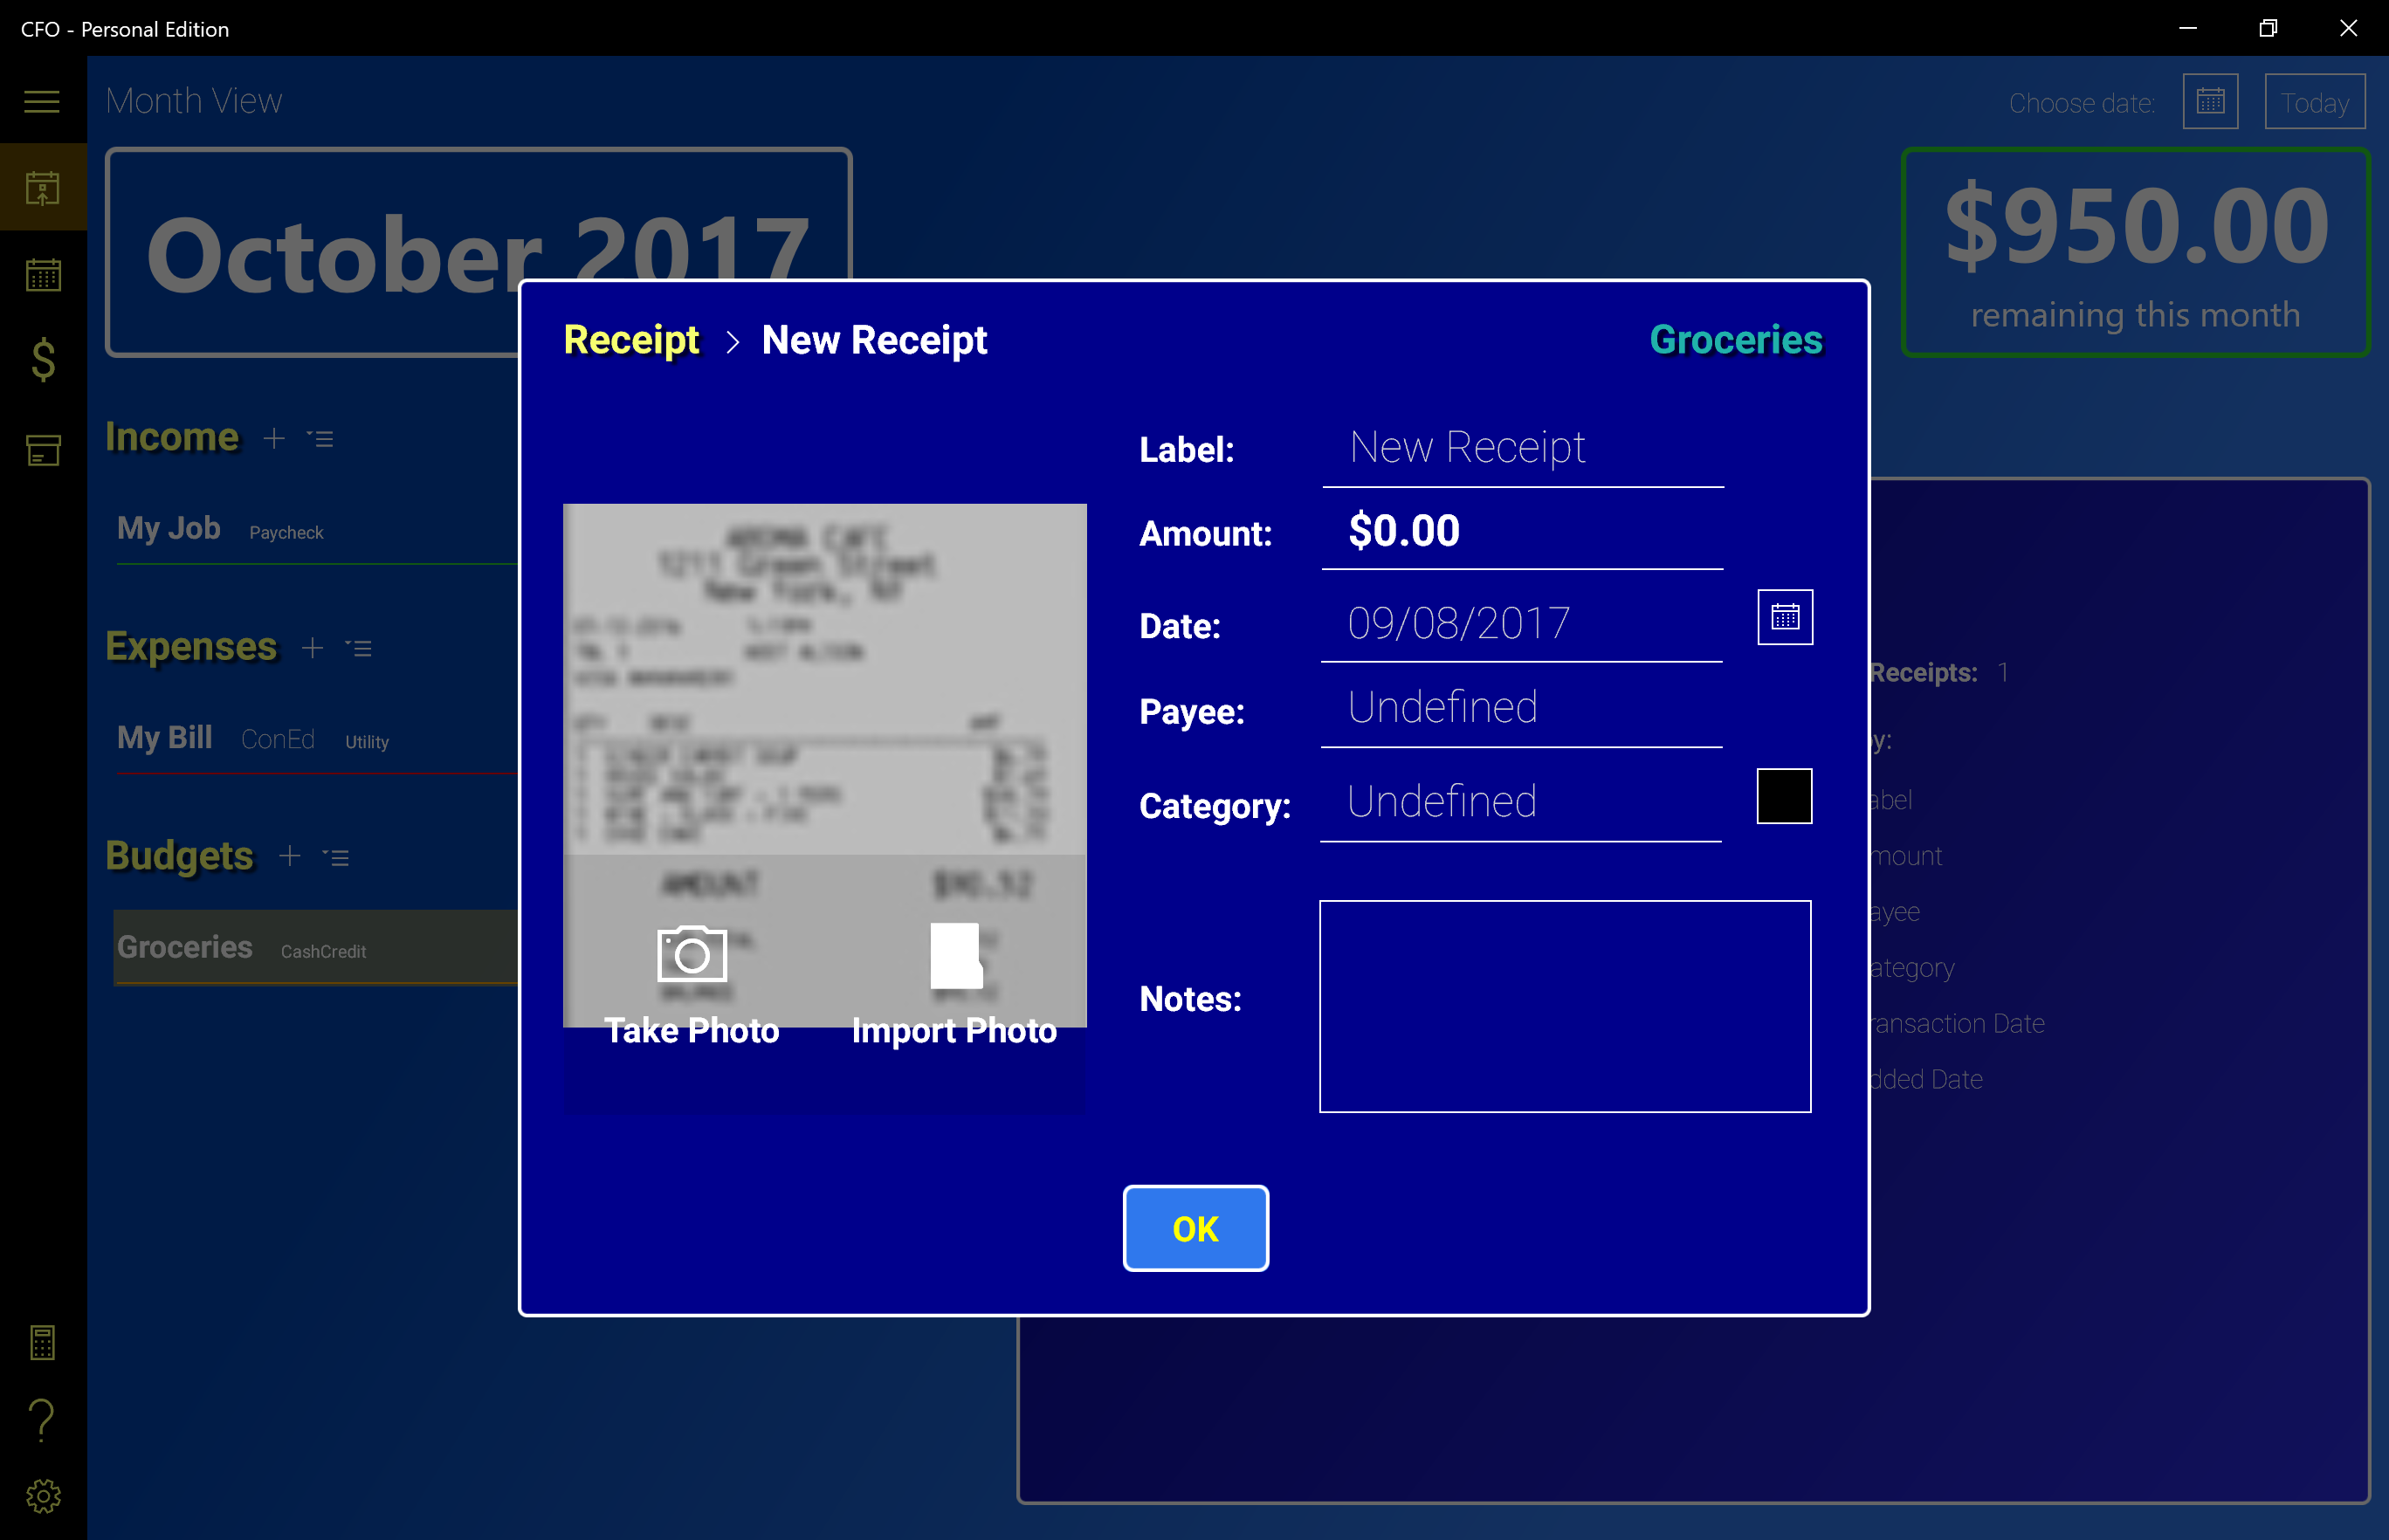
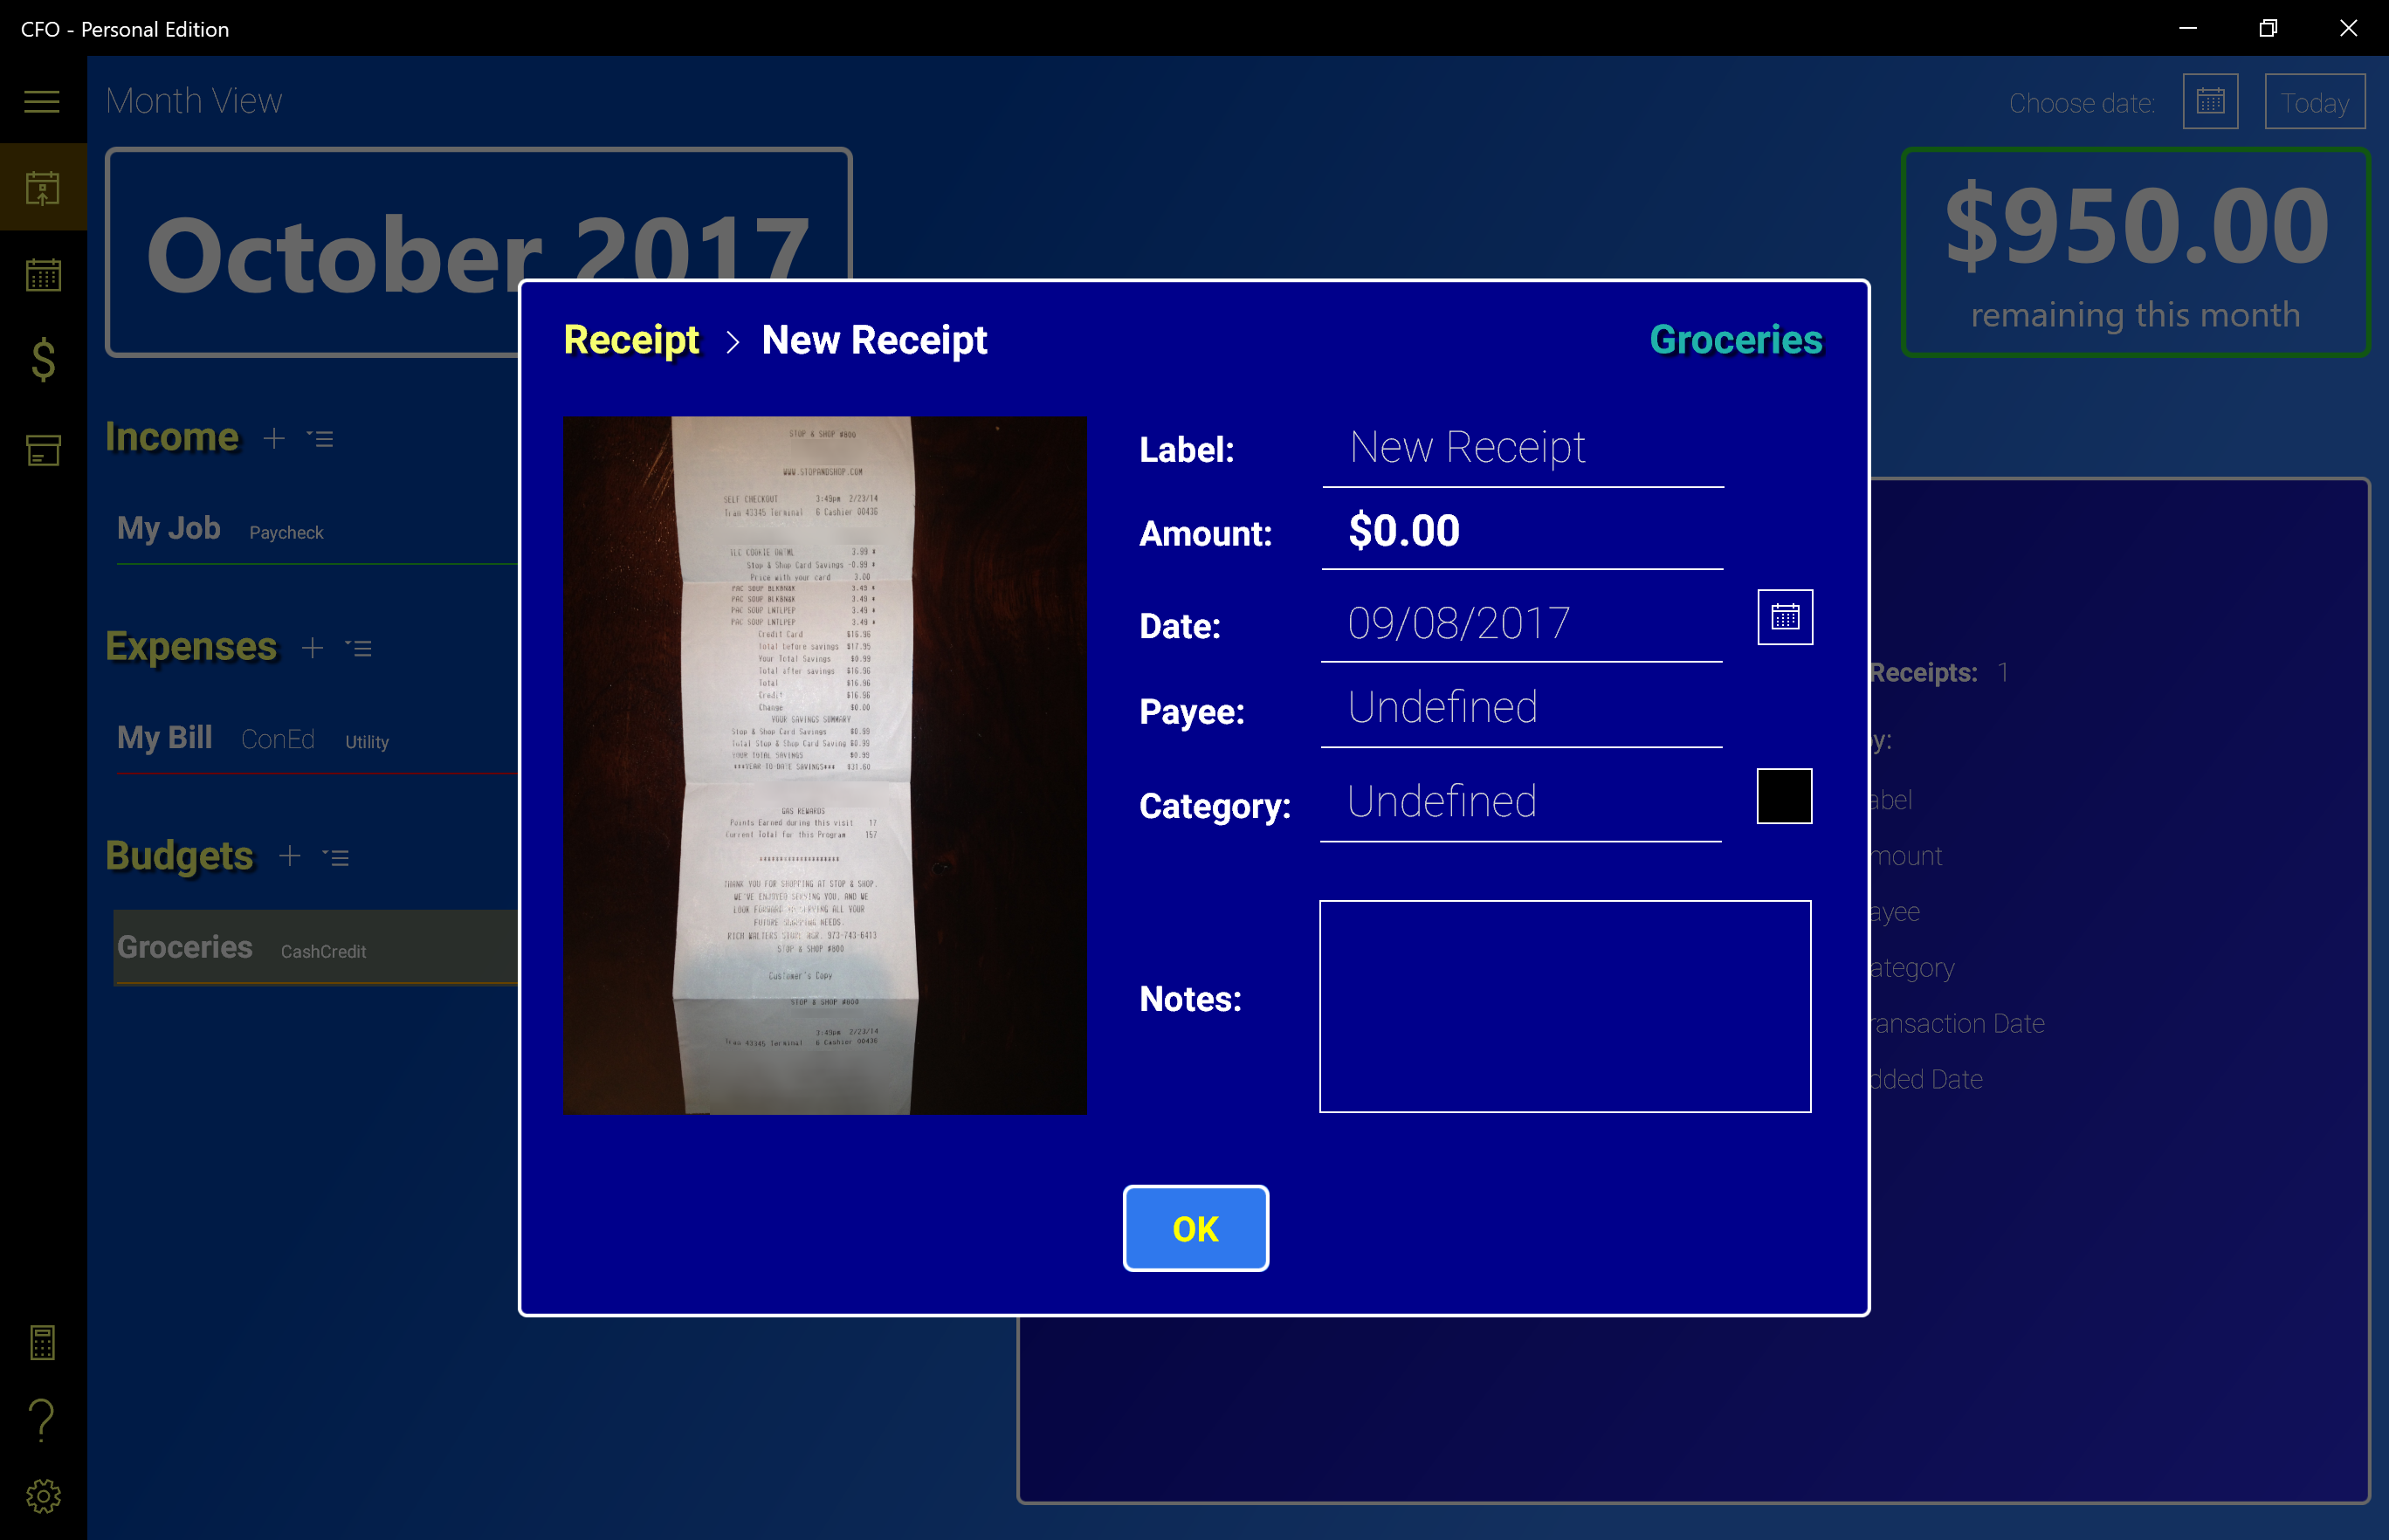
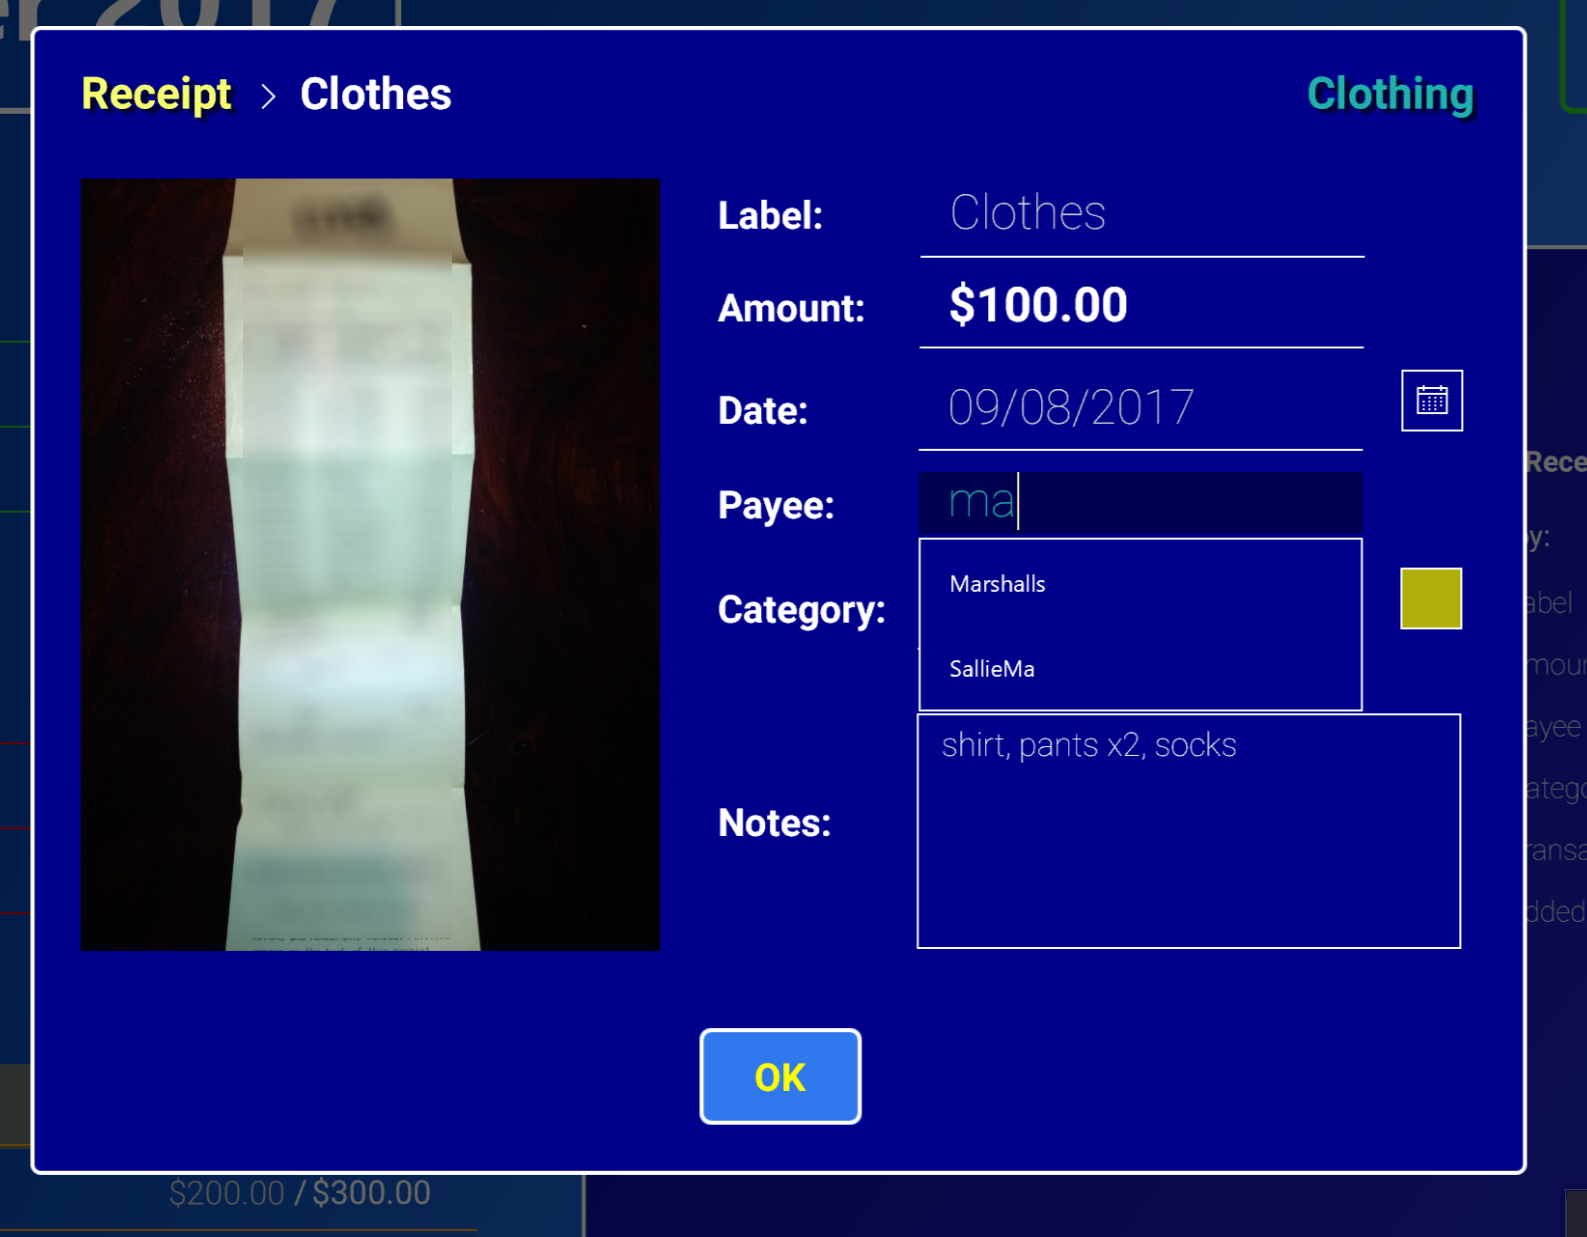
After clicking the "New Receipt" button or clicking on an existing Receipt, you are taken to the Receipt Editor. On the right hand side, you can change the Label, Amount, Transaction Date, Payee, Category and Notes of the Receipt. All changes made in the editor are saved when you click the OK button.
On the left is a Placeholder Image (or Actual Image if you have previously added one) of the Receipt. Hover the mouse over the image to reveal the following options:
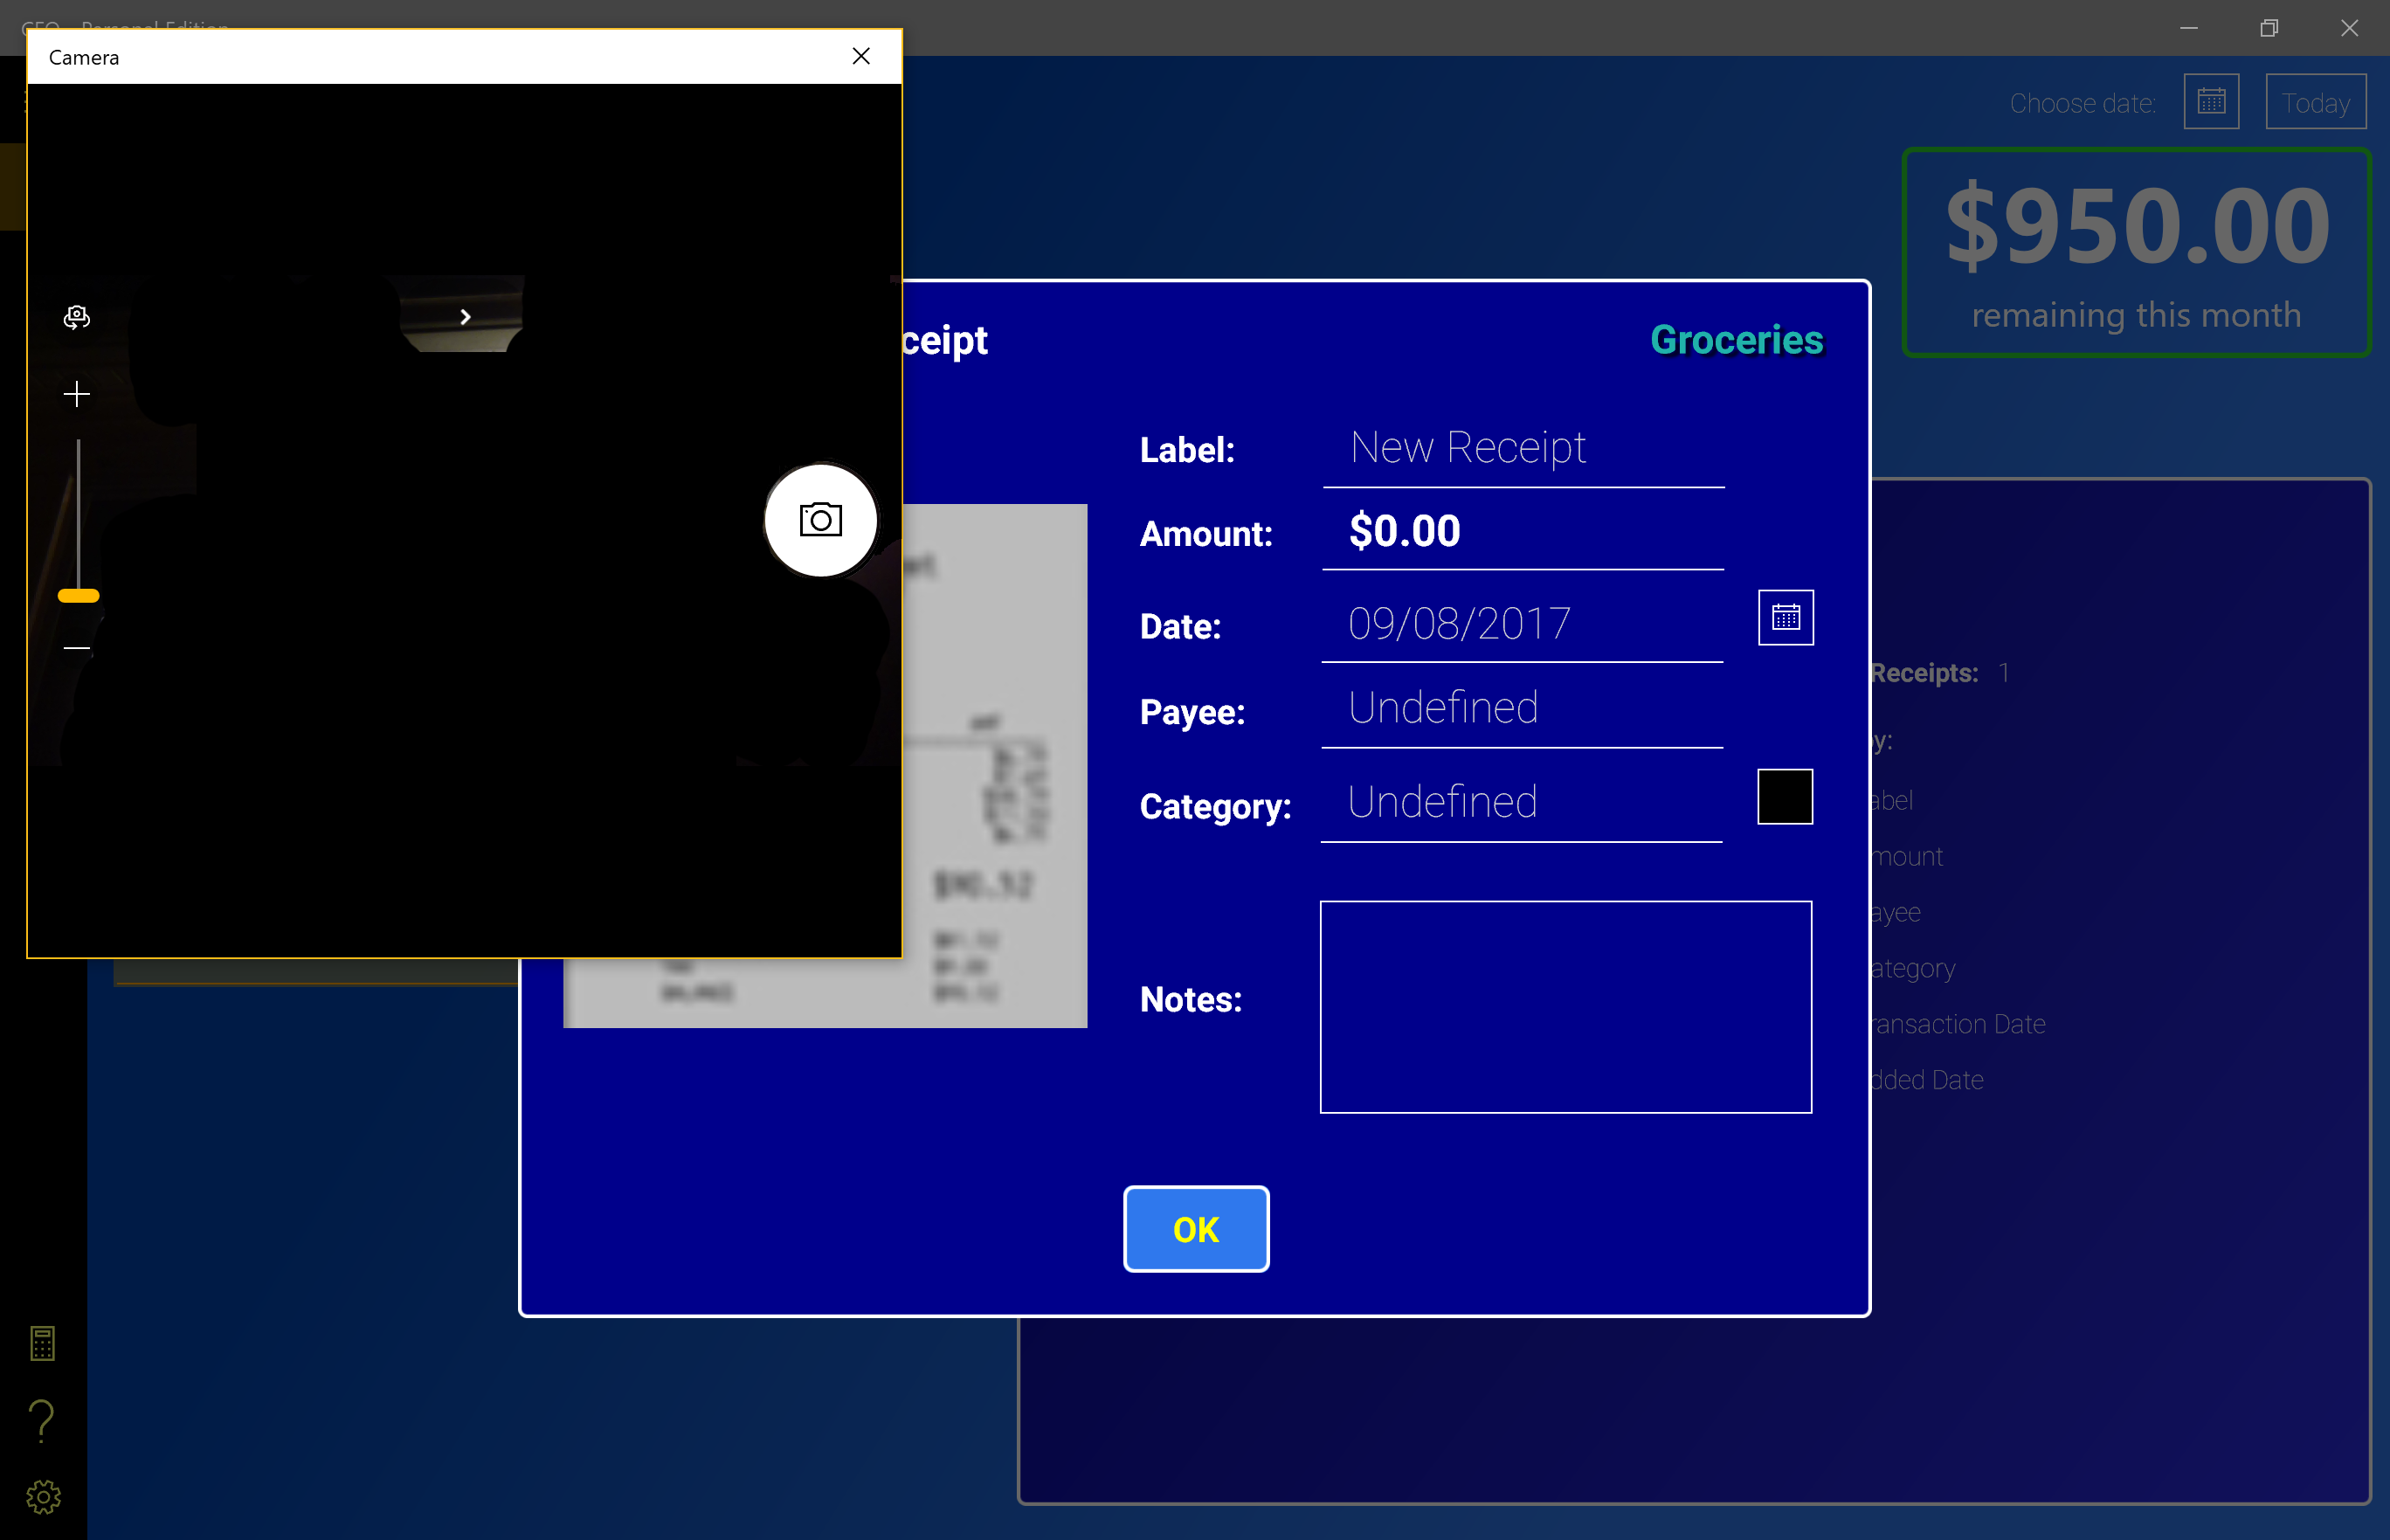
 Take Photo - You can take a photo of your Receipt with your device's built-in camera. In Windows 10, the Photo Taker allows you to crop your image before accepting it.
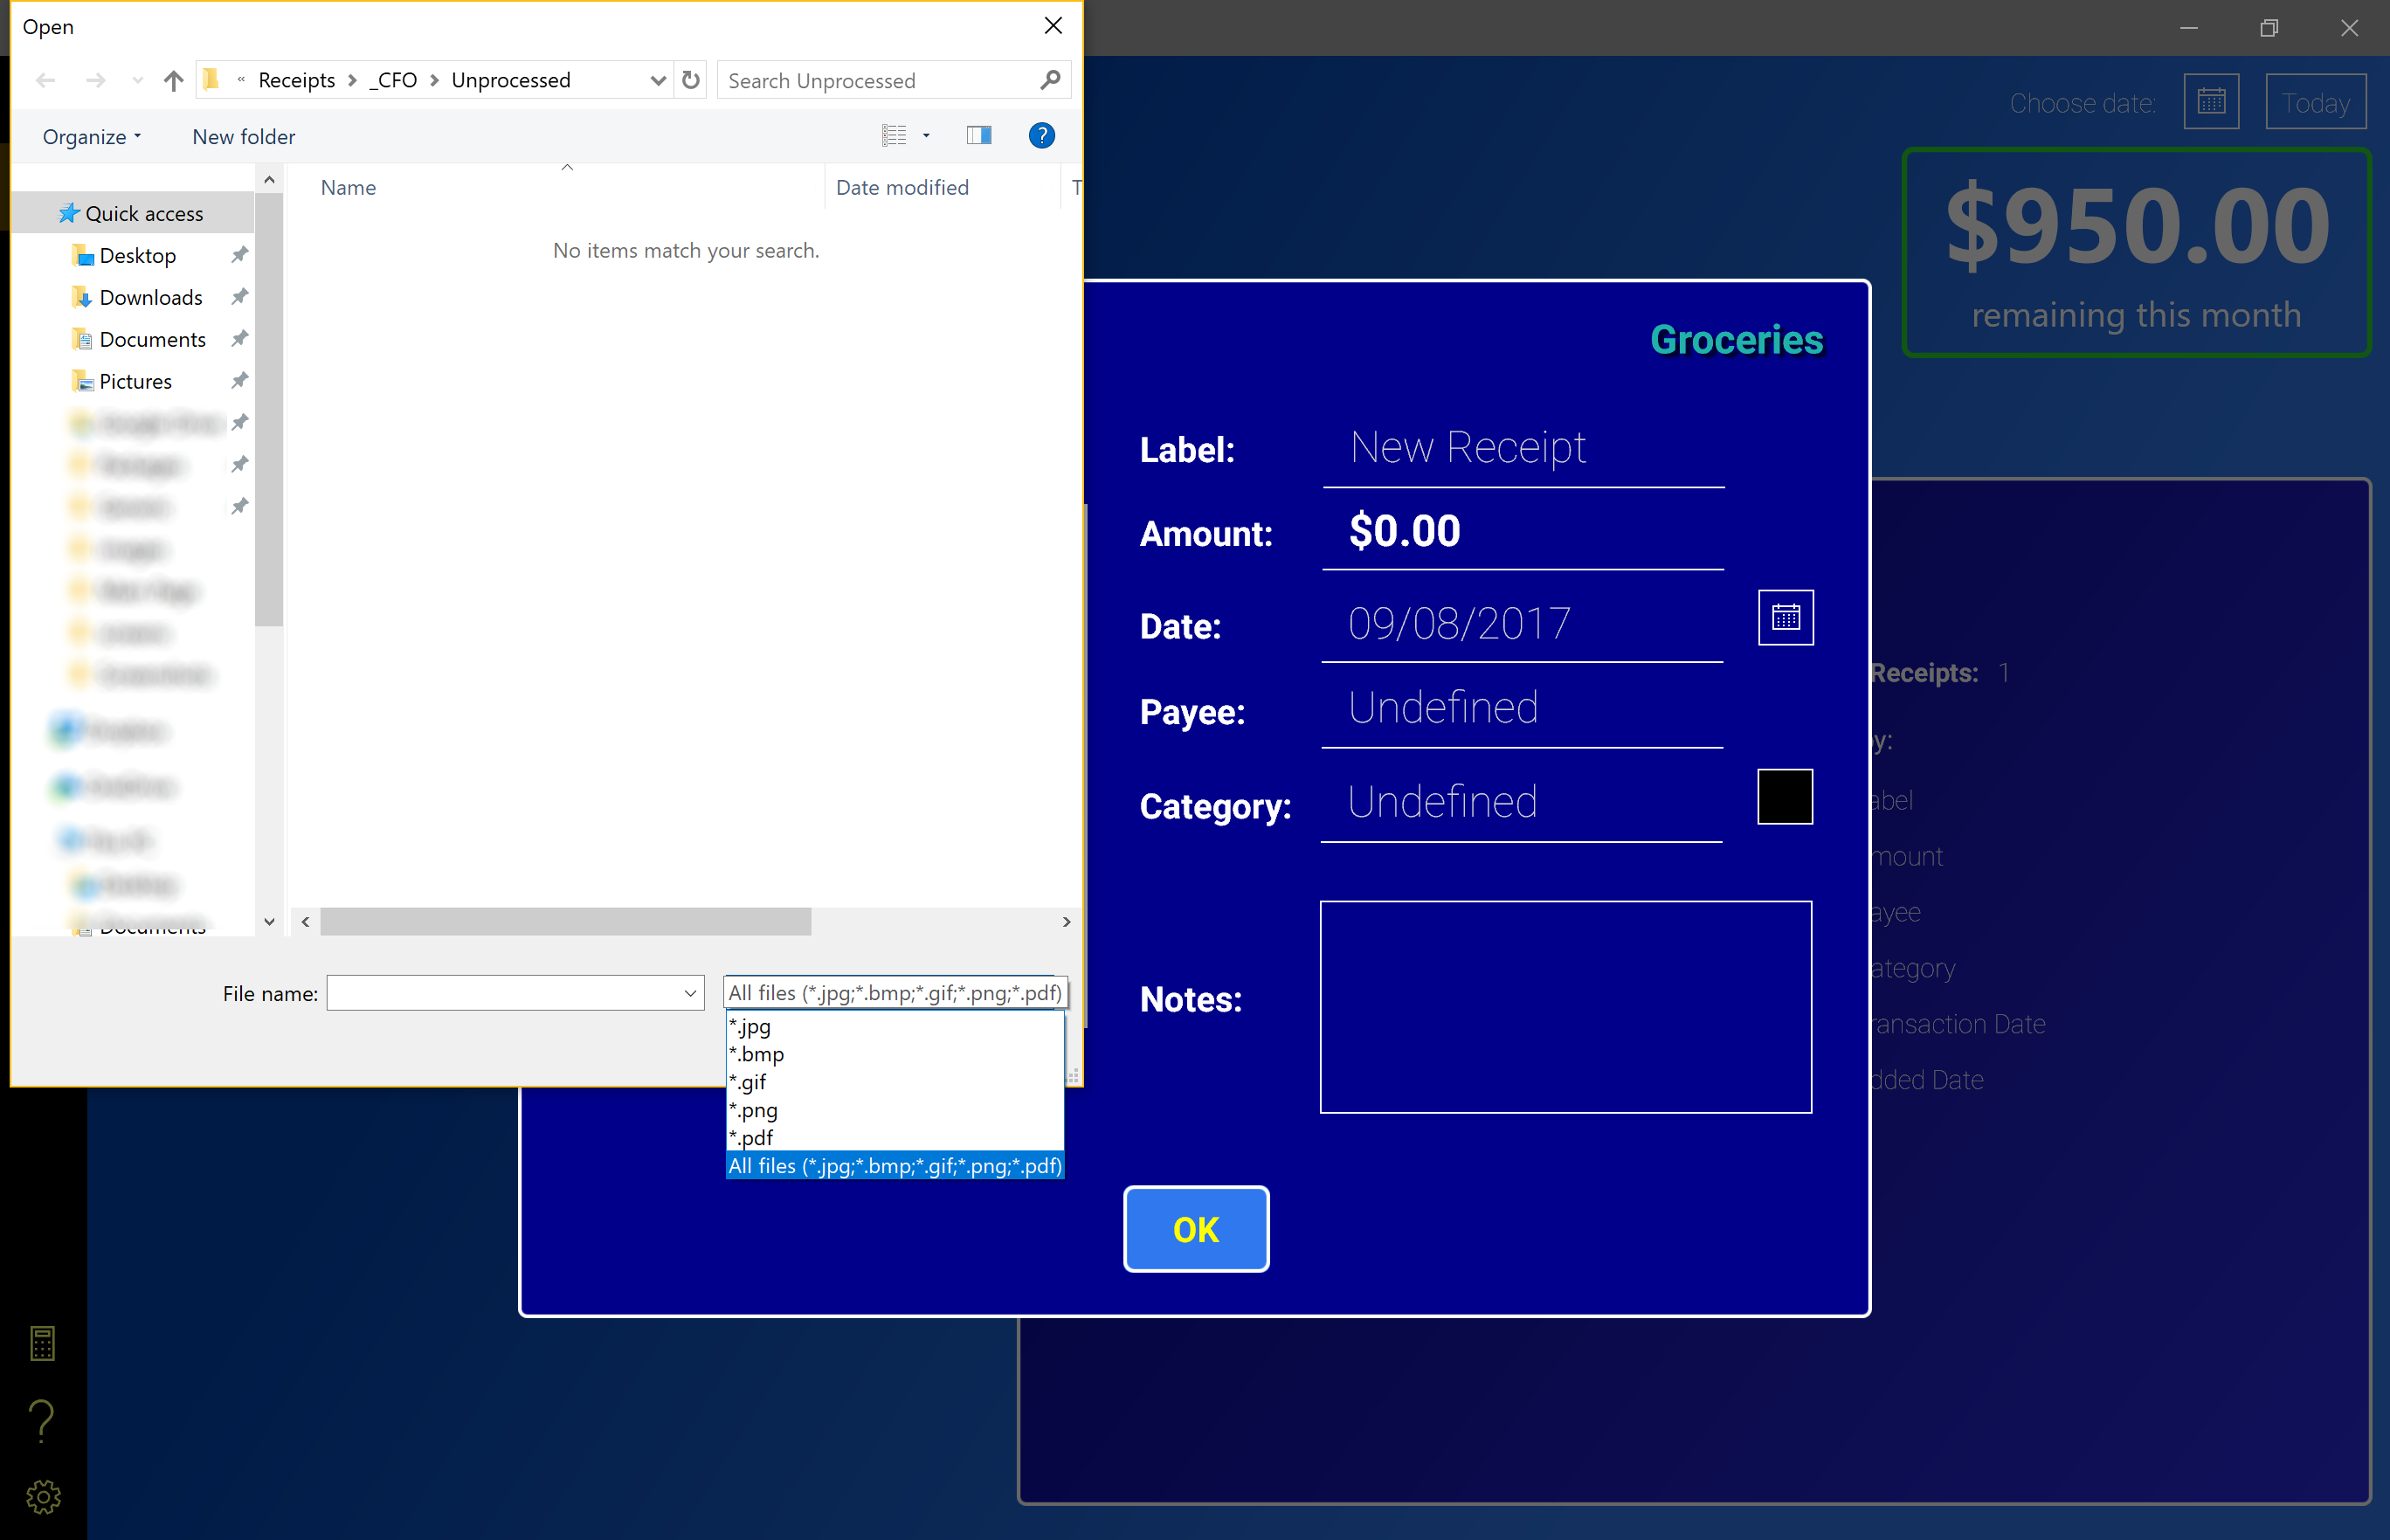
 Import Photo - You can also import an image file of your Receipt (.jpg, .png, .gif, .bmp) or an image embedded in a PDF file.
No matter how you enter your Receipt image (Camera or Import), the text of your Receipt is captured as metadata and retained in the file using OCR (Optical Character Recognition). In the Receipt Archive, you can search this metadata to find past Receipts by the text that is inside their images. This is useful, for instance, if you know you bought a certain item but never labeled it or made a note, but you want to find it in the Archive. Another use is searching for the address of a store or restaurant that you've made a purchase at.
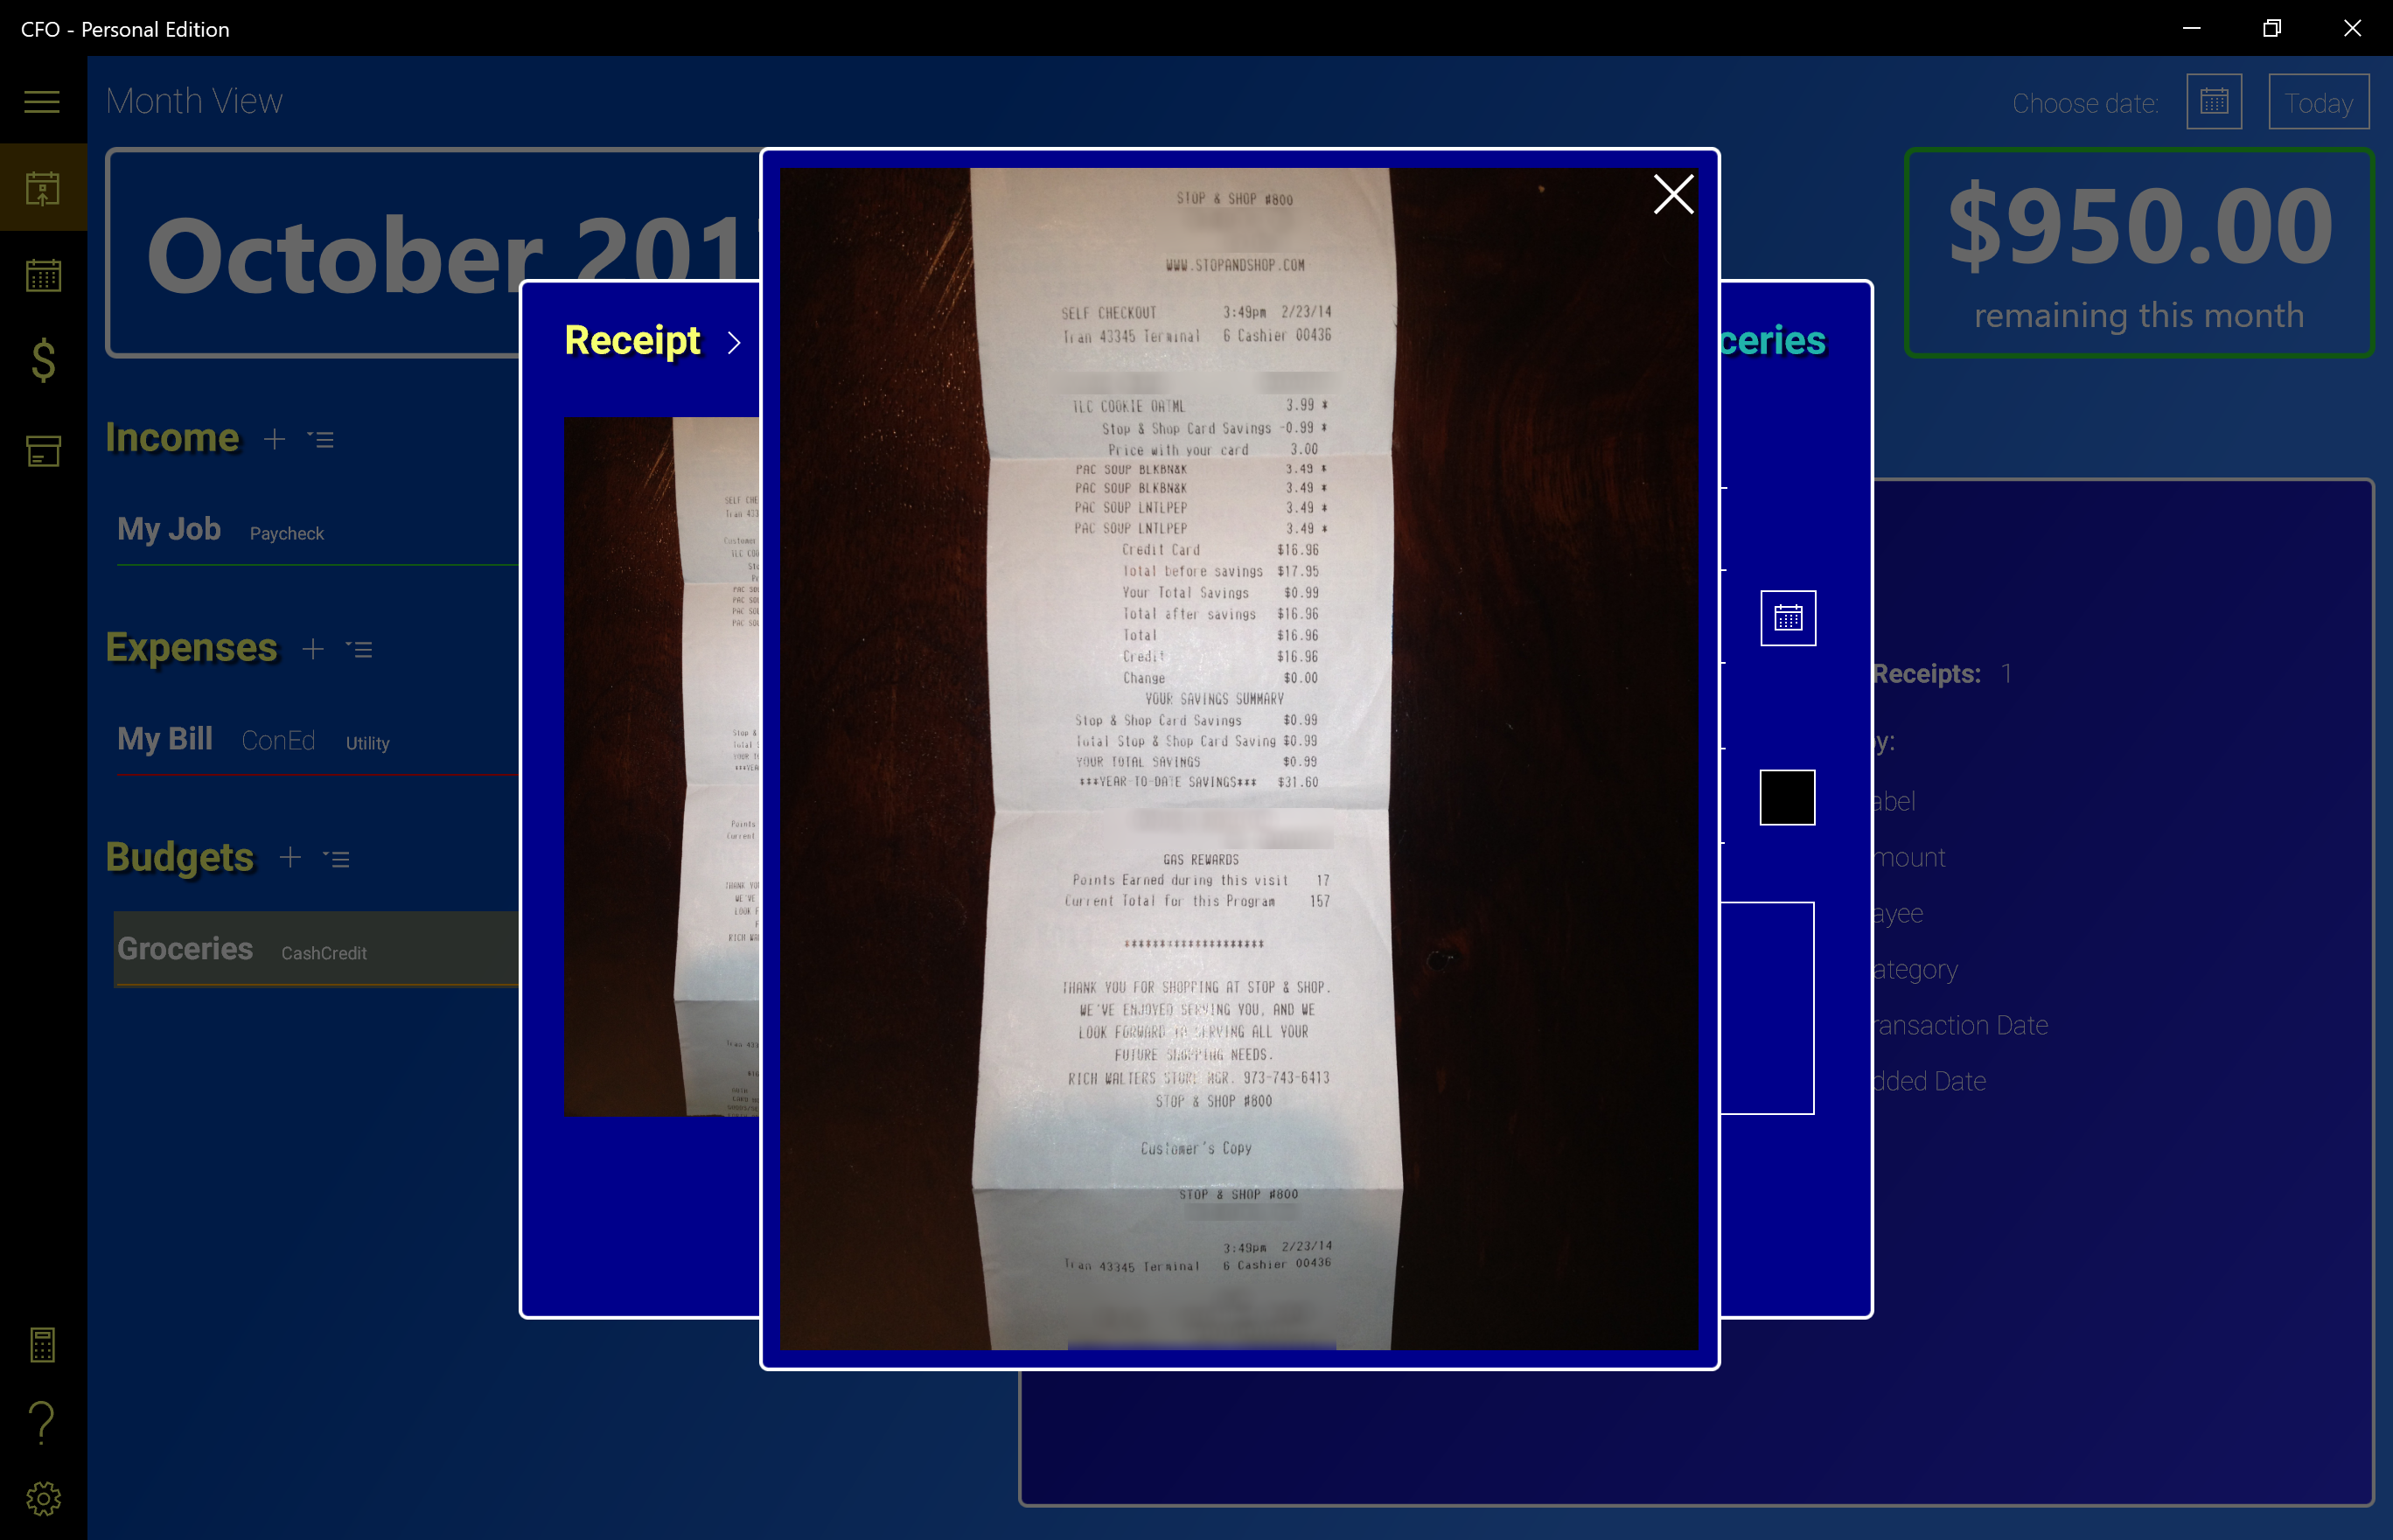
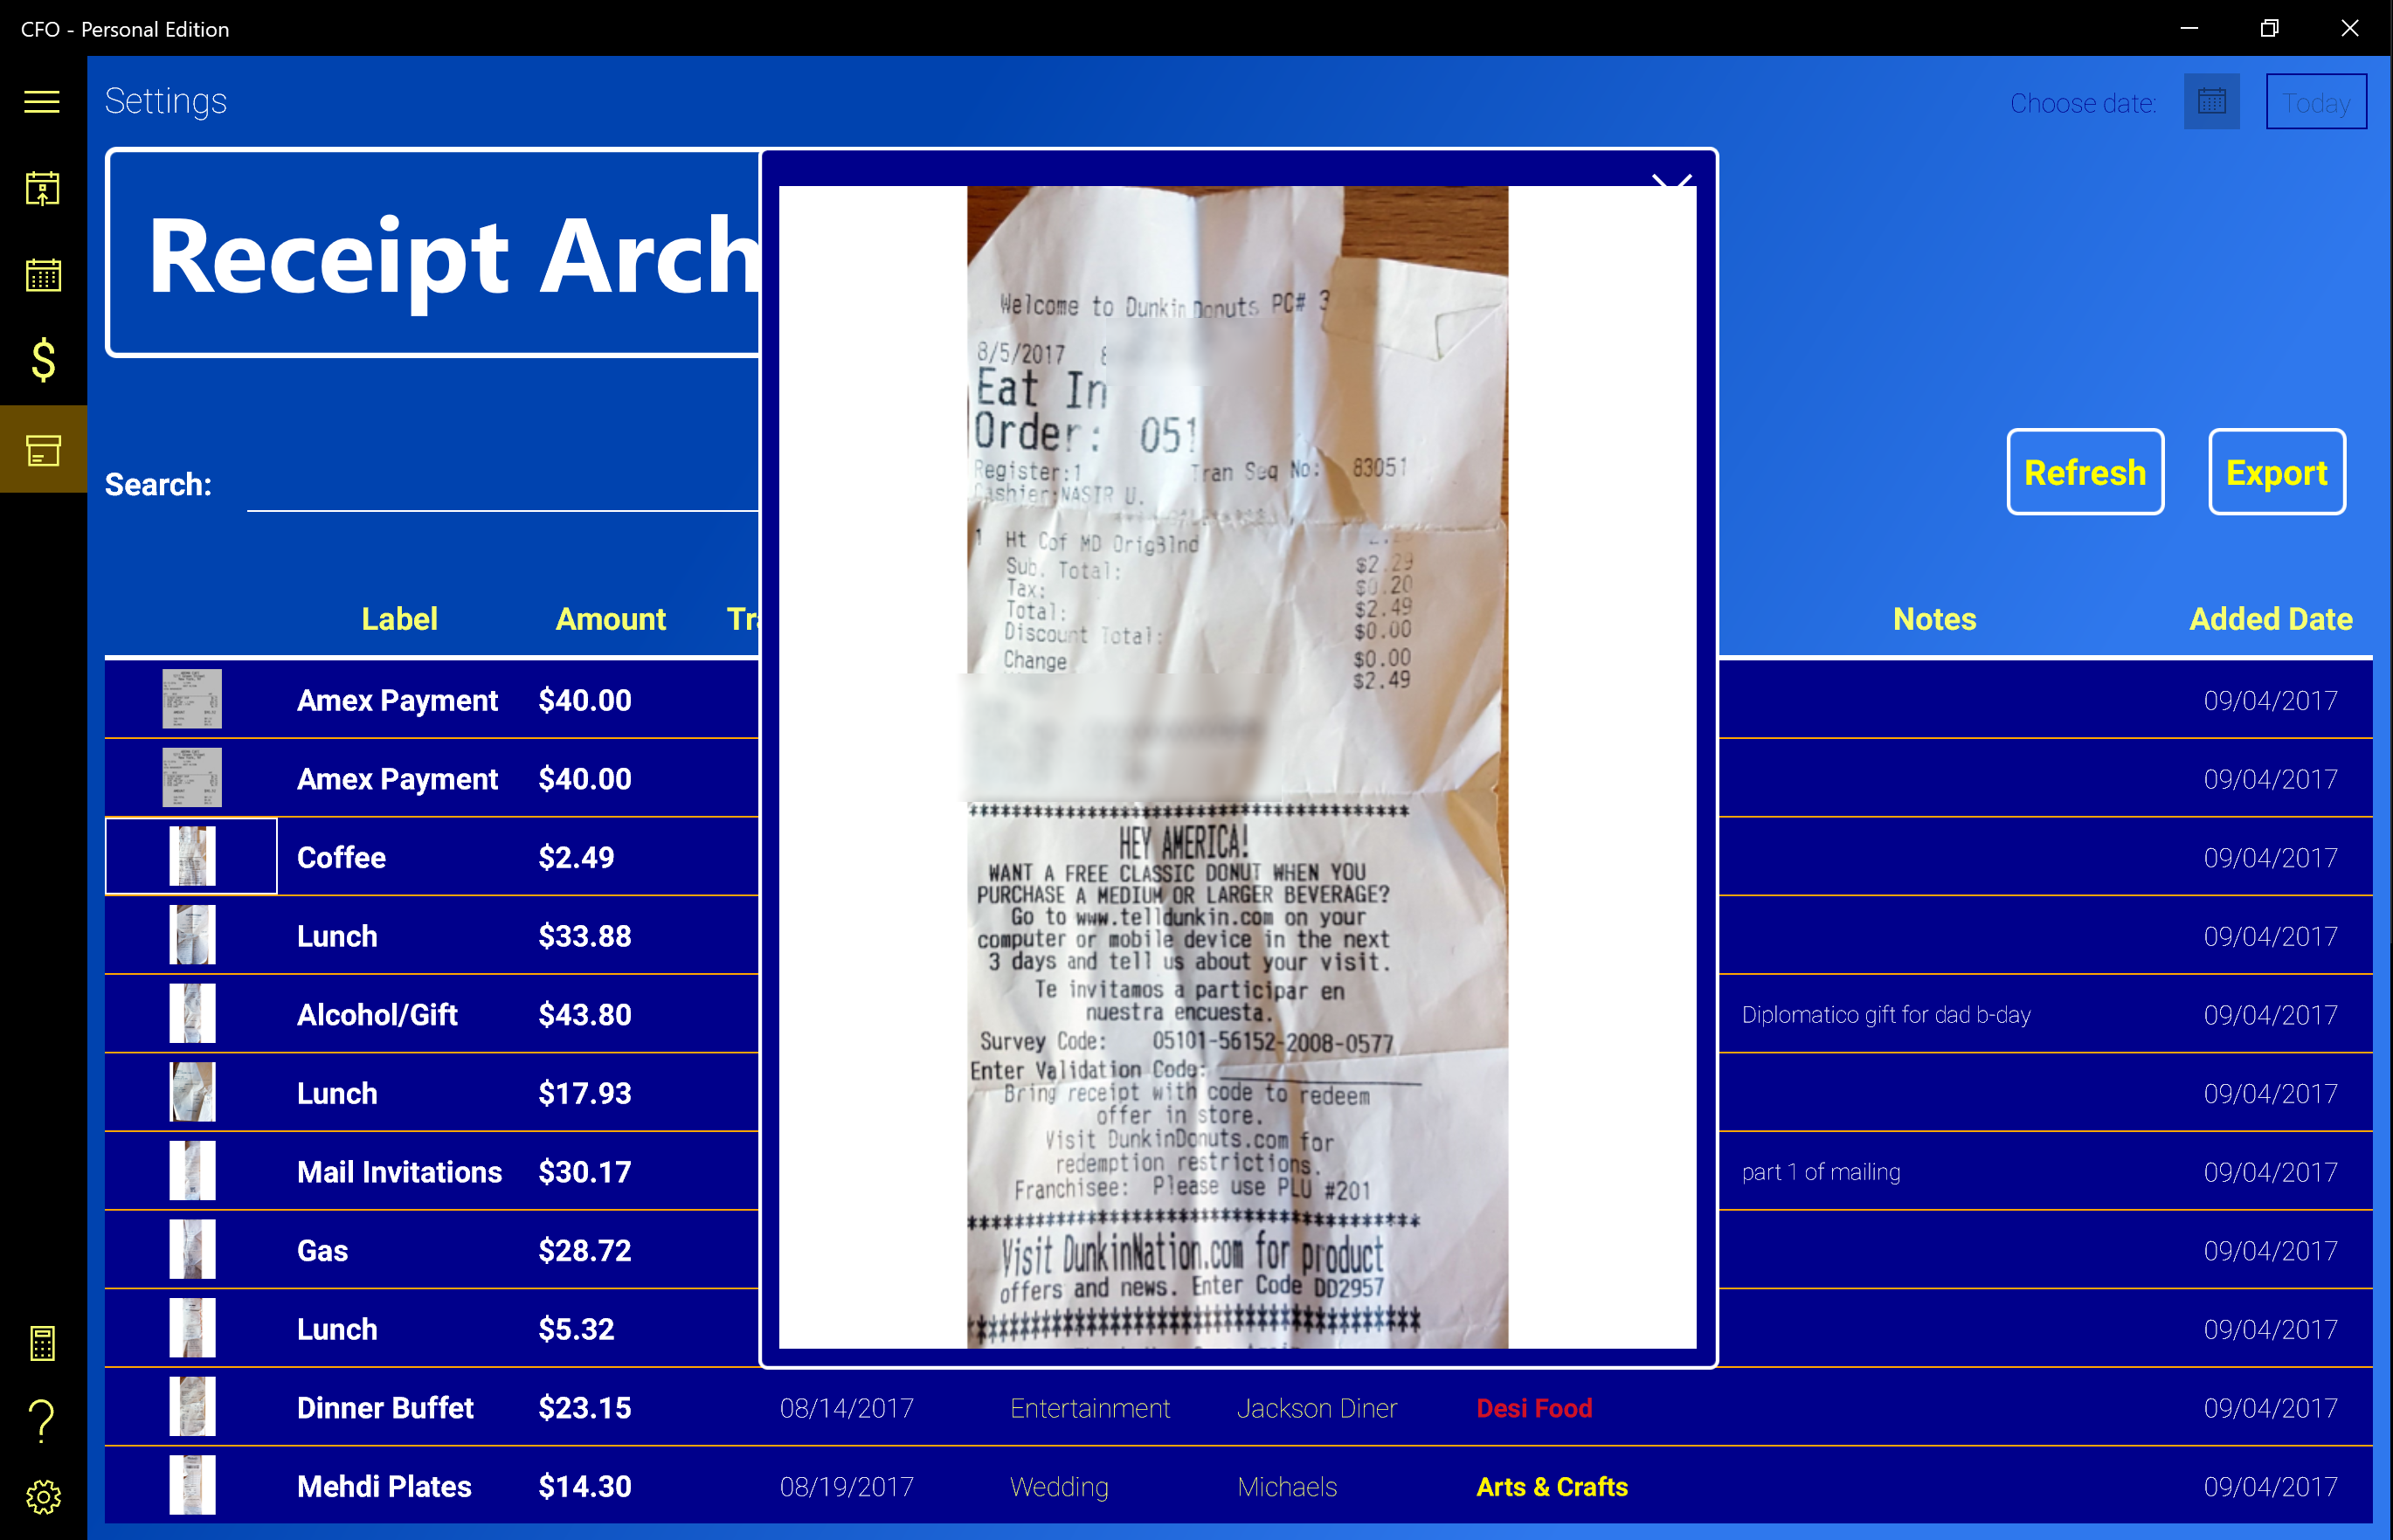
If you click on the image in the Editor (above the Camera and Import buttons) you can view a larger version of the image and can zoom in to see the Receipt image in greater detail.
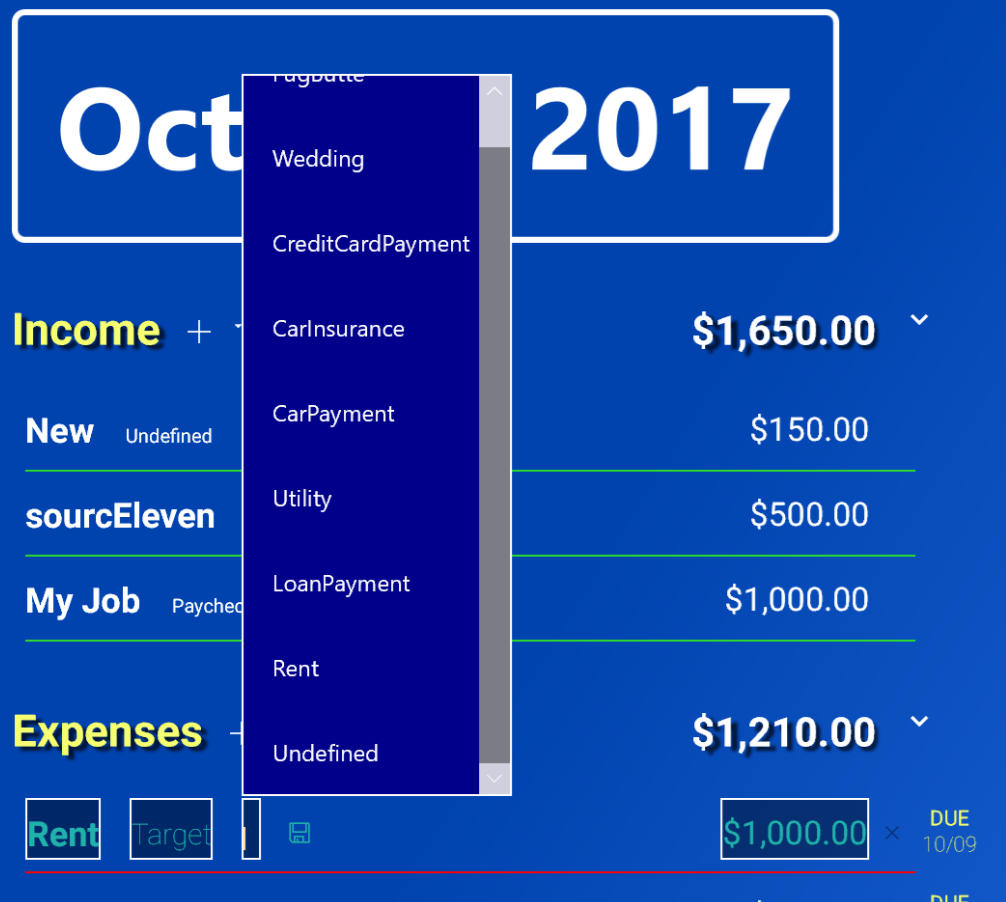
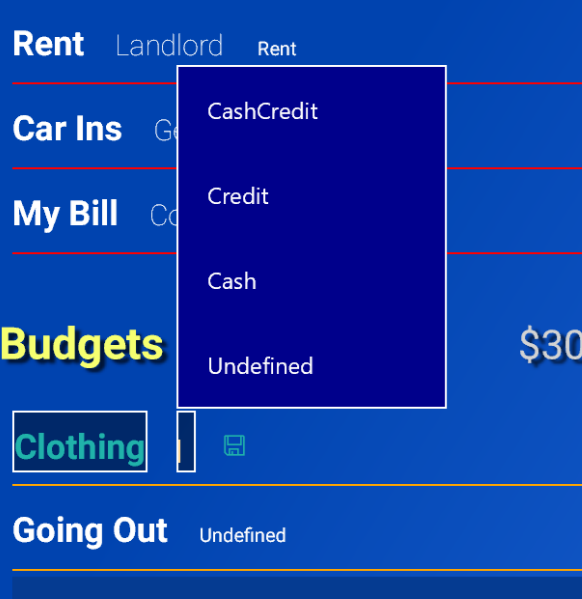
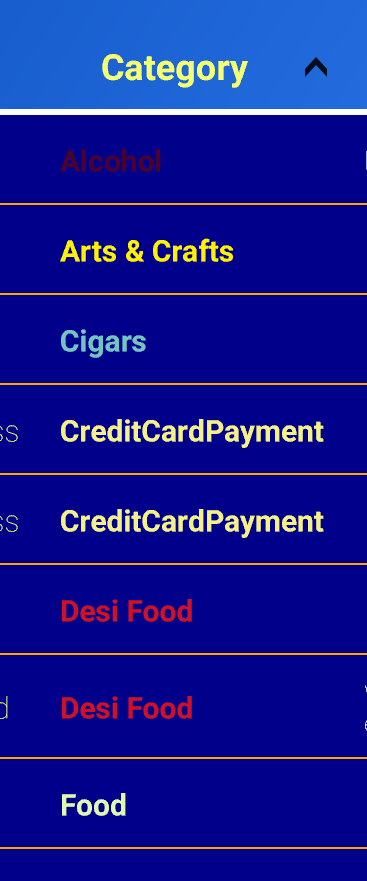
One of the features on the CFO app that makes it very customizable is the Payee and Category system. You can add a Payee to an Expense or a Receipt only, but every type of entry has its own Category. By default, a newly created Income, Expense, Budget or Receipt is in the "Undefined" Category (and if applicable, has a Payee of "Undefined").
However, once you start selecting or creating Payees and Categories for your items, you will see how powerful these organizational tools are. Not only can you Sort any list of items by its Payee or Category, but the CFO app automatically creates Charts and Graphs based on the Categories you apply. This gives a deeper view of your money, where it came from, where it is going and where you might want to make some changes in your spending.
To Change or Add a Category (or Payee):
- Click the Edit Button on the Income, Expense or Budget you want to change the Category for. For a Receipt, click on the Receipt in the Receipt List to get to the Receipt Editor.
- Replace the text in the Category or Payee field. As you type, suggestions will be made to you from previously created Categories and Receipts. To select one of these, click or tap it or use the arrow keys to highlight it and then hit Enter.
- If you are typing a new Category or Payee name that doesn't already exist, pressing Enter while in the field will create a new Payee or Category with that name. That entry will now appear in the suggestions list.
NOTE: Each Receipt Category is given a color at random when you create it. In future releases of CFO, the Receipt Category colors (as well as other colors) will be customizable.
The Payees you create are shared between Expenses and Receipts. Creating a Payee for an Expense will make that Payee avaible for Receipts as well.
Categories are specific to their types. So creating an Expense Category called "Utilities" will make that Category available to other Expenses only. To make the "Utilities" Category available to Receipts as well, you must create a "Utilities" category under a Receipt.
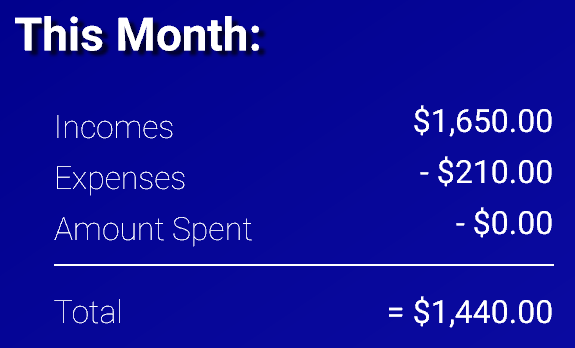
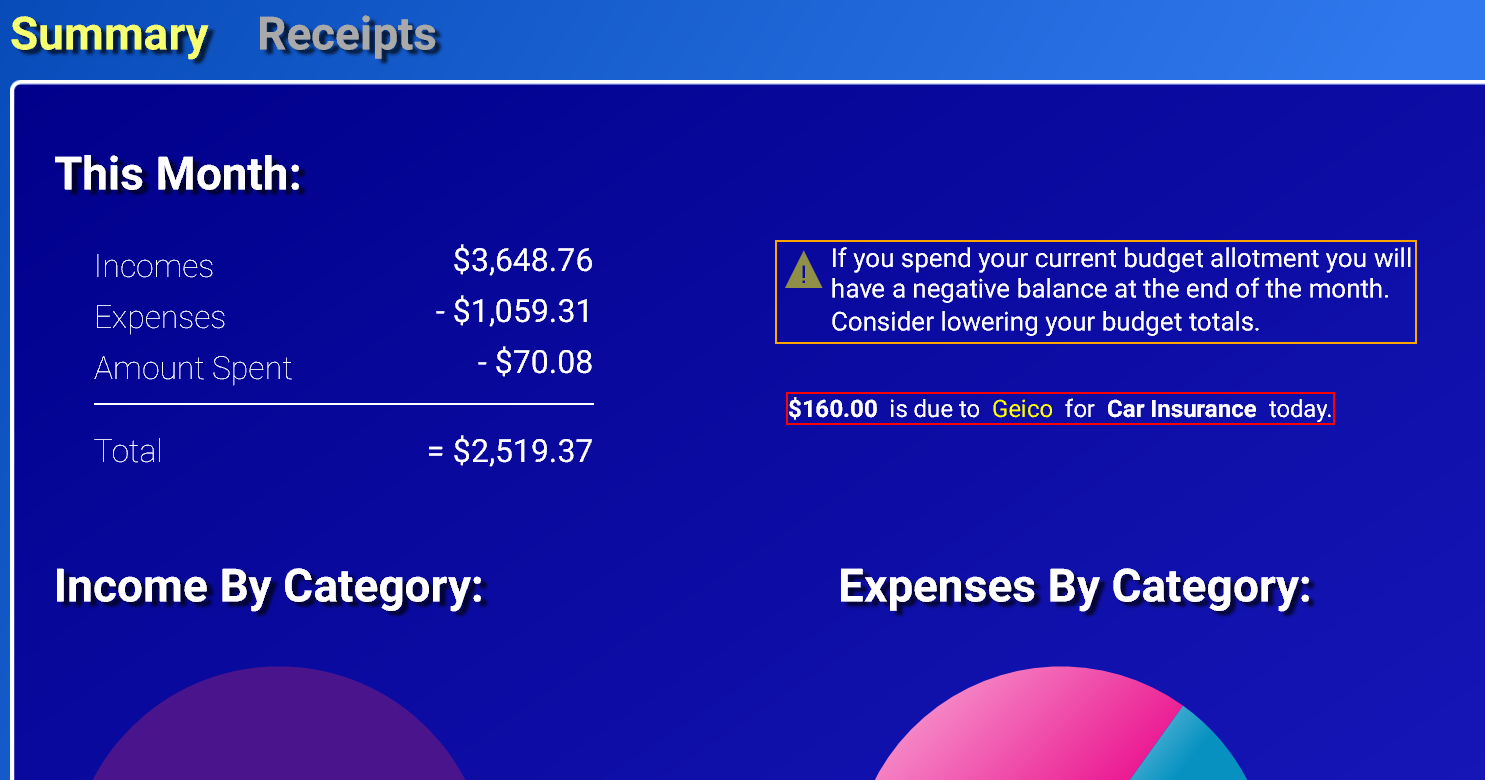
To the right hand side of the Income, Expense and Budget Lists is the Summary View (unless you have a Budget selected, then the Receipt List for that Budget occupies this space). The Summary View shows you the calculation that is used to give you your Grand Total for the Month, which is the Amount you have remaining to spend or save.
To the right of that calculation is a space where the following alerts may be presented:
- Budget Overflow Warning - If the total amount of all your Budgets exceeds the amount of money that you have after subtracting your Expenses from you Incomes, you will get a warning. This is designed to alert you that if you spend the total amount you alloted to your budgets, you will end up with a negative balance at the end of the month. To fix this, you can Edit your Budget Amounts to be less, add Incomes, delete Expenses or close large Budgets so that you don't spend any more for that Budget this month.
- Expense Due Warning - If you have an Expense due today, an alert will appear here. If you have already marked an Expense that is due today as "Paid", it will not appear. Marking an Expense as "Paid" on the day it's due will remove the alert.
The bulk of the Summary View is dedicated to the Charts which display statistics on your Incomes, Expenses, Budgets and Receipts. These Charts are helpful in giving you a more detailed view of where you money has come from and where it is going so you can plan for future months. The Charts are especially useful afer having assigned Payees to Expenses and Receipts and Categories to all items.
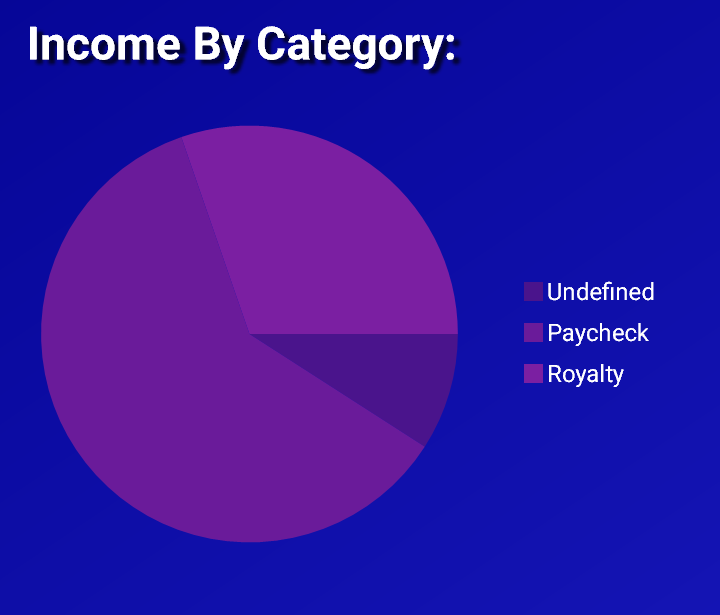
- Income By Category - Shows your Incomes broken down by Category. See from which Categories you receive the most money each Month.
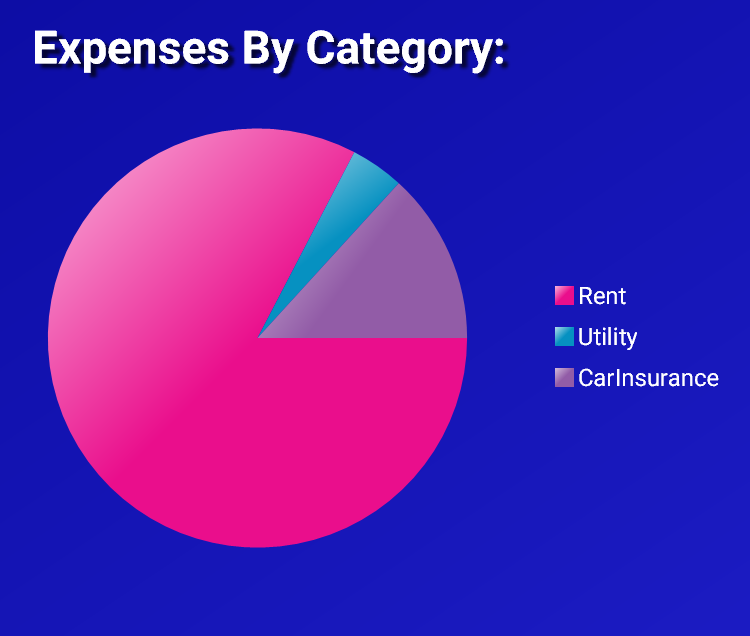
- Expenses By Category - Shows your Expenses broken down by Category. See where most of your money goes and where you might want to decrease your bills.
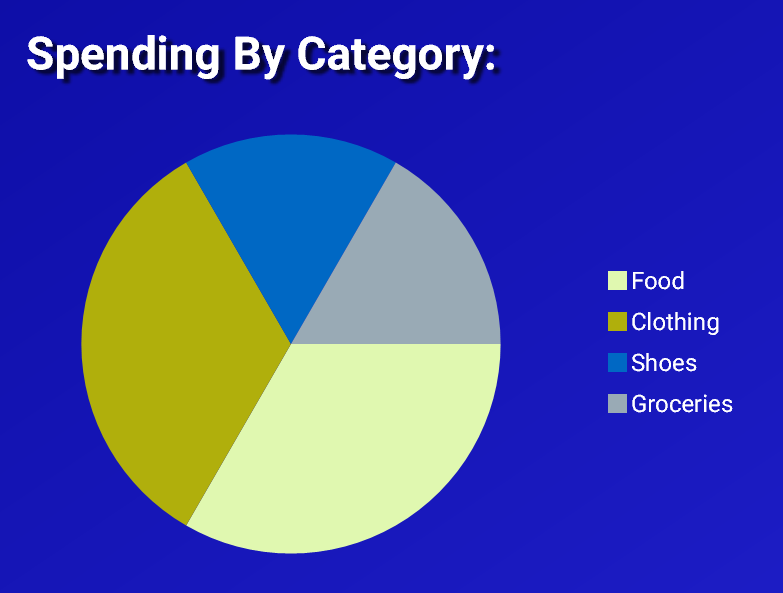
- Spending By Category - Shows your Receipts broken down by Category. Like Expenses, you can track for which Categories you spend most of your money. If you spend too much on one thing (i.e. Electronics) you can see this at a glance and adjust your spending in the future.
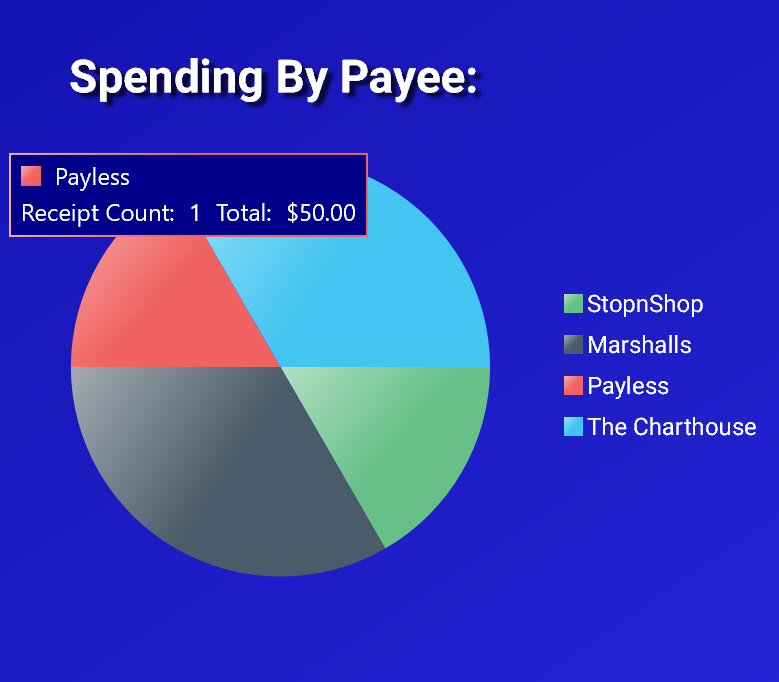
- Spending By Payee - Shows your Receipts broken down by Payee. This will tell you at which locations you have done most of your purchasing/shopping for the Month.
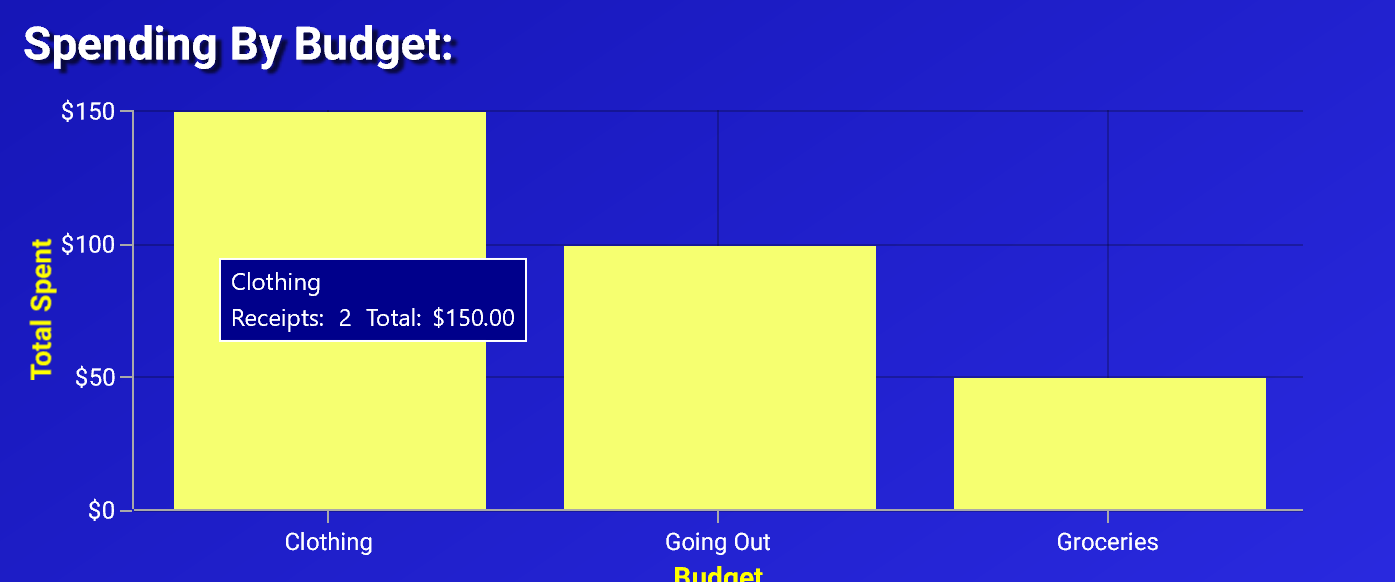
- Spending By Budget - Shows how much has been spent in each Budget so far.
If you hover the mouse over a slice of any chart, you can get details for that slice. For instance, in the Spending By Category Chart, each slice represents a Receipt Category. Hovering over that slice will show the Number and Total Amount of Receipts in that Category.
Grand Total
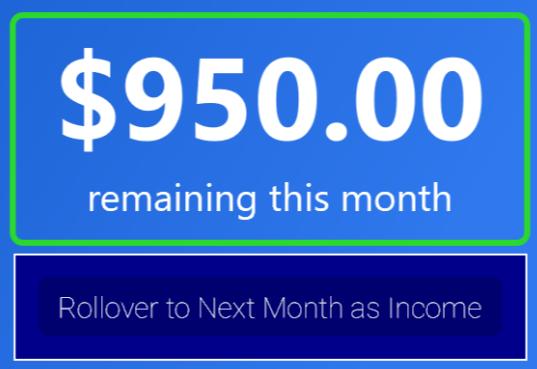
At the top right of the Month View is the Grand Total. This is a number that you want to keep above zero, as it is the Total Amount you have left this month after subtracting all of your Expenses and Receipts (daily spending) from your Incomes. If it is negative, that means you have spent more than you made this month.
If your Grand Total is above zero at the end of the month, you can Copy it to the next Month as a "Rollover Income" by right clicking on the number and selecting "Rollover to Next Month as Income". If you decide to save this money instead of spend it next month (as you should), it's best not to roll it over.
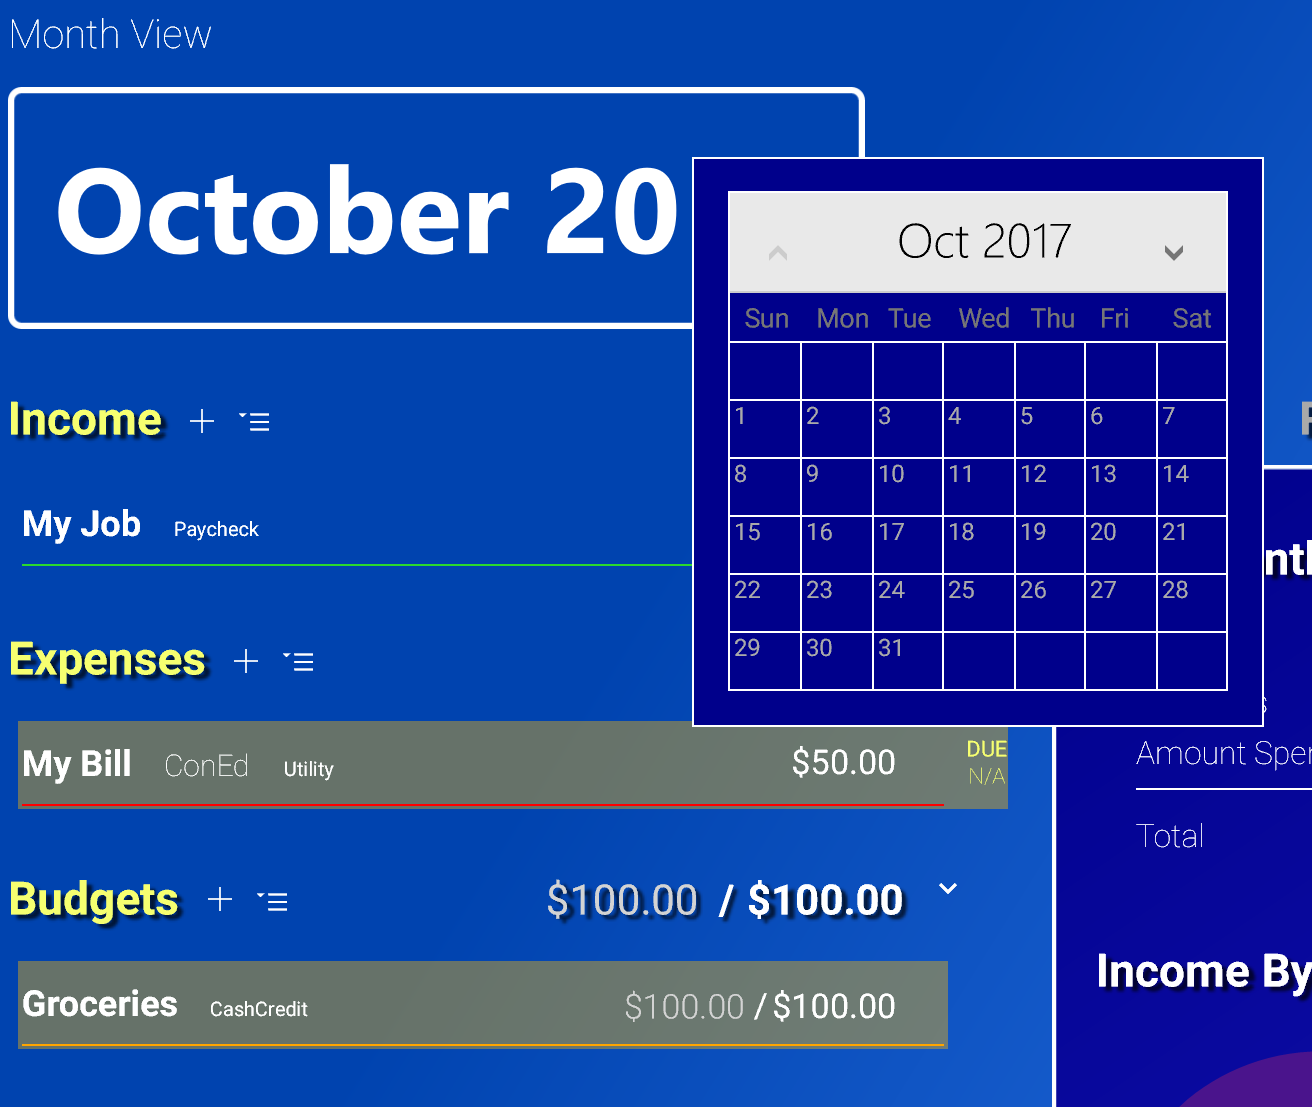
To move between Months, hover the mouse over the Month Name so that the navigation arrows appear. Click on one of the arrows to go to the next or previous Month.
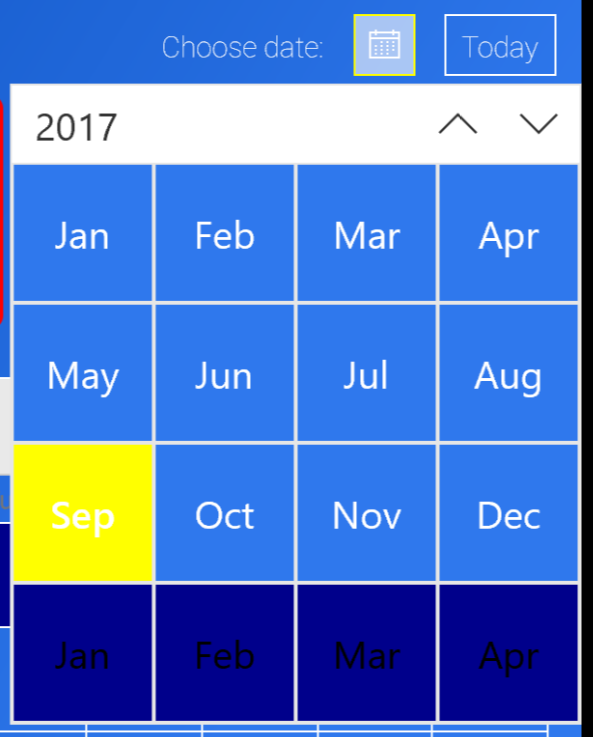
To jump to a specific Month in the past or future, click the Calendar button next to "Choose Date" on the top right of the app screen. This will allow you to choose any day. Once you choose a day, the Month View will jump to the Month containing the day you selected.
To return back to the current Month at any time, click the "Today" button on the top right of the app screen next to the "Choose Date" Calendar button.
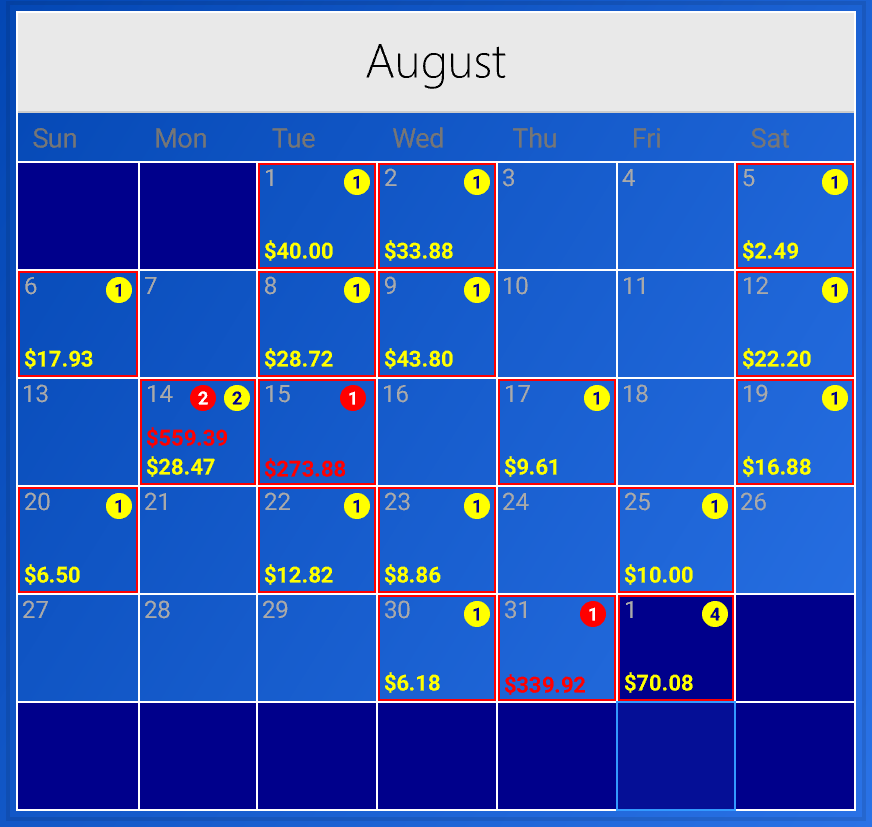
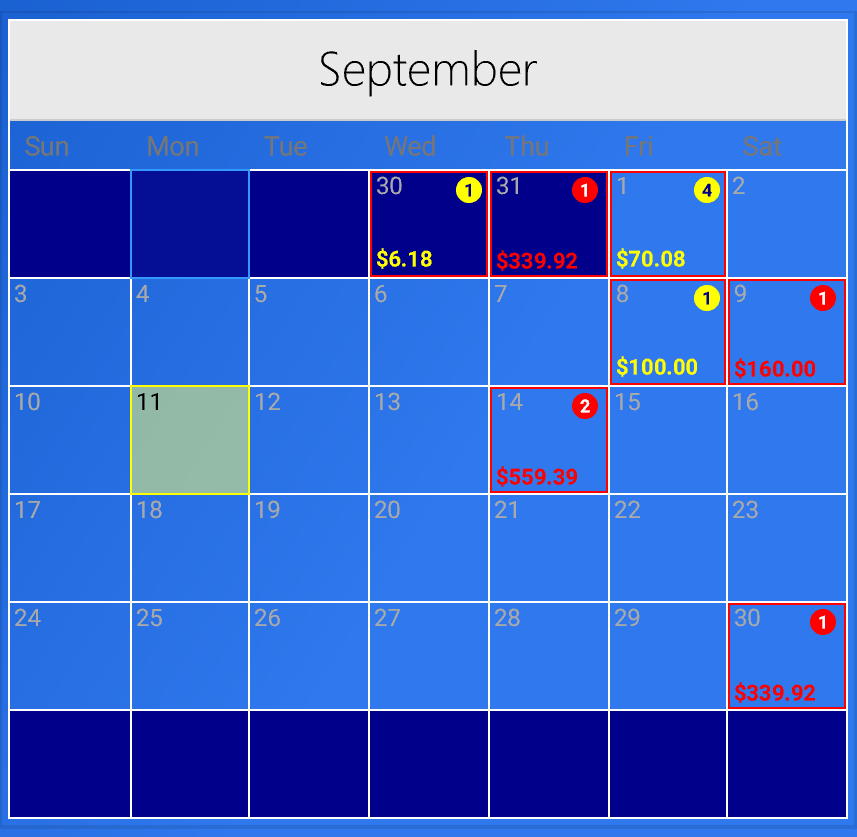
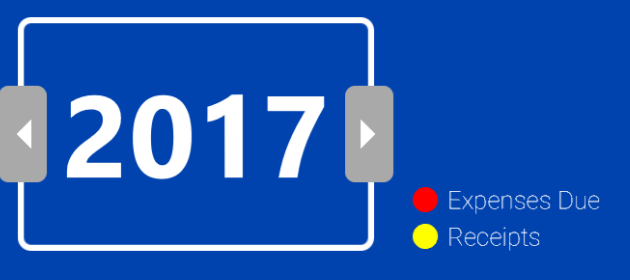
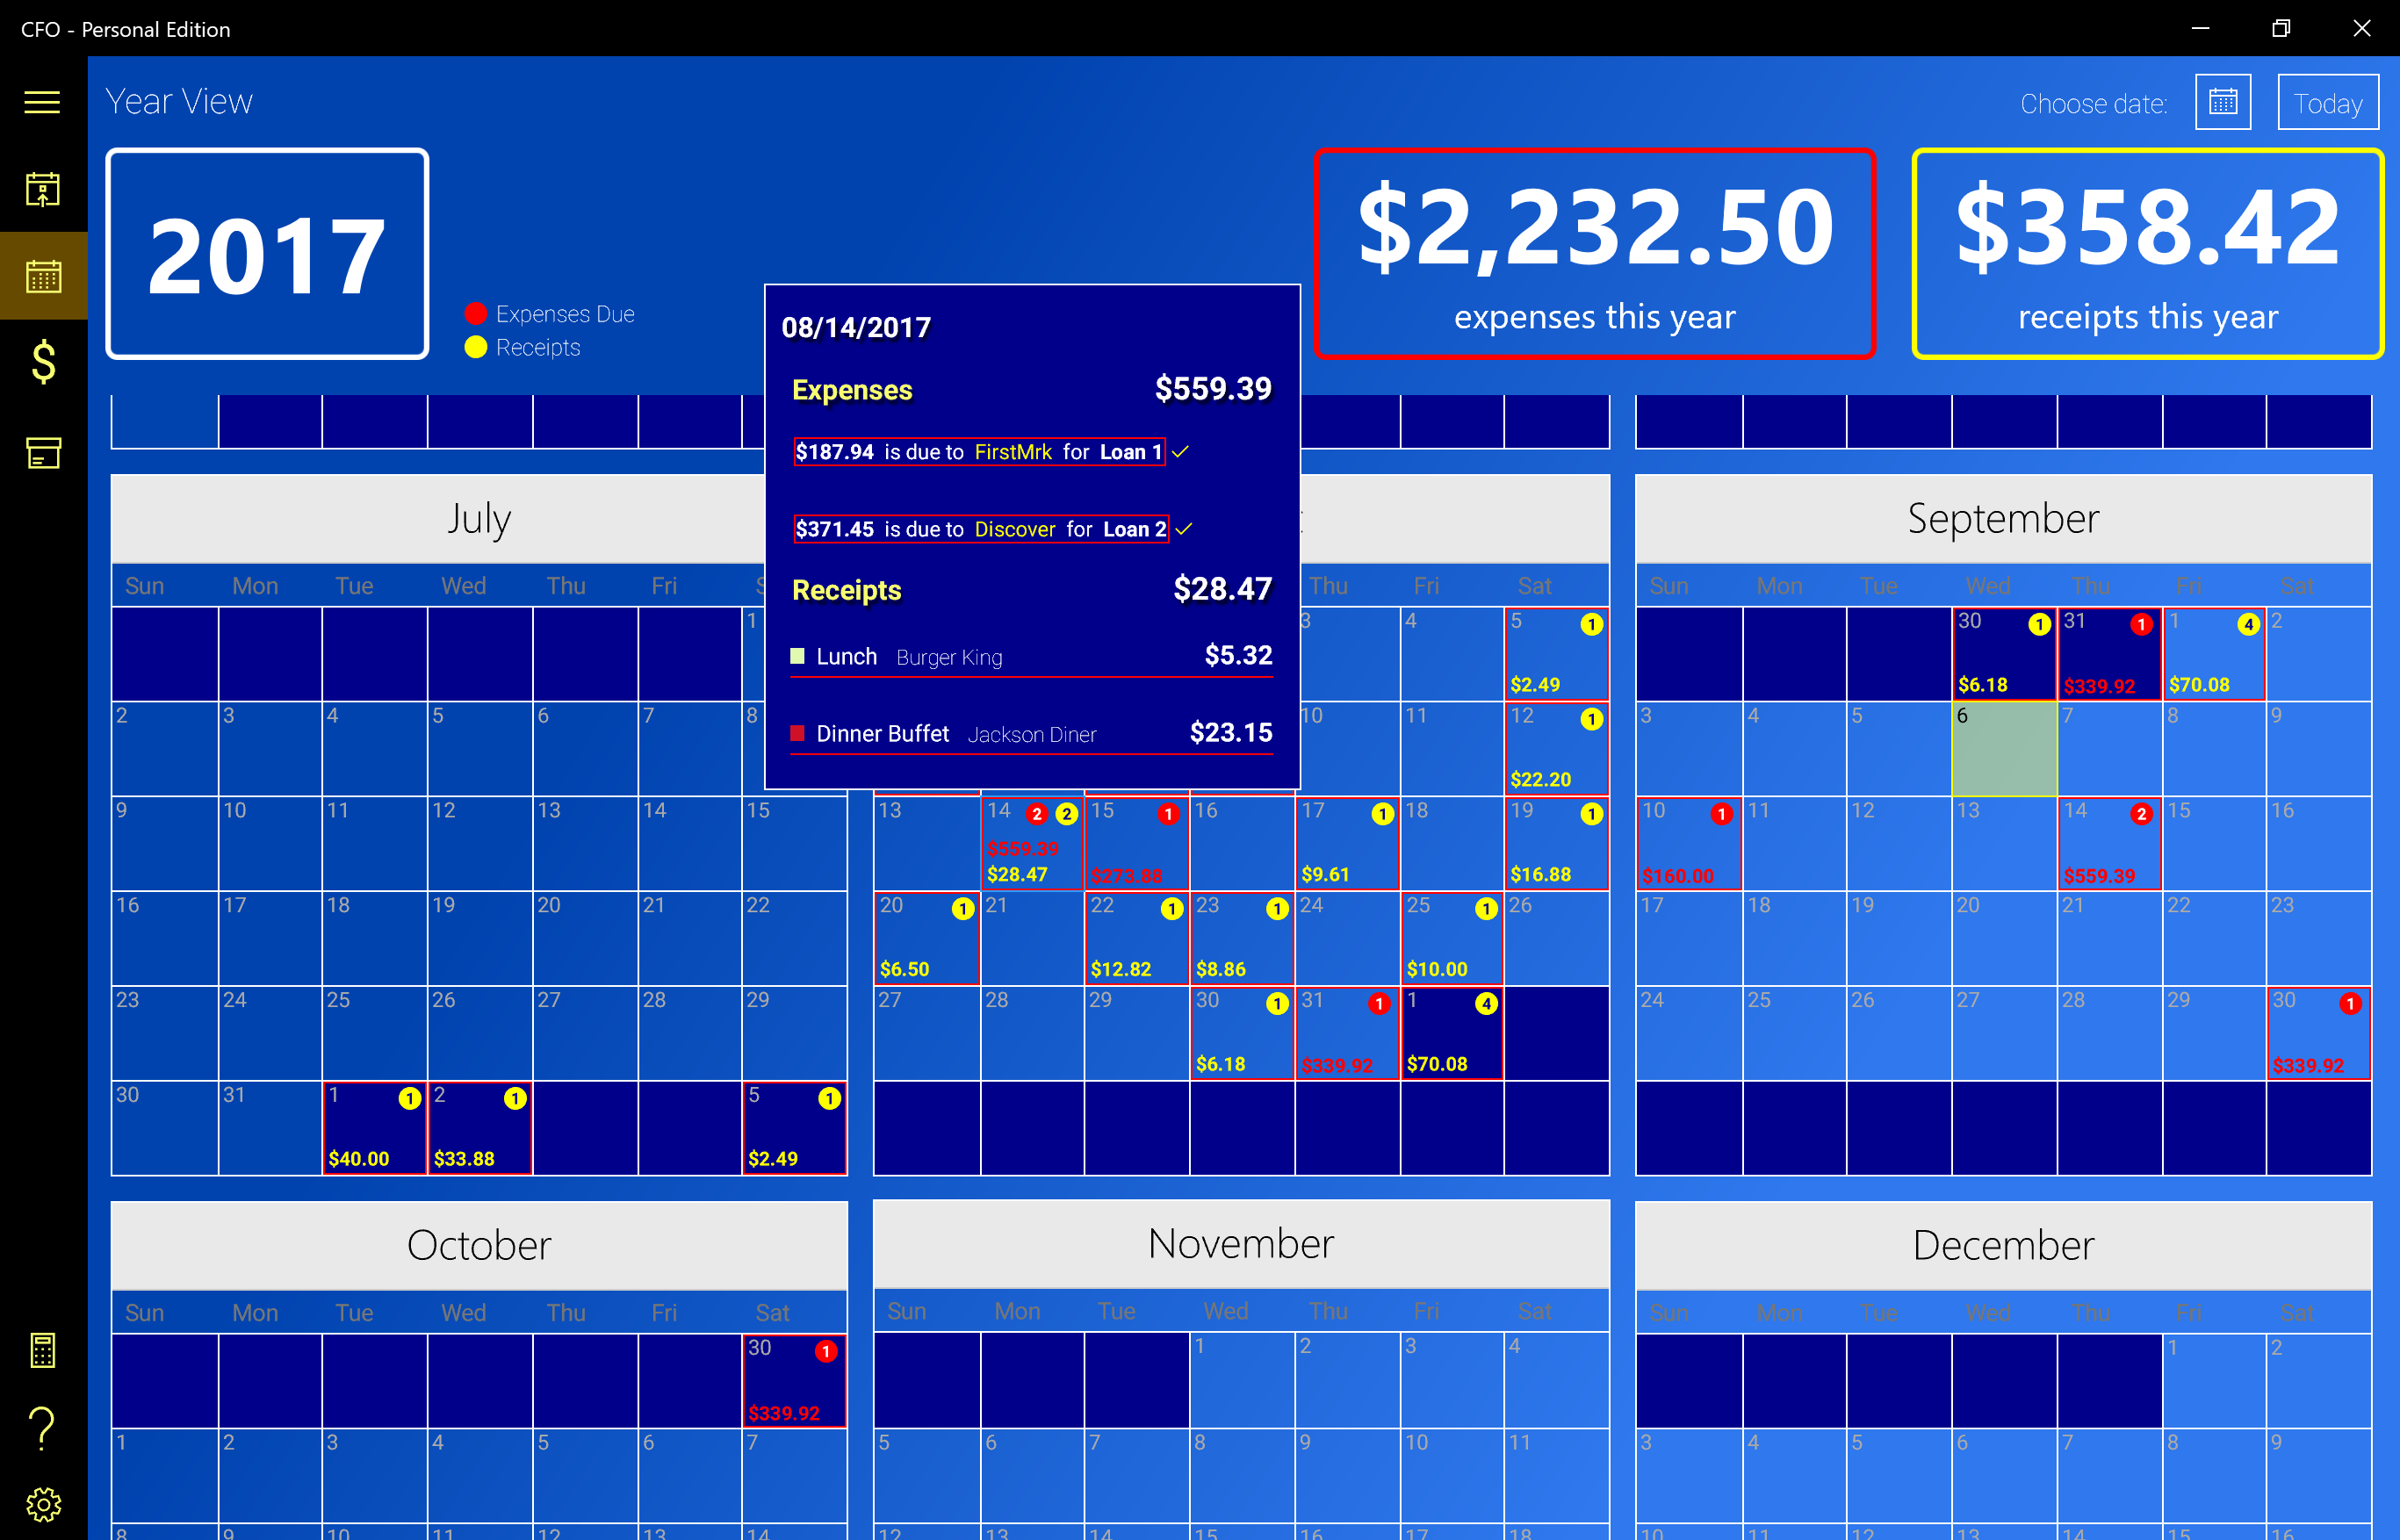
The Year View gives you an overview of your spending across the entire year. There is an Indicator and Total Amount displayed on each day that you have either an Expense Due or a Receipt transaction that took place. This allows you to see at a glance how much you've been spending each day and on which days you have not spent any money.
All of the information in the Year View comes from the Expense Due Dates and Receipt Transaction Dates that are set in the Month View so be sure to assign those properties in order to have the Year become populated correctly.
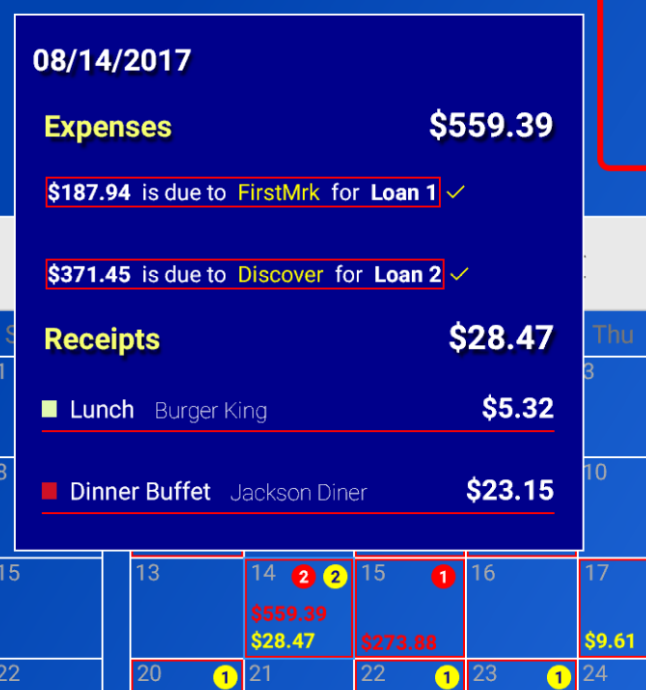
The current Day is highlighted in yellow and every day that contains an Expense or Receipt has a red border.
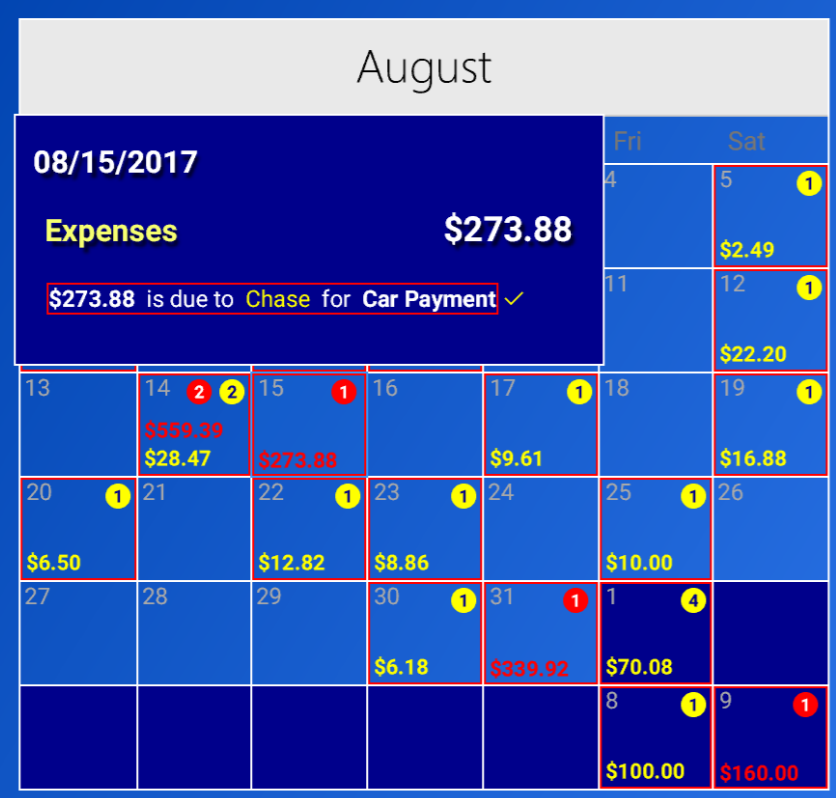
If you click on a Day in the Calendar that has Expenses, Receipts or Both, you can get details about the items for that day. For Expenses, the Amount Due, the Payee and the Label field are shown as well as the Total Amount of Expenses Due that day. If the Expense(s) for that Day have been marked as "Paid" in the Month View, a yellow check mark will appear next to the information indicating that it has been Paid already.
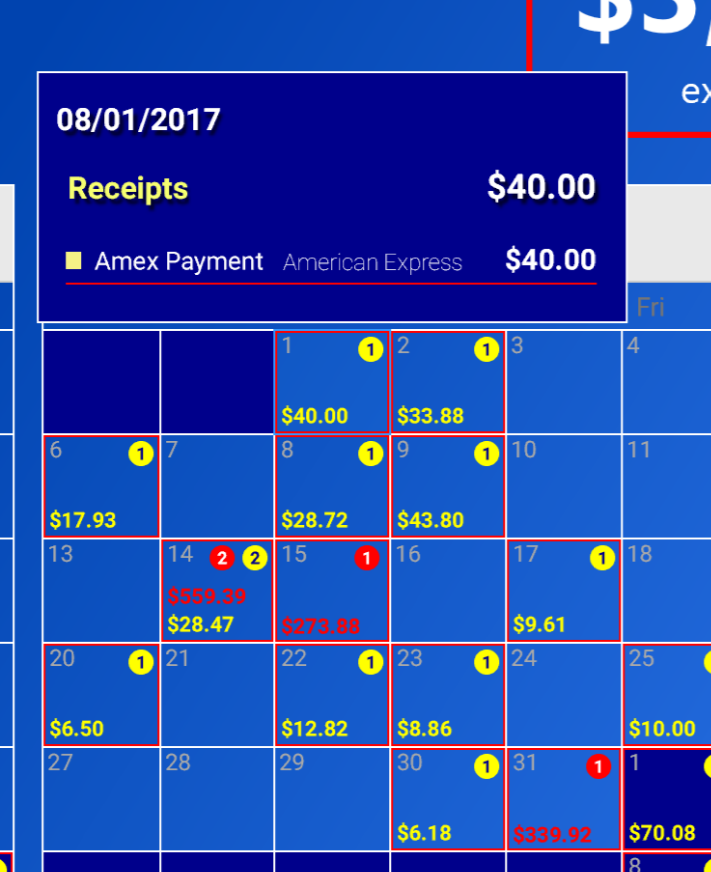
For Receipts, the Category color, Label and Payee are shown for each Receipt of the day as well as the individual Amounts of each Receipt and the Total Amount. If many Receipts have been entered for that day, the list can be scrolled by using the up and down arrow keys after clicking in the Day of the Calendar to reveal the Details List.
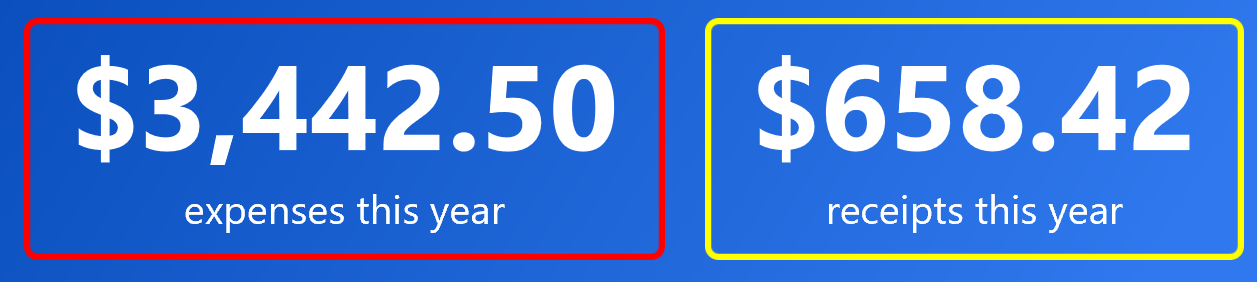
Grand Totals
Just like in the Month View, the Year View has a Grand Total section. In the Year View, the Total Amount of all Expenses for the Year and the Total Amount of all Receipts in the Year are shown.
Similar to navigation between Months, you can hover the mouse over the Year display to reveal arrows that when clicked will take you to the next or previous Year.
You may also use the Calendar button on the top right of the app screen to choose your date and the Year View will update accordingly. To return to the current Year, you can click the "Today" button on the top right of the screen next to the Calendar button.
The Special Budgets section is meant to stand apart from the Month View's Budgets. In Special Budgets, you can create Budgets in the same way that you did in the Month View. However, the Budgets here are not assiociated with any calendar Month. They are one-off or long term Budgets that can be used for things such as party budgets, vacation budgets or budgeting gift money that you received that you don't want to spend recklessly.
Receipts are entered in the same way as in the Month View. Simply create a Budget, click on it and the Receipt List for that Budget will appear on the right hand side. Unlike the Month View, there is no Summary View in Special Budgets. However, the Receipts you enter in a Special Budget WILL appear in the Receipt Archive along with all other Receipts (See below for more info).
TIP: You can create a Special Budget with a total spending Amount of $0.00 if you just want to track a certain type of Payment/Receipt across a long period of time. Just use the negative balance of the Budget as an indicator of the Total Amount you have spend in that pseudo-Budget.
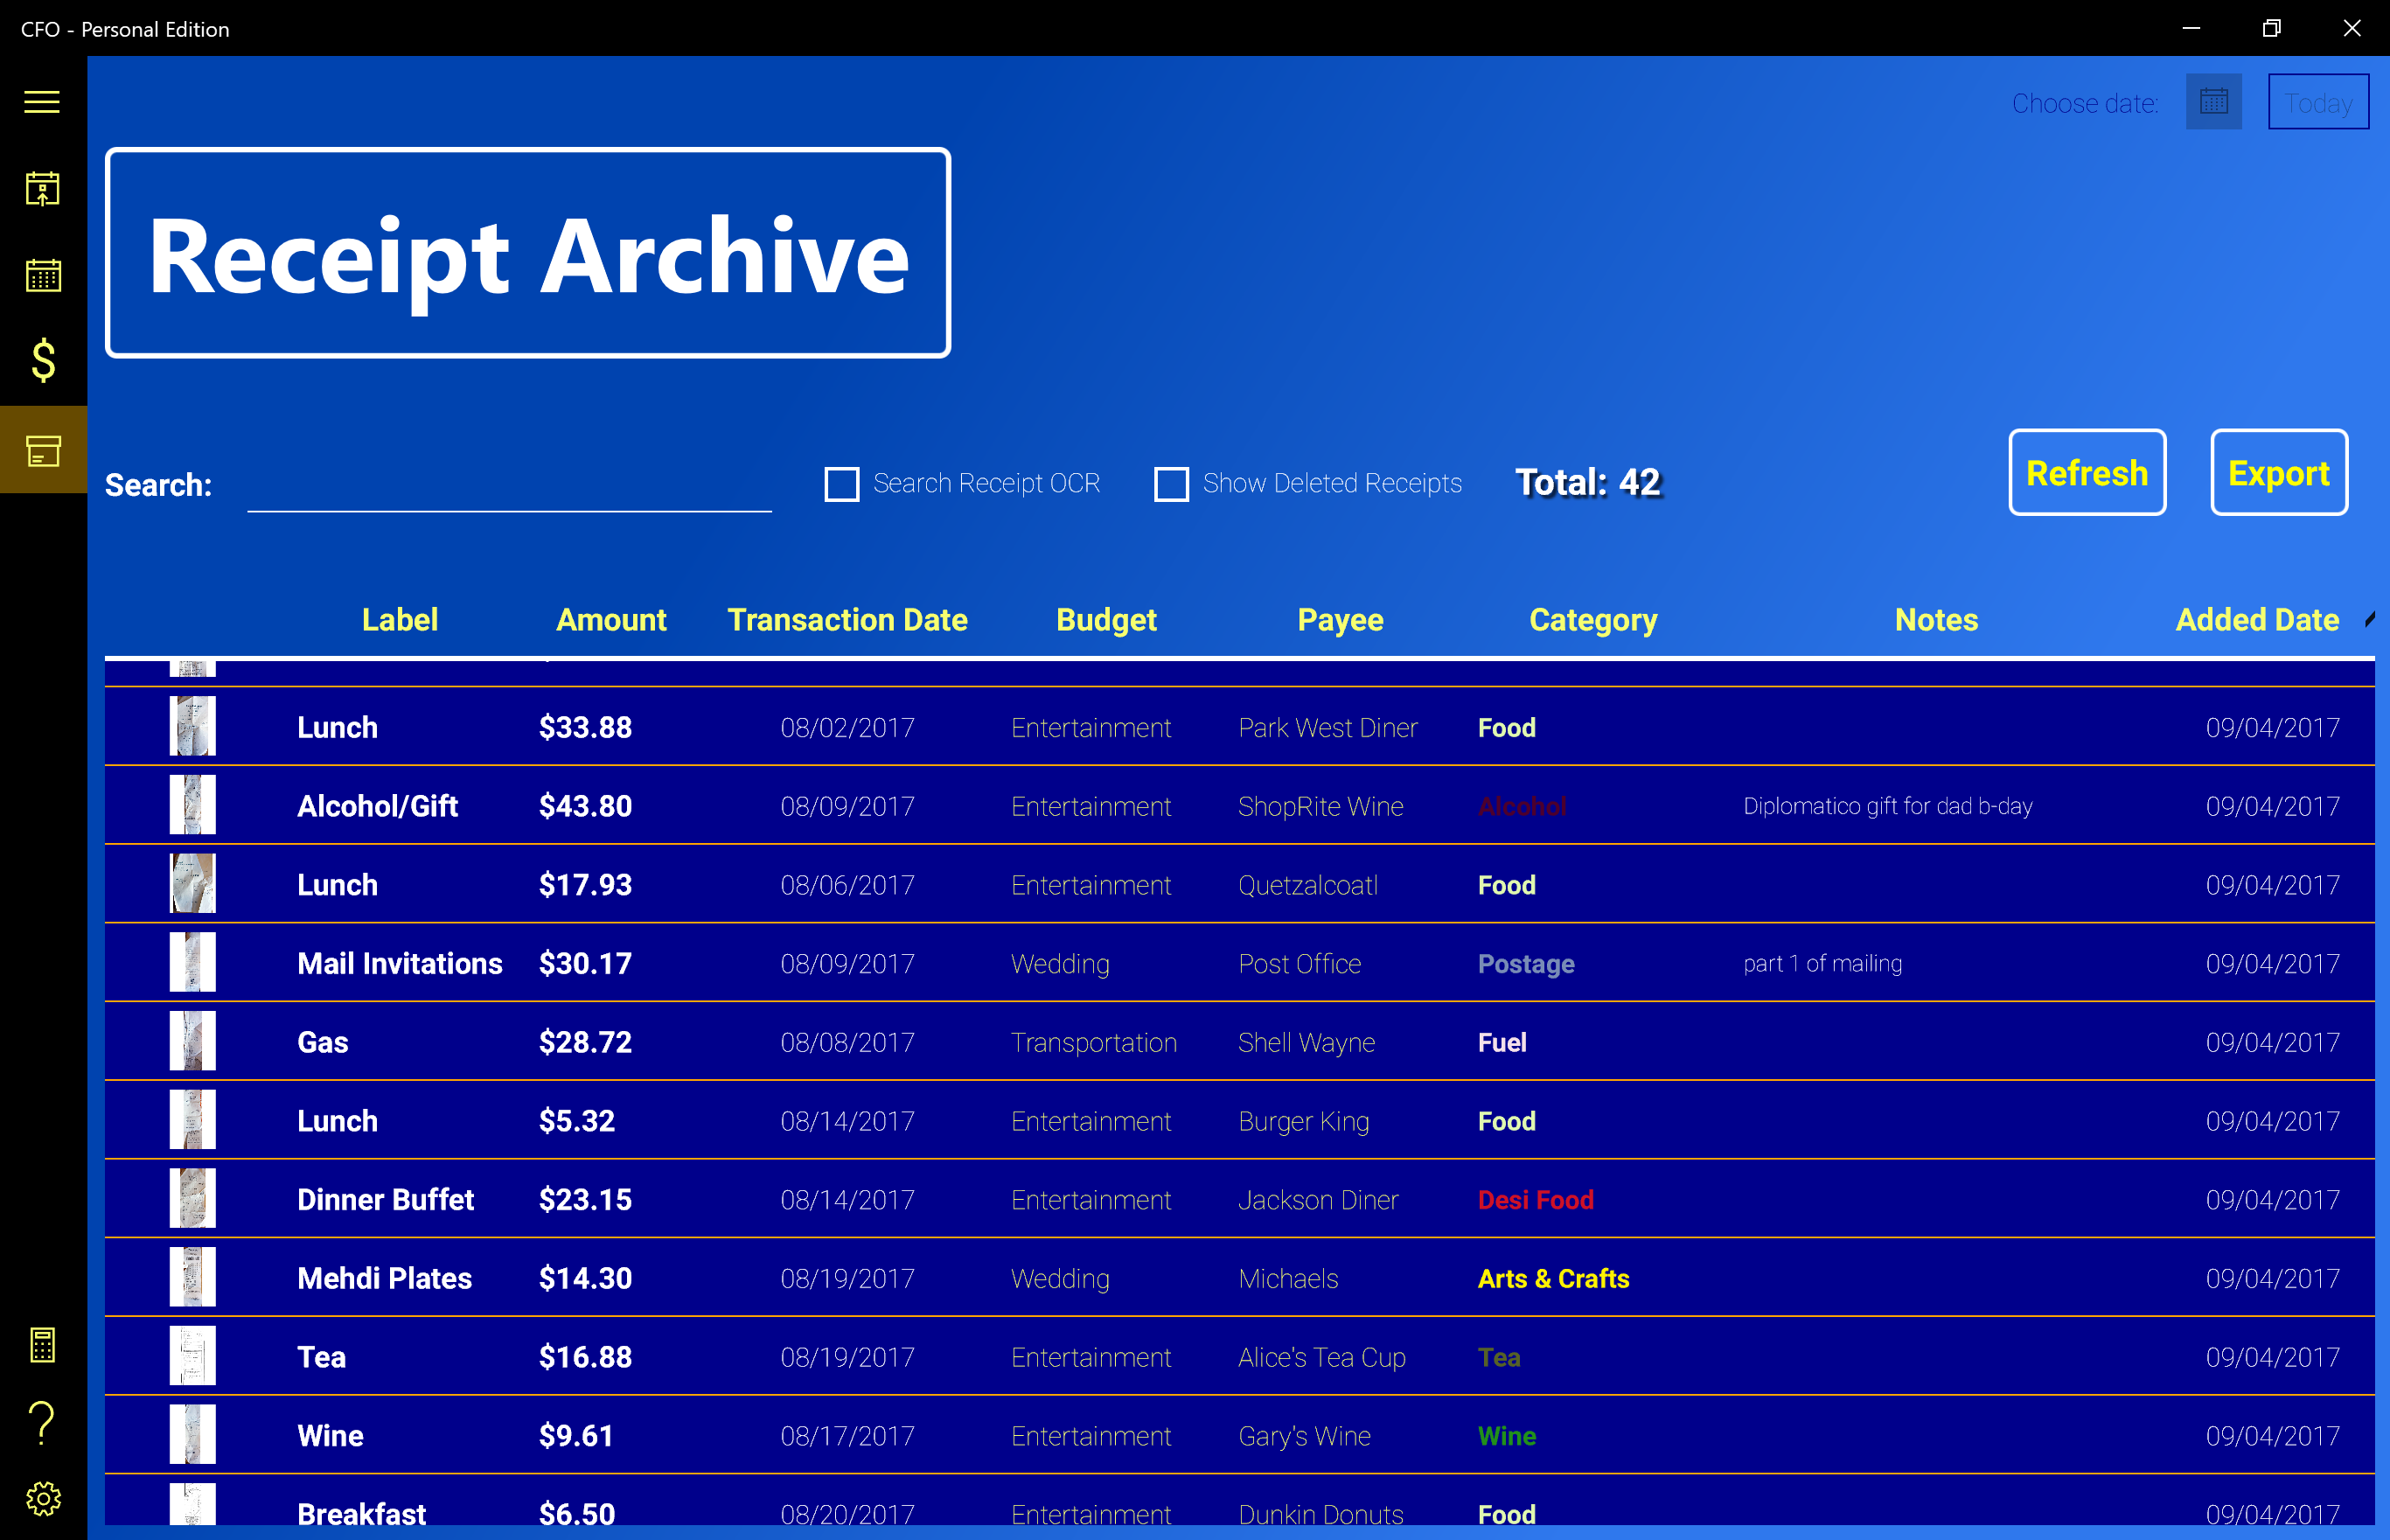
Every Receipt that you enter in the CFO app winds up in the Receipt Archive. The Archive is a database of all Receipts from the Month View and Special Budgets sections and it contains all of the Receipts you have deleted as well (unless you "Clear Deleted Receipts" in Settings, see below).
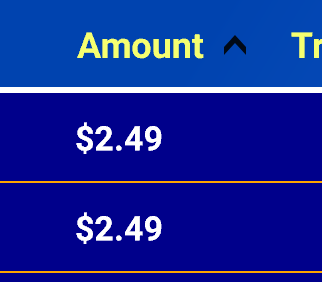
Each column of the Archive contains a different attribute of the Receipts. The columns are all resizable by dragging the space between the column Labels or the vertical space between columns. In addition, you can Sort all columns (except the Image column and Notes) in ascending or descending order by clicking on the column header. A black arrow indicator will appear to show you which order the column has been sorted in.
You can click on a Receipt Image thumbnail in any row to view a larger version of the image which you can also zoom in on.
TIP: If you click on one of the thumbnails to expand it, you can then scroll through the Receipt Images quickly by using the up and down arrows.
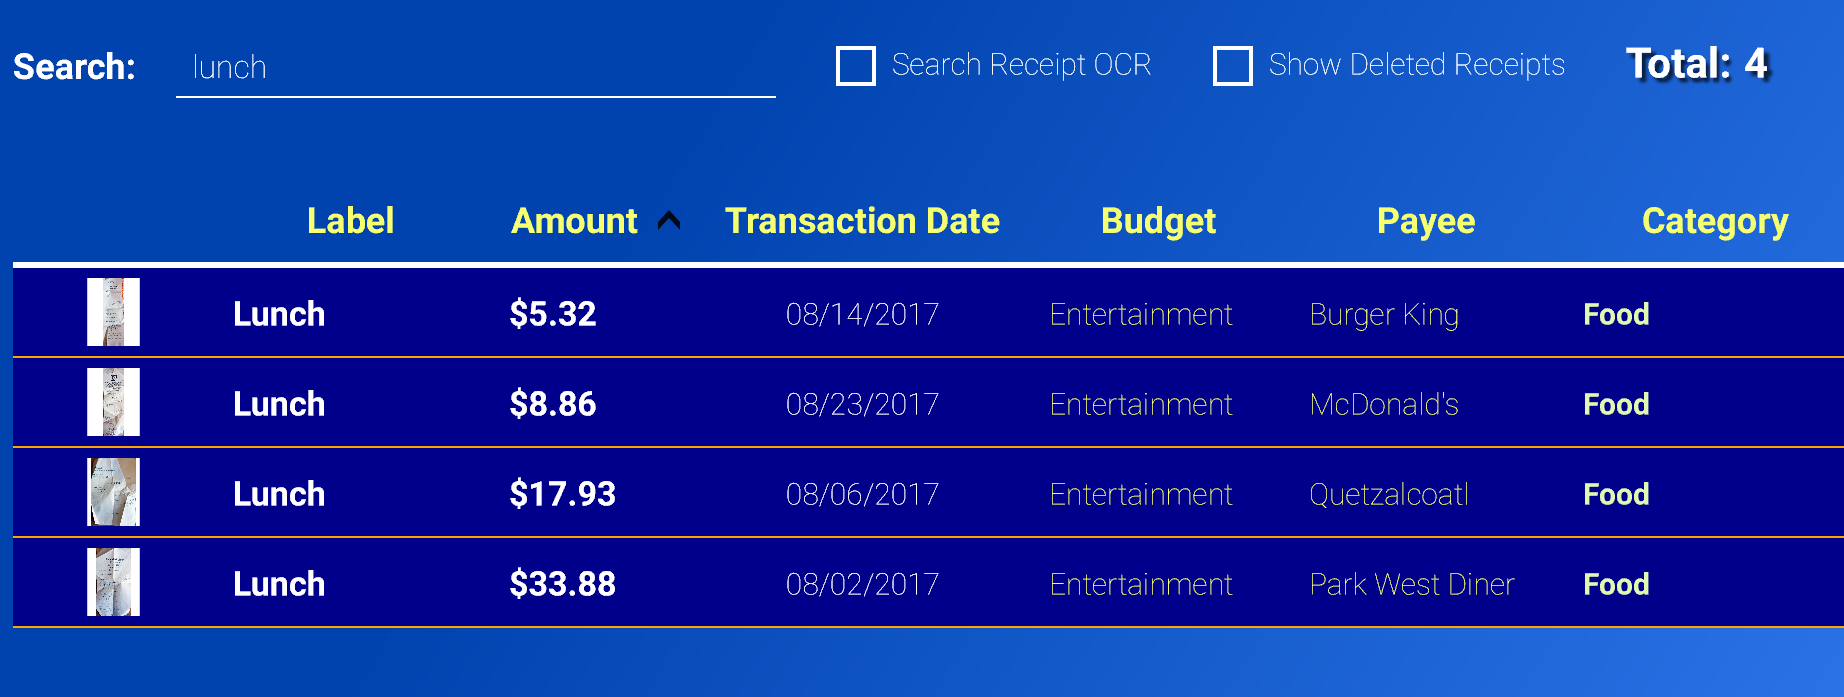
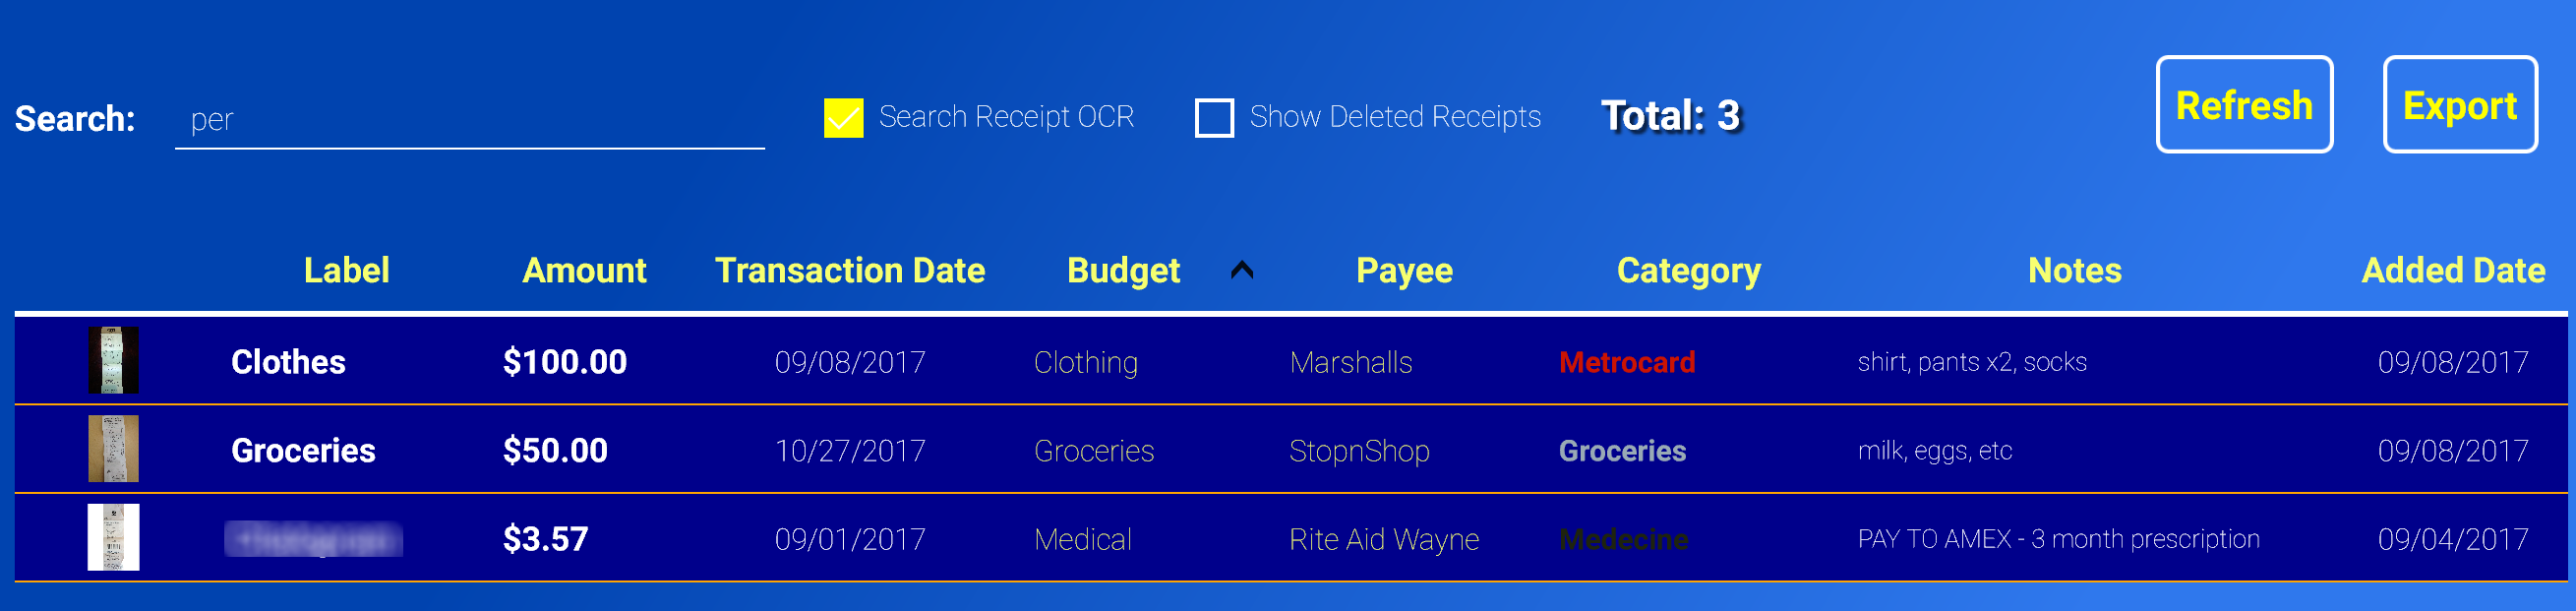
You can easily search for any Receipt in the Archive by typing in the Search Bar above the list and to the left. As soon as you start typing, the list will be filtered to only show Receipts that contain the characters that you've typed. The Total Receipts count will also change to reflect the number of Receipts that have turned up in the Search.
Initially, when you search, it is only in the Label, Amount, Transaction Date, Budget, Payee, Category, Notes and Added Dates fields. This is all the information that you entered when you created (or edited) the Receipts. If you check the box that says "Search Receipt OCR", then your search will also look inside the embedded OCR (Optical Character Recognition) metadata that was created when you took or imported the picture of your Receipt.
For example, if you took a picture of a Receipt for McDonald's on Bay Parkway in Brooklyn but never entered "Bay Parkway" or "Brooklyn" into your Receipt entry anywhere, chances are if you turn on OCR Searching and search for "Bay Parkway" or "Brooklyn" that Receipt will be included in the Search Results since those terms were most likely printed on the Receipt itself.
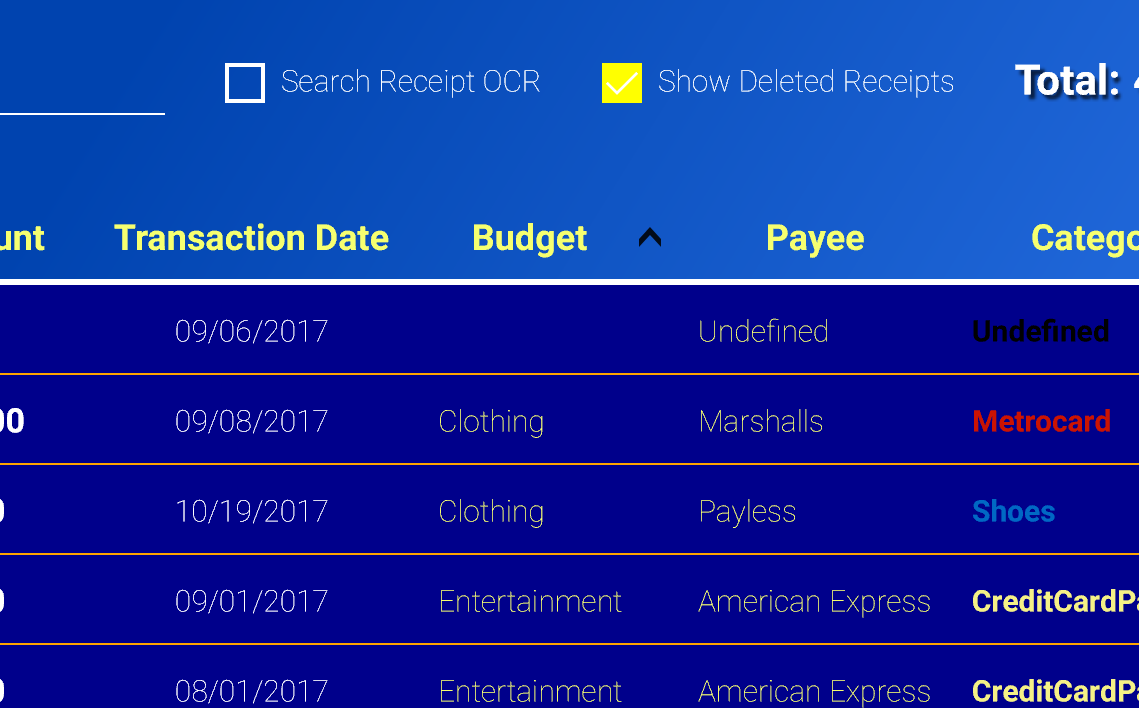
The other check box "Show Deleted Receipts" does just what it says. It will include Deleted Receipts in any Searches that you perform, including ones that include OCR.
NOTE: The "Budget" column of a Deleted Receipt will always come up blank in the Receipt Archive since the Budget property of the Receipt is wiped out when you delete it. This also goes for Receipts that were deleted as a result of you deleting their parent Budget. However, the Category and Payee of the Deleted Receipts remain intact.
Normally, any newly entered or edited Receipts will automatically show up when you navigate from the Month View or Special Budgets to the Archive. If, for some reason, you are not seeing all of the current data, you can press the "Refresh" button on the top right of the Archive Receipt List to refresh the view.
Another time you might need the "Refresh" button is if you are in the Receipt Archive, then go to Settings and click "Clear Deleted Receipts" then go directly back to the Archive. You may still see the Deleted Receipts that are now technically gone and you will need to Refresh the view.
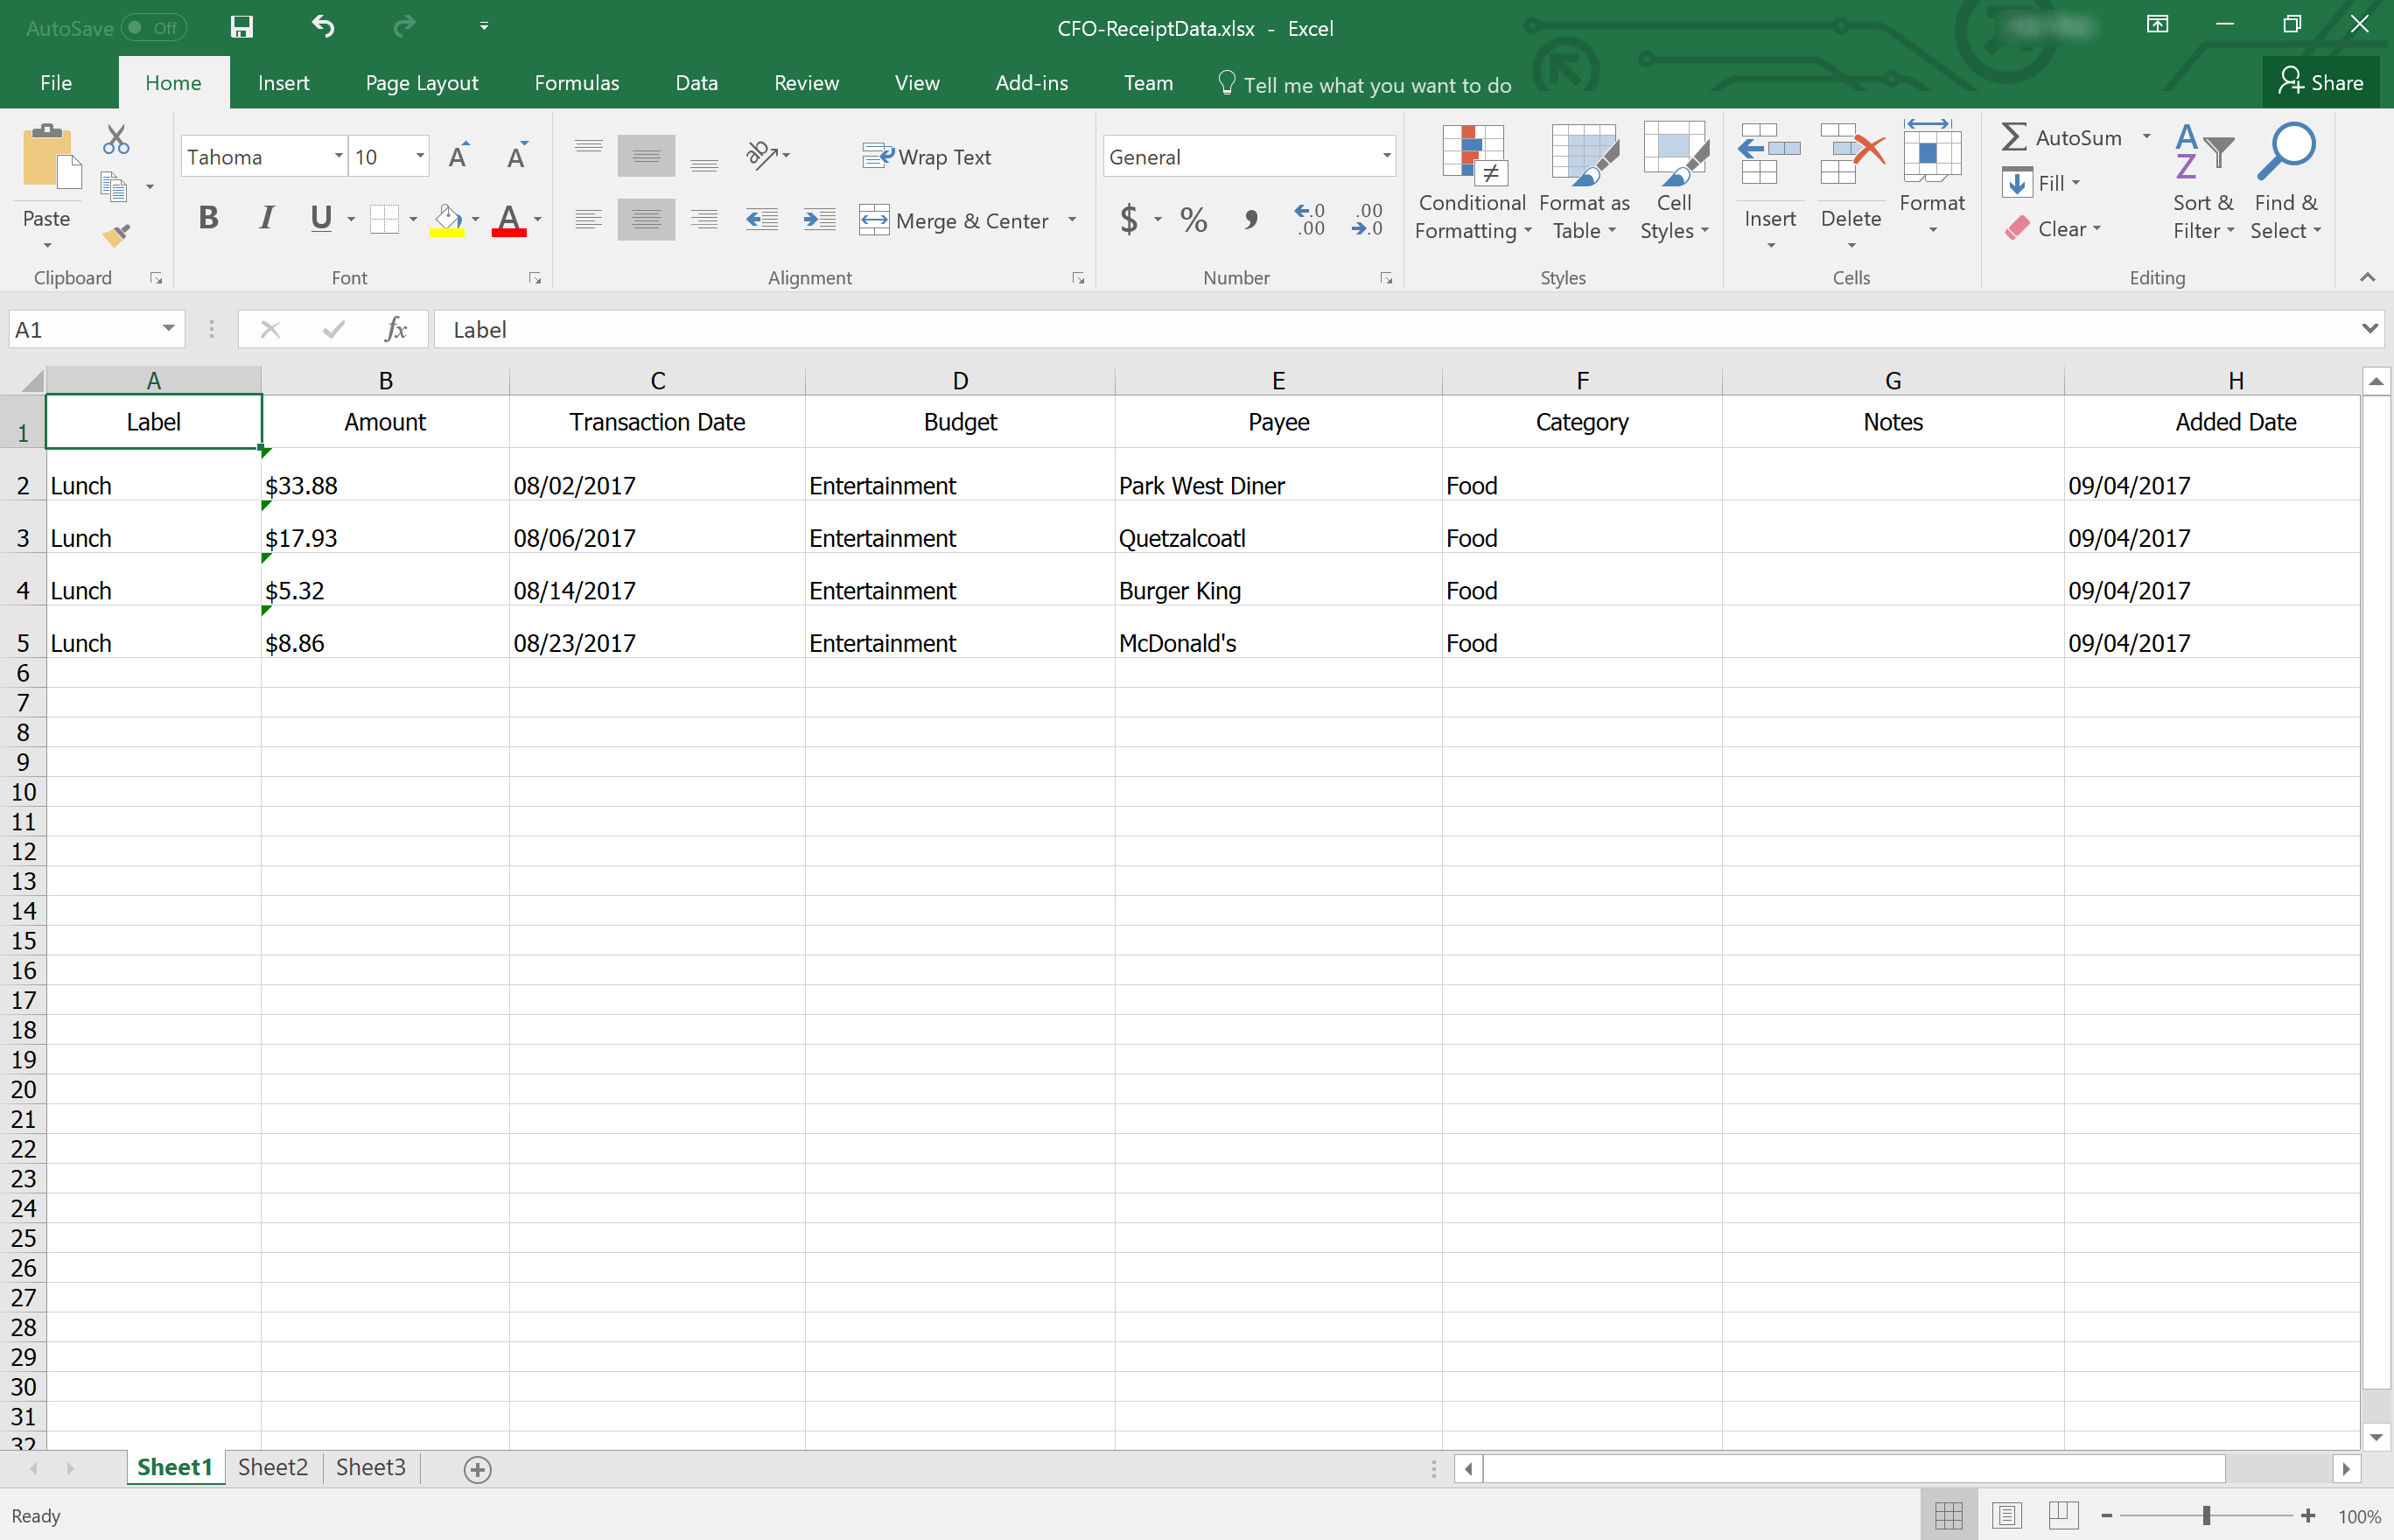
Next to the Refresh button is the Export button. When you click "Export", a file picker will open allowing you to choose a location and file to save a Receipt Report to. The Report will contain all of the data that you currently see in the Archive List, except for the Receipt Image (Receipt Image Export is a feature planned for an upcoming update).
If the Search Box is empty, the report will contain every Receipt in the database. If you perform a Search before clicking "Export", only the Receipts in the Search results will be included in the Exported file. Also, if you have clicked "Show Deleted Receipts" they will be included in the Report as well.
When choosing a destination file, you can change the file extension dropdown in the file picker to be ".xlsx" to Export to an Excel Spreadsheet or pick ".pdf" to export your Report as a PDF.
A built-in Calculator is included in the CFO app so that you don't have to switch windows to use a Calculator. The Calculator can be activated from within any section by clicking the Calculator button on the lower left corner of the app above the Help (?) button and the Settings button. The Calculator can be dragged anywhere on the app's screen. To dismiss the Calculator, click on the Calculator button a second time.
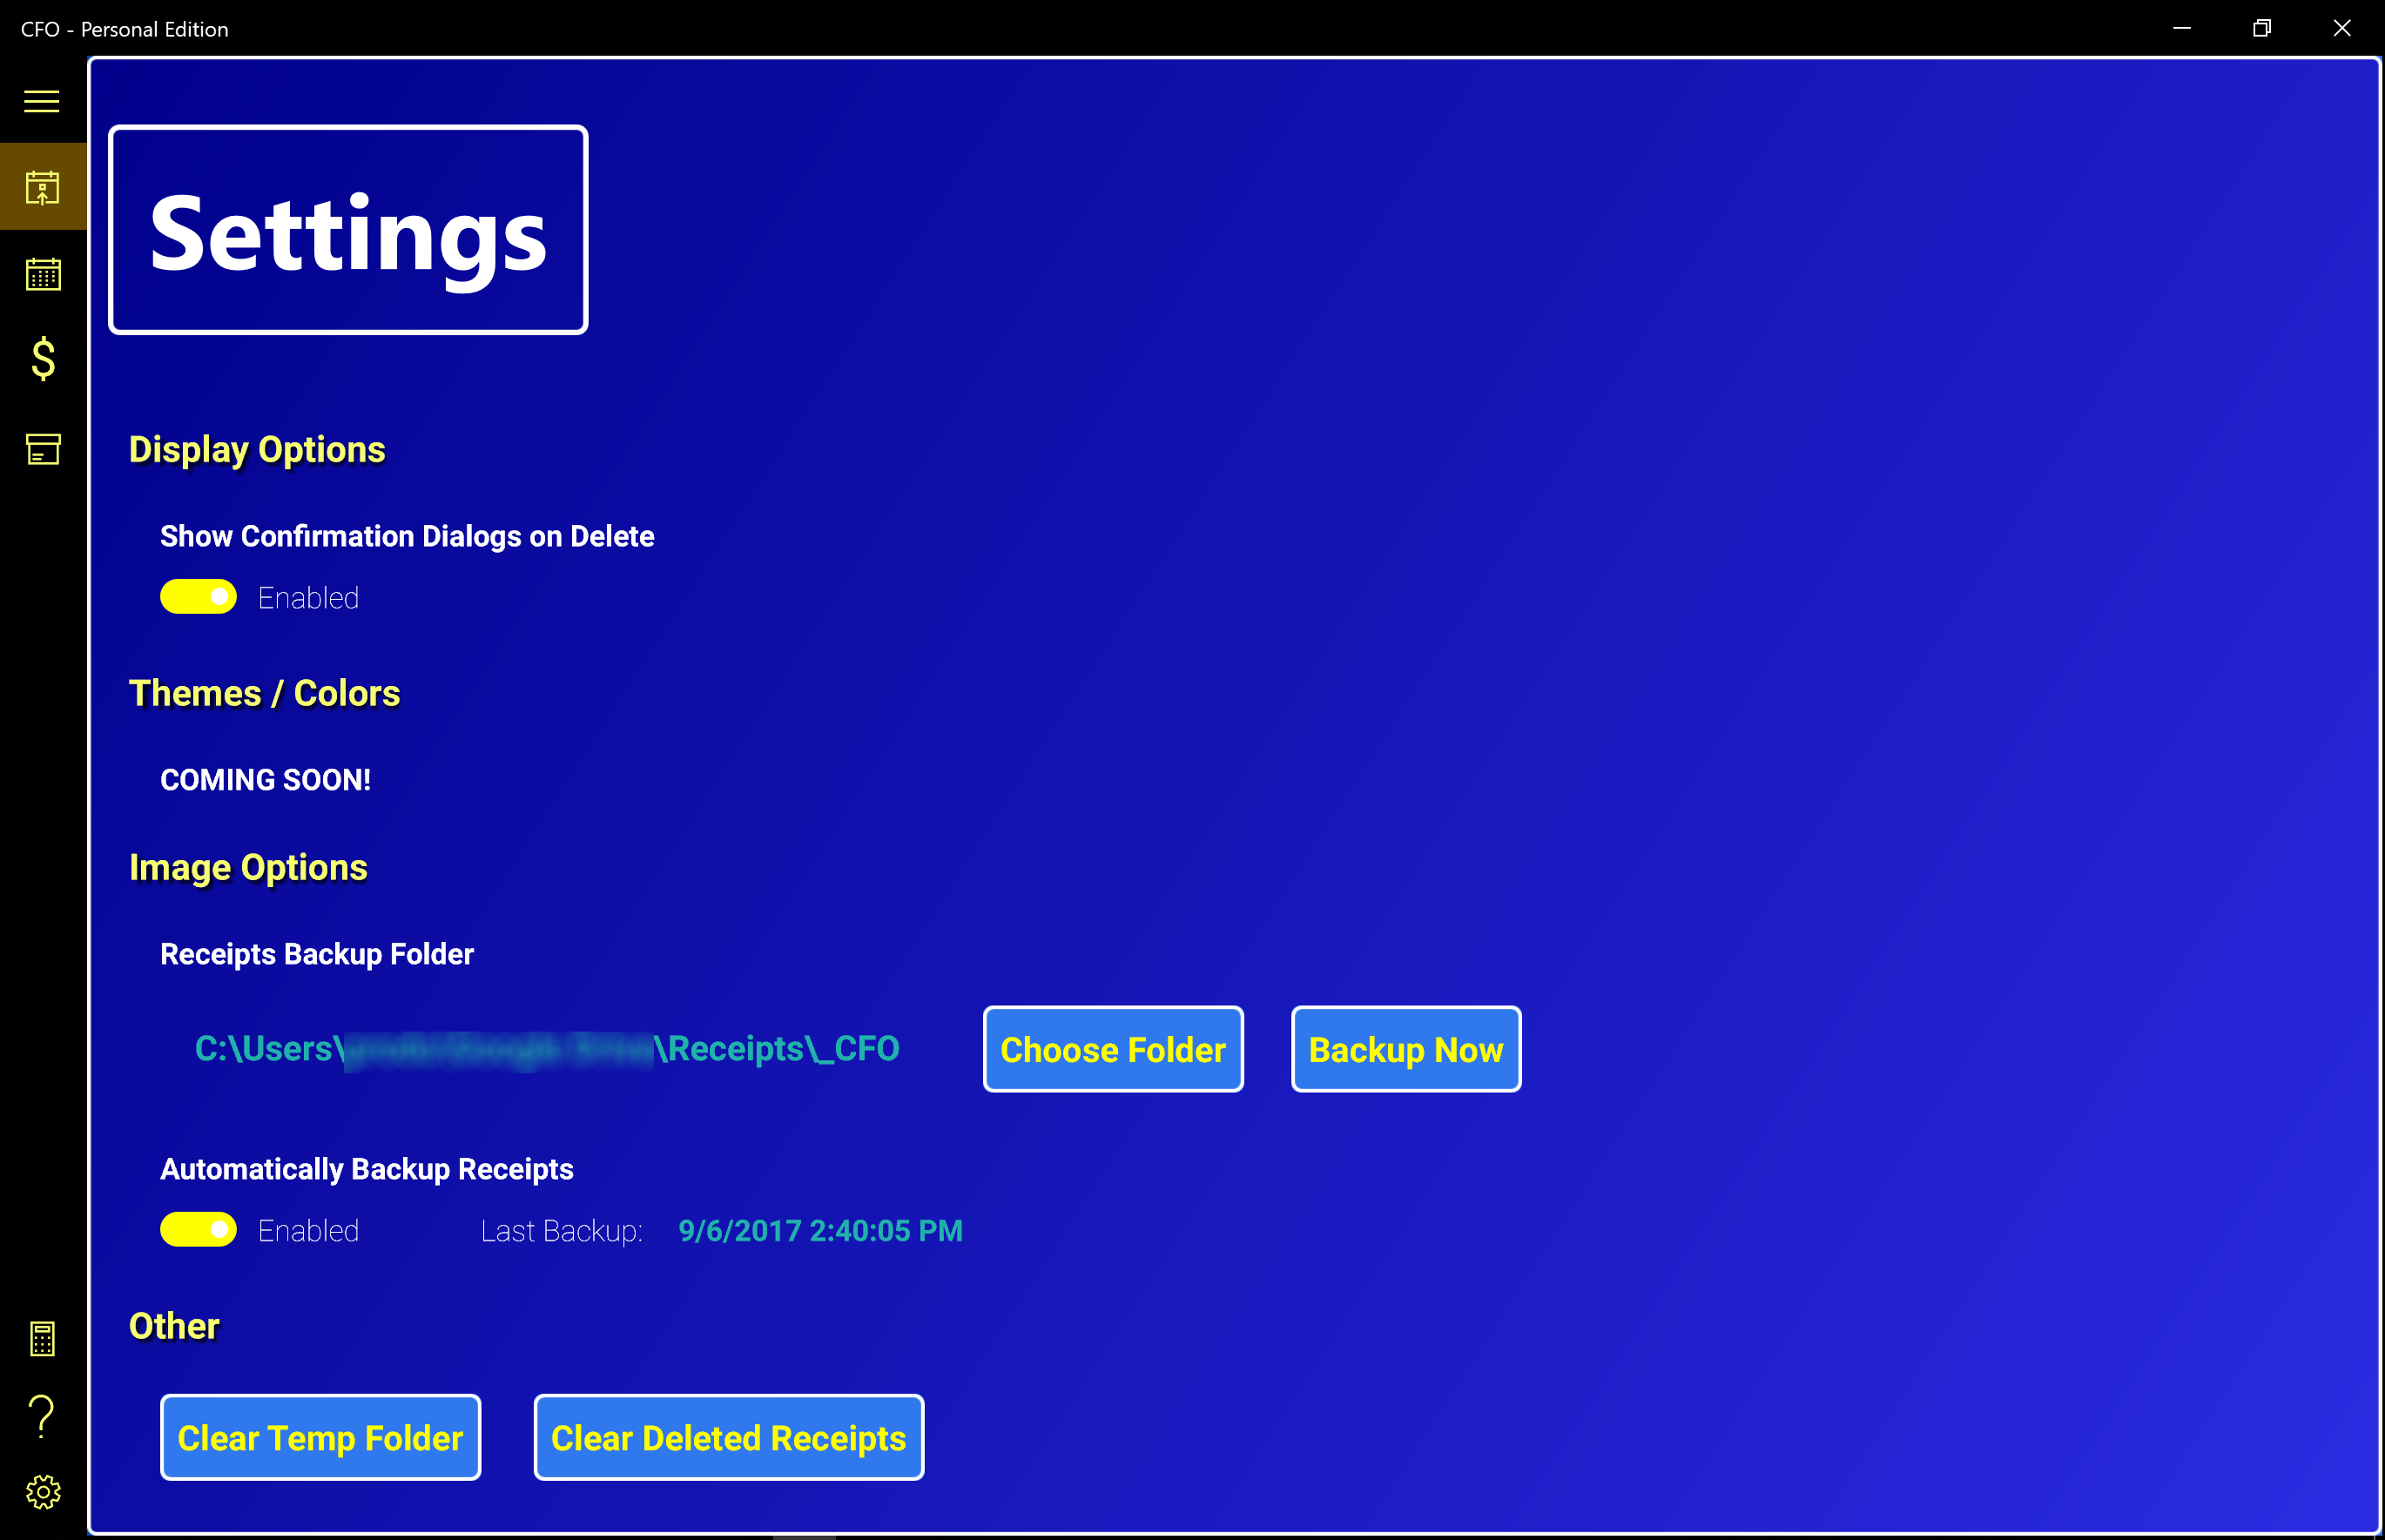
Show Confirmation DIalogs on Delete
- By default, any time you click to Delete an Income, Expense, Budget or Receipt you are given a confirmation dialog asking if you are sure. If you want to disable this dialog, set this setting to Disabled.
- Default: Enabled
Receipts Backup Folder
- You can set a folder anywhere on your computer to store a backup copy of all your Receipt Images (the app itself stores them internally). Click the "Choose Folder" button to set the Backup Folder. After setting a folder, you can manually perform a backup at any time by pressing "Backup Now".
- Default: None
Automatically Backup Receipts
- Once you set a Receipt Backup Folder, you can turn on Automatic Backups by setting this option to Enabled. Backups are performed when you close the app. The Last Backup time is displayed to the right of this option.
- Default: Disabled
Clear Temp Folder
- As you use the CFO app over time, temporary files are created when you take photos of or import Receipt images. Windows 10 will eventually clear out the Temp folder if it needs disk space, but if you'd like to manually remove all Temp data from the app's internal storage you can click this button.
Clear Deleted Receipts
- The Receipt Archive will remember all Deleted Receipts and can still display them if you so choose. However, if you have a very large number of Deleted Receipts, the Receipt Archive may take a long time to load. If you find that the Archive is taking way too long to load or you know you just deleted hundreds or thousands of Receipts and don't want the Receipt Archive to lag, you can click "Clear Deleted Receipts" to permanently remove all traces of them.
- NOTE: There is no way to recover Deleted Receipts once they've been cleared.
Where can I buy the CFO app?
Click the "Get it on Windows 10" button
here to purchase the app.
Is there a trial version of the app?
Yes, there is a 15-day trial for the full app during which there are no restrictions and all features can be used.
What features can I use after the trial expires?
After the 15-day trial period ends, you will still be able to use the Month View and Special Budgets sections to add Incomes, Expenses, Budgets and Receipts for each month. The Calendar Year View and the Receipts Archive, including image OCR searching and excel/PDF export features will become inactive after the trial.
Do I get free upgrades?
As of now, all future upgrades are free for anyone who has purchased a full version of the app.
Does this app collect any personal or sensitive data?
No. CFO does not collect, transmit or store any personal or financial data with anyone. For more details, please see our
privacy policy
Can you add a feature to the app or fix a bug?
If you have a feature request or find a bug you can send an email to source@sourceleven.com and we will look into it.
What email address can I contact for Support?
You can send an email to source@sourceleven.com for support.

 - Edit the Label, Categories and Amount of the item.
 - If the Edit Button is clicked, the Save Button appears. Click this when you are done editing the item to save your changes
 - Delete the item. If a Budget is deleted, all Receipts added to that Budget are deleted as well.
 - Expenses Only, click this button once you have paid an Expense and it will be reflected in the Summary and the Year View.